FamLedger Complete Guide
Welcome to the official documentation of FamLedger. This guide is structured step-by-step to explain with absolute simplicity how to configure and make the most of every single feature in the app.
👋 Chapter 1: Welcome and First Launch
FamLedger is designed with a strict philosophy: "no central servers, no registration, no cloud". All data you enter stays in your smartphone's local memory. The only exception, entirely optional, is the Family feature: if you turn it on, the accounts you choose to share are exchanged directly between your family's phones, on the same Wi-Fi, without going through any server.
The Welcome Screen
Upon first launching the application, you will simply be asked to enter "your name" (e.g. Antonio) to configure the main user. No email address, password, or registration is required: tap Start now and you are instantly ready to use the app!
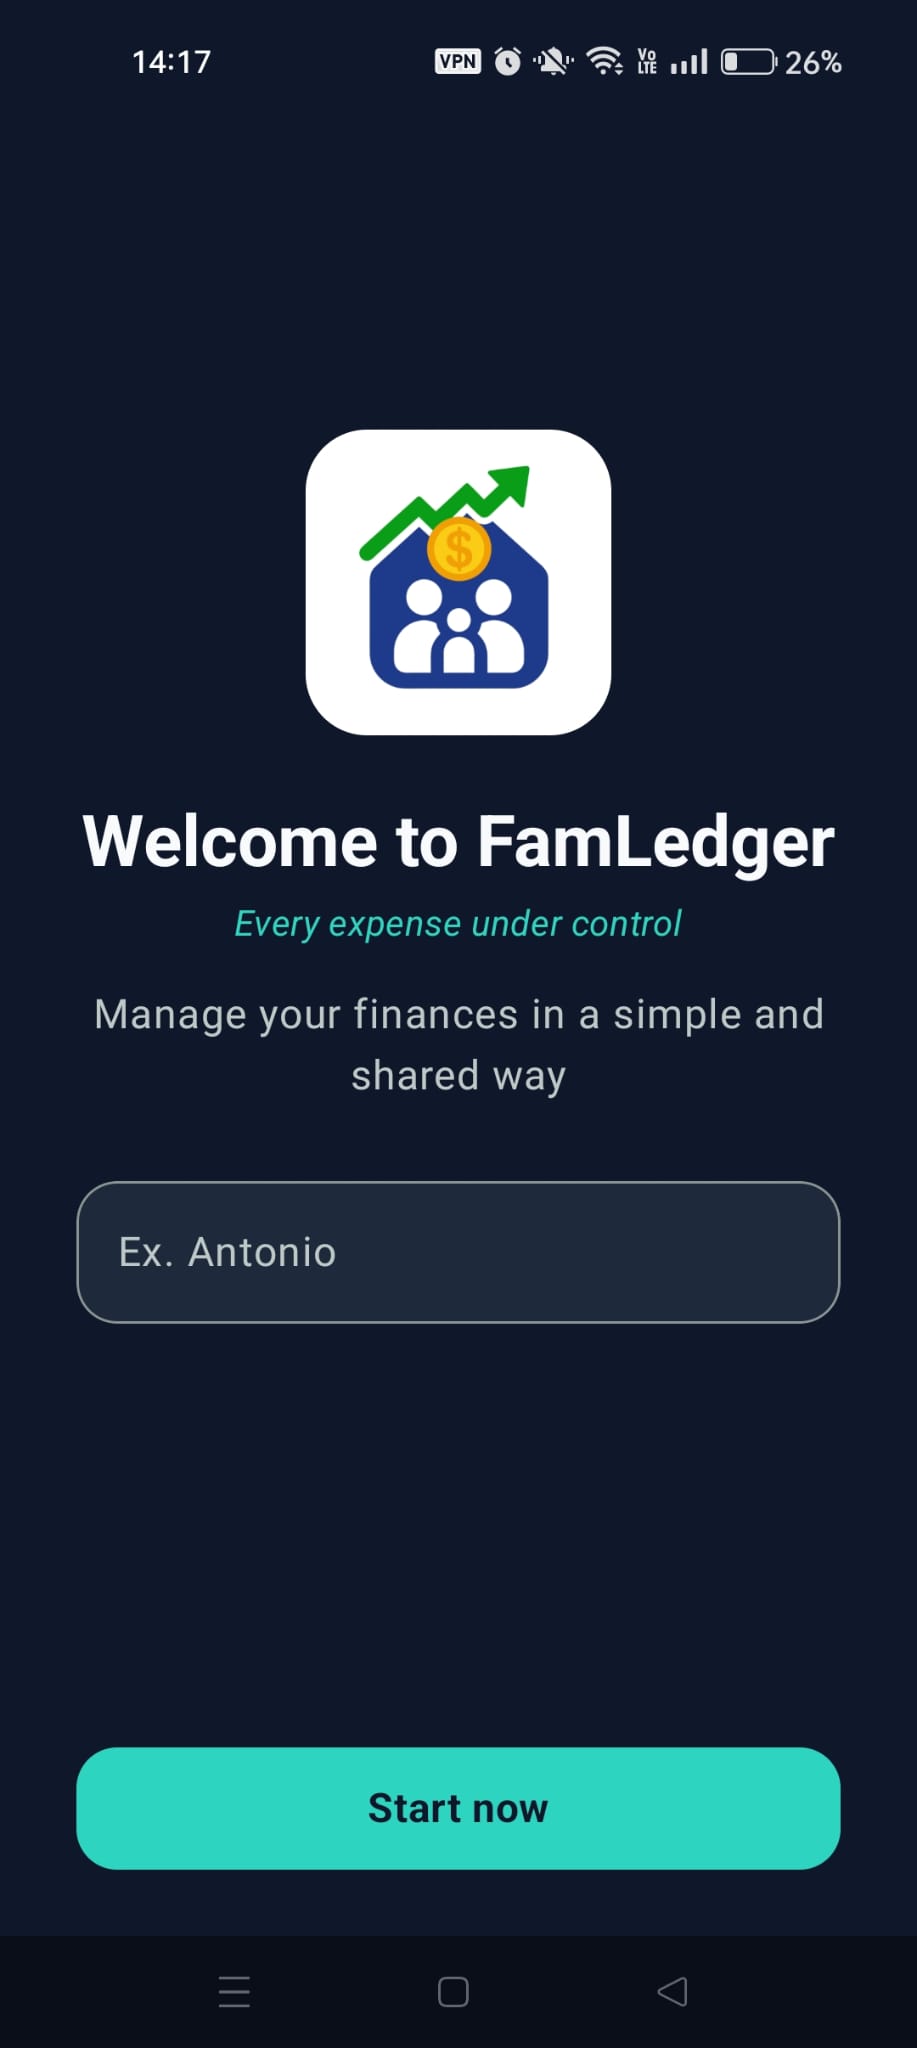
The initial welcome screen to enter your name
The main screen: Overview
The bottom menu takes you to the sections of the app. The first one is Overview: here you find the overall balance (the liquidity of your accounts plus the current value of your investments), the balances of the single accounts, the income and expenses of the period, the Debt situation and the "+" button to record a transaction.
Setting a Security Password (Optional)
If you wish to protect the application from prying eyes, you can enable an Unlock password:
- Go to Settings.
- Open Security, enter the new password and tap Save.
- The password must follow these rules: at least 8 characters, at least one uppercase letter, at least one lowercase letter, at least one digit and at least one special character.
- The Password hint is a separate field with its own Save button: write a very clear hint (e.g. "My dog's name") and save it.
Once activated, the application will ask for your password on every launch. The hint is shown from the first wrong attempt to help you remember it. To remove it, use Remove password: an empty password can't be saved. After setting the password you can also turn on unlocking with your fingerprint: see section 9.3.
🏦 Chapter 2: Account Management
Before entering any transaction, you need to define "where your money is". In FamLedger, every expense or income must be associated with a specific account. On first launch there is already an account, Cash: you can use it right away or add others.
Creating a New Account
- Go to Settings and then Manage accounts.
- In the Description field, write the name of the account (e.g. Checking Account, Cash).
- If you like, fill in the Owner (optional).
- Leave the Active switch on and press Add (it becomes Save when you edit an existing account).
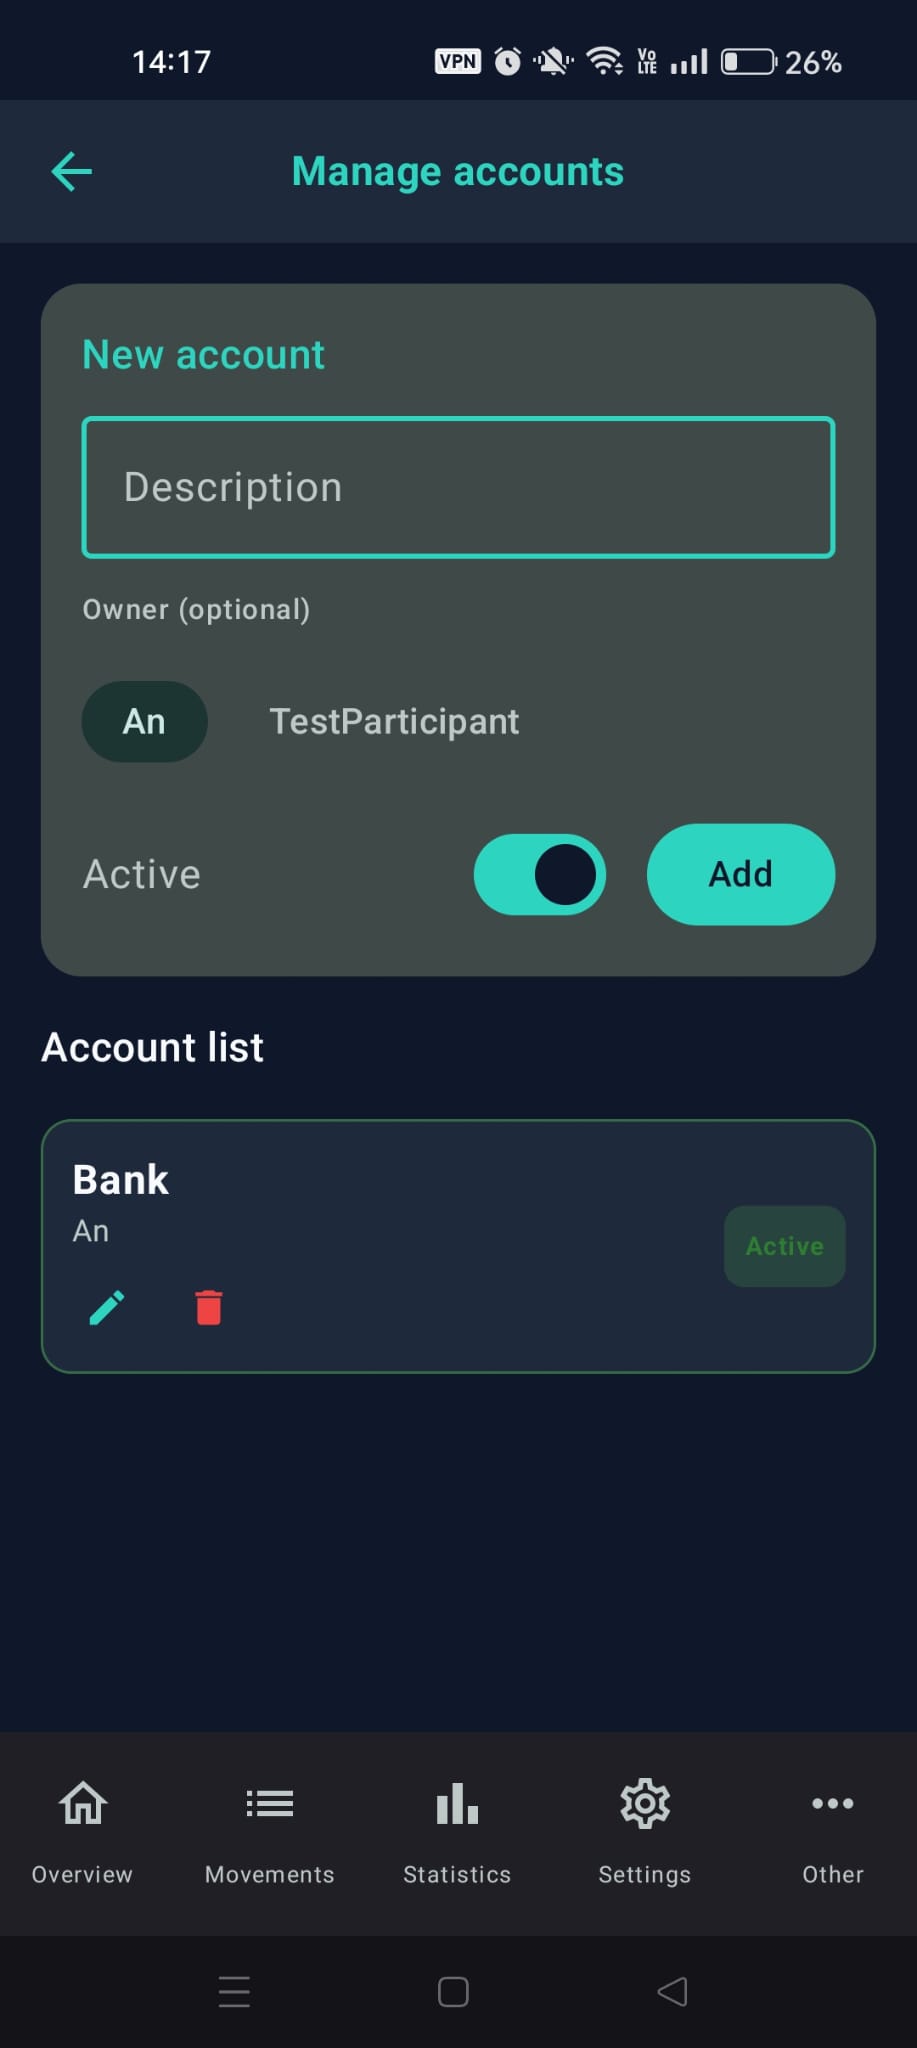
The account creation screen
Sharing an account with your family (optional)
If you are in a family, the form for a new account also shows the Sharing field, with the choices Personal and Family. If you don't use the Family feature you won't see this field and you don't need to do anything. All the details are in section 11.5.
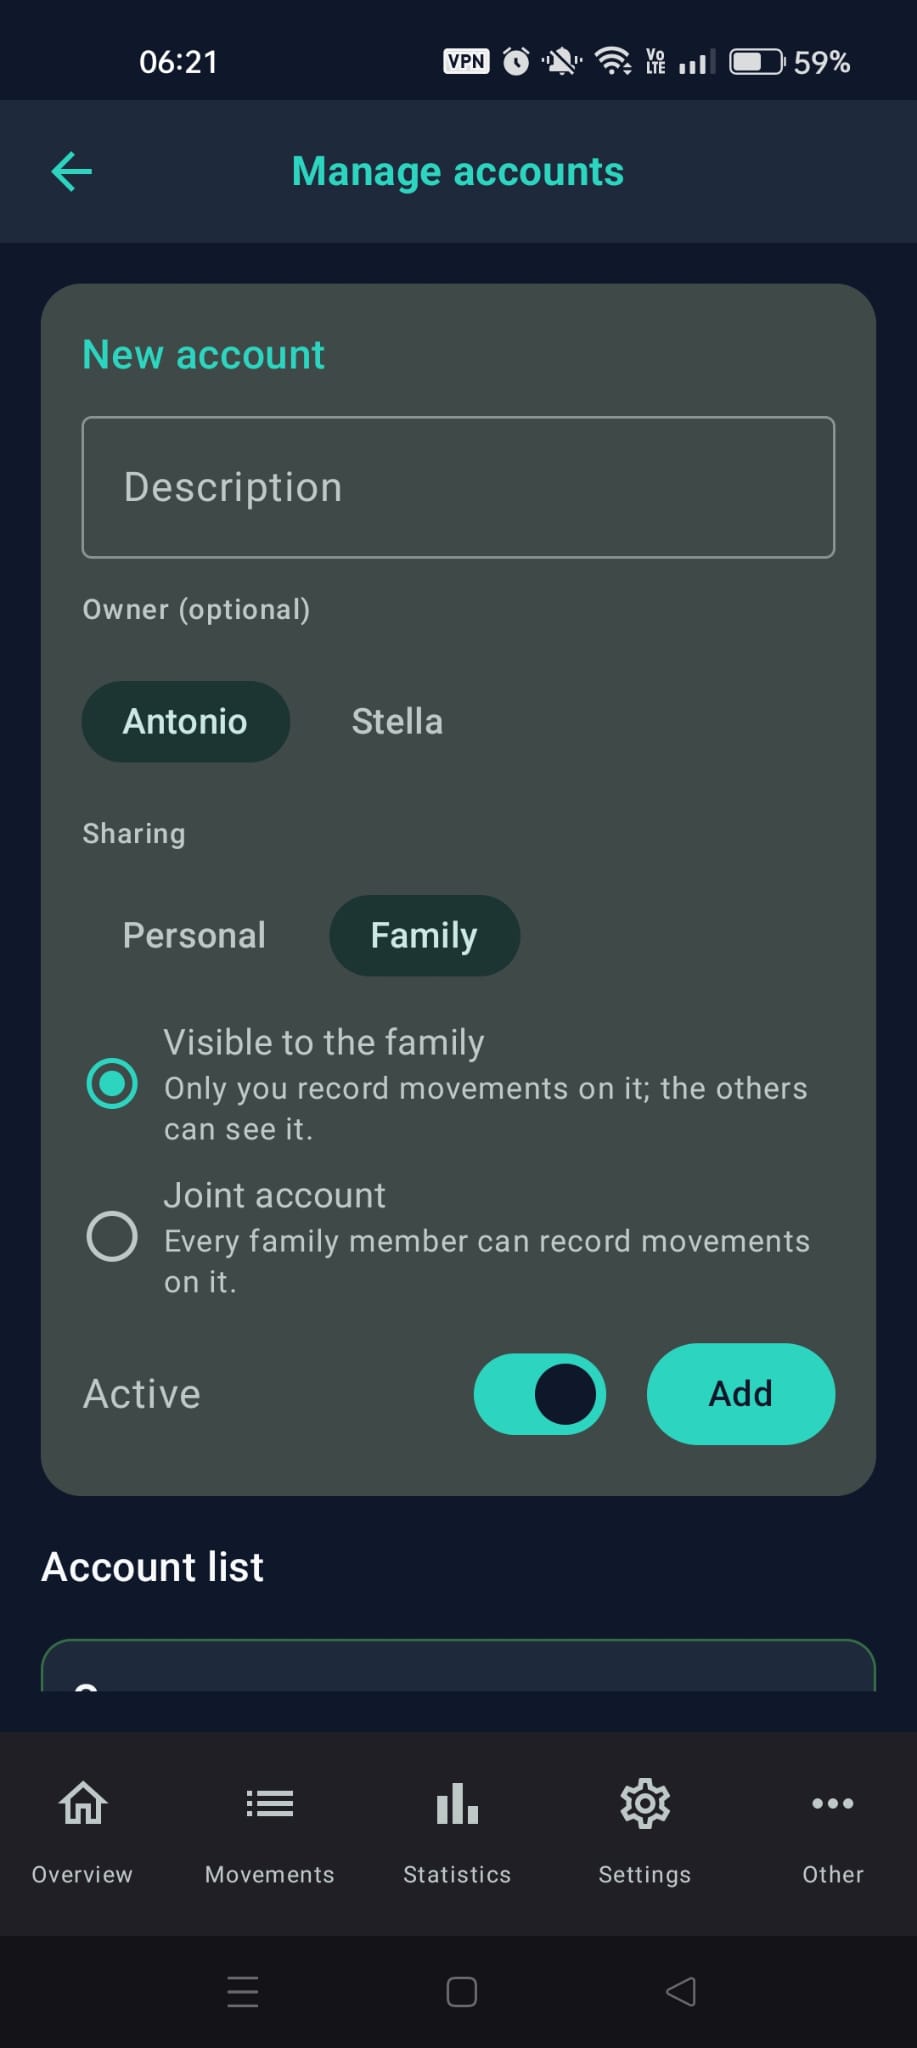
Manage accounts: the account form with "Sharing" set to "Family" and the two choices "Visible to the family" and "Joint account"
💸 Chapter 3: Transactions and Transfers
Recording daily expenses takes just a few seconds. When you tap the "+" button in Overview or in Transactions, you find four tabs at the top of the screen: Expenses, Income, Transfer and Investments.
1. Expenses and Income
Choose the Expenses or Income tab and fill in the fields:
- Amount: The amount spent or received.
- Description: A brief label (e.g. "Grocery").
- Account: Which account should be debited or credited.
- Category: Select a category (e.g. Food, Auto, Salary) to classify the transaction.
- Shared expense: For expenses only. Turn this switch on if the expense is to be split with someone.
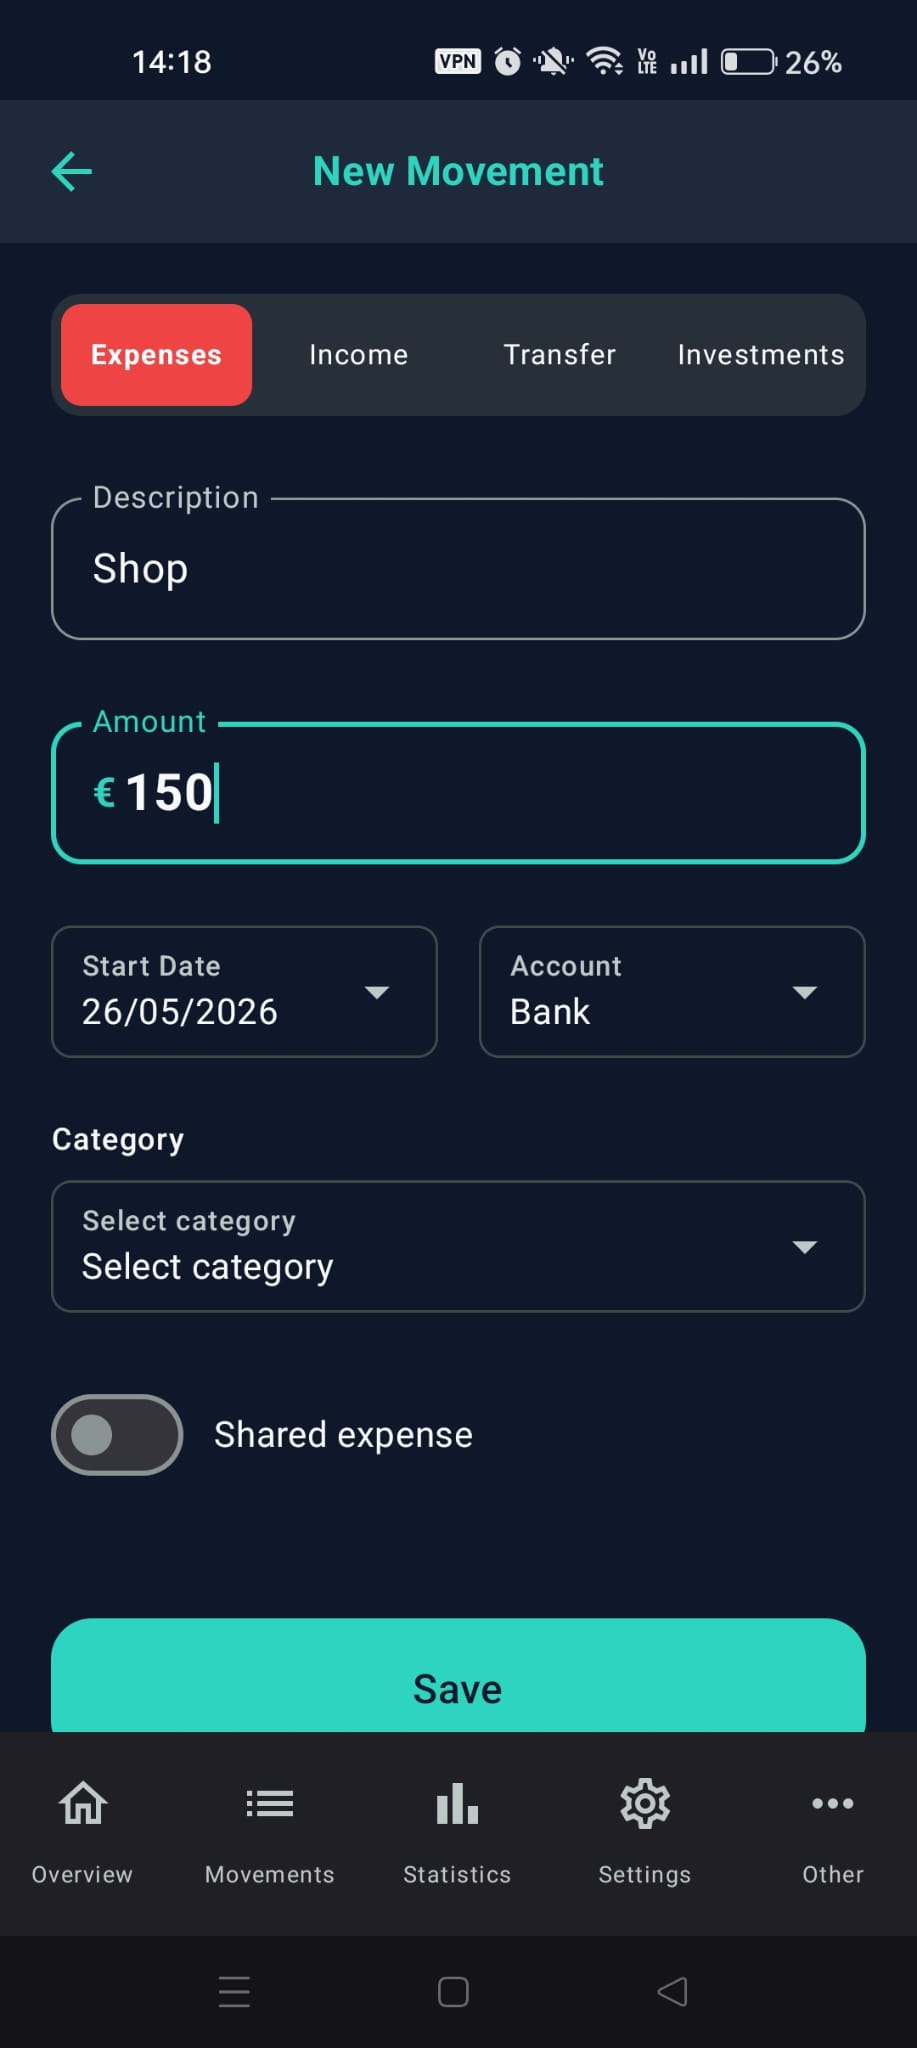
The transaction entry screen
2. Transfers (Internal Transfers)
If you move money from one account to another (for example, withdrawing €100 from the ATM to put it in your Cash wallet), choose the Transfer tab. You will be asked for From account (where the money comes from) and To account (where it goes). The two accounts must be different and at least one of them must be yours. The source account must have enough balance; the same applies to the account you use to pay for an investment purchase.
A transfer is made of two linked halves: an expense on the source account and an income on the destination account. If one of the two is a family joint account, also read section 11.8.
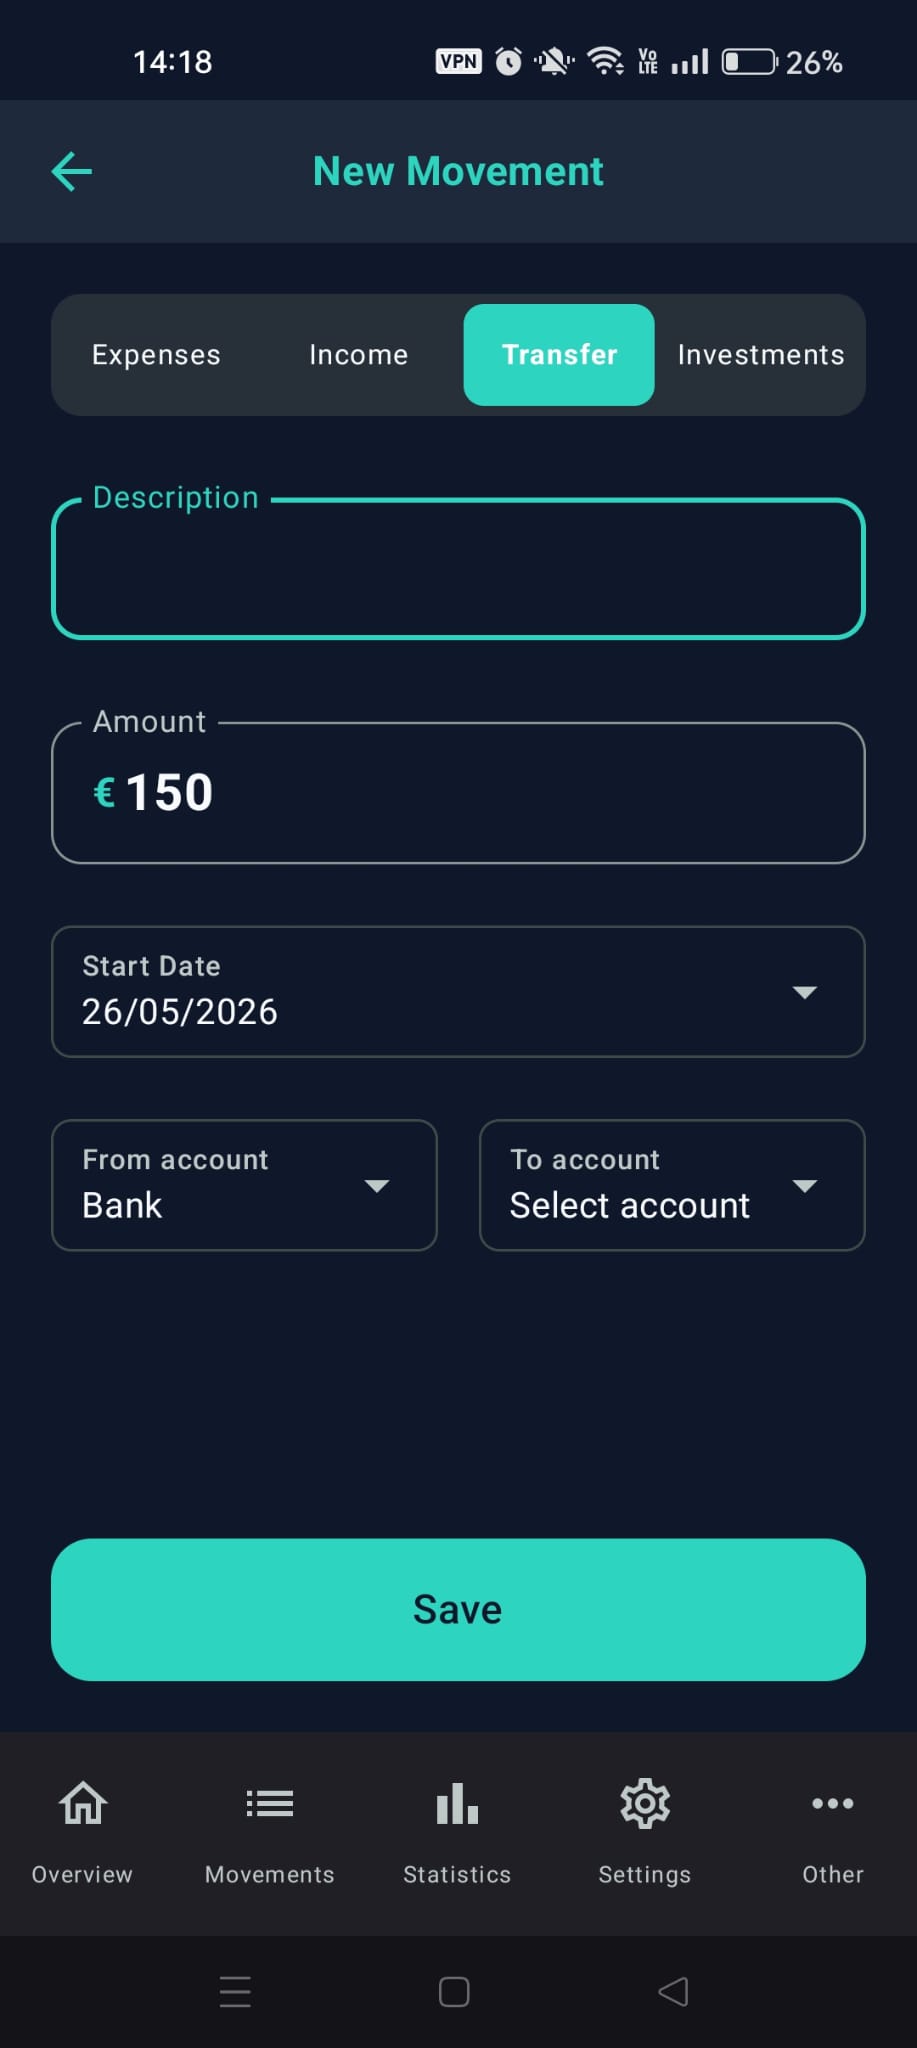
The internal transfer entry screen
3. Recurring Transactions (Bills, Salaries, Subscriptions)
If you have fixed expenses or income (e.g. Rent), the app can record them for you automatically. You set them up in Settings > Recurring transactions: all the steps are in section 9.2.
4. Dictating a transaction with your voice
Next to the "+" button, in Overview and in Transactions, there is a microphone icon: you can dictate the expense instead of typing it. Examples are in What's New & Updates.
📈 Chapter 4: Investments (Markets and Savings) BETA
FamLedger includes an "Investments" section designed both for market investors and for those who prefer fixed-yield instruments. To add an investment, tap the "+" button: New asset opens, where you choose one of the two tabs, Markets (Variable) or Savings (Fixed).
Markets (Variable)
Use this tab for ETFs, stocks, listed bonds or cryptocurrencies. In the ISIN or ticker field write the code of the security (e.g. IE00BK5BQT80, VWCE.DE, BTC-EUR): the app looks it up and downloads its price. When you create it you only set the code, the description, the tax rate and, for bonds, Quoted as % of nominal (bonds): in that case the quantity is the nominal value and the price is per 100 of nominal.
You record the units afterwards, with the Buy button on the investment's card: enter the Quantity, the Purchase price, if you like the Fees (optional), the date and the account you pay with, which is debited. From then on the app calculates your average cost and your gain or loss. You can also record a purchase from the "+" button in Overview or Transactions, in the Investments tab, but there is no fees field there.
If the security can't be found, you can use Manual entry and update the price by hand. Quotes can be delayed: when a price may not be up to date, the app tells you.
Savings (Fixed)
Use this tab for deposits and fixed-rate instruments. No ticker is needed here: you set the Deposited amount / quantity, the Annual interest %, the Taxes % (you can use the default rate you chose in the settings or a custom one for that single investment), the Start date and, if there is one, the Maturity date (optional). In From account choose the account the money comes from, or "Existing capital (no account)" if you don't want any account debited. The app calculates the interest accrued day by day, already net of taxes.
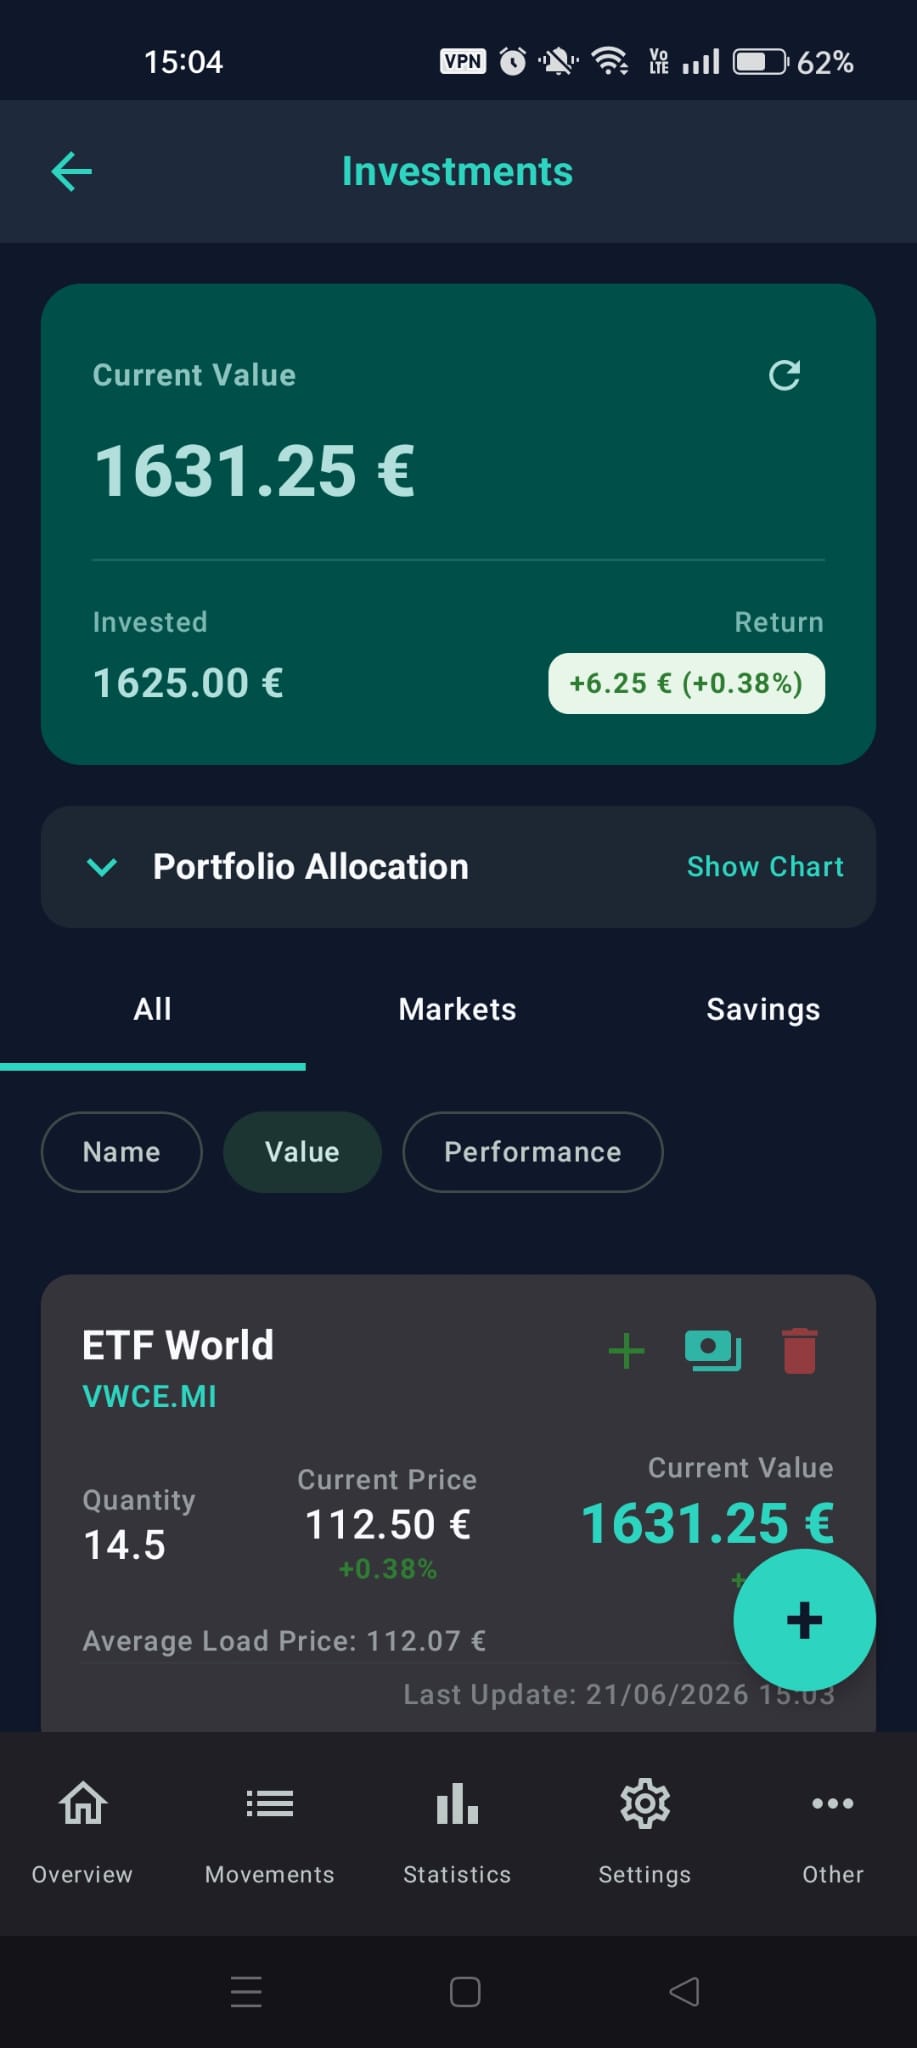
The investments screen
Operations on an investment
Each investment's card has the Buy button (Deposit for savings): add more units or a new deposit. Everything else is in the More actions menu:
- Register dividend / coupon: note down an income.
- Sell (markets) or Withdraw (savings): record a sale or a withdrawal, even a partial one. Investments sold in full move to the Closed list.
- Update unit value: correct the price by hand. It is there only for manual-entry investments.
- Edit maturity date: savings only.
- Tax rate and Asset type: change the taxes and the type of that investment.
- Price alerts (only for securities with a ticker), Investment plan and Compare with benchmark: explained below.
- Delete: removes the investment.
Investment plan
With Investment plan you schedule periodic purchases of the same security, by amount or by quantity, at a frequency of your choice: Weekly, Every 2 weeks, Monthly, Quarterly or Yearly. When one is due, the app proposes the purchase at the top of the Investments screen: tap Review to confirm it at the actual price, or Skip. If Update prices in the background is on, you also get a notification when there are purchases to review. Nothing is bought automatically: FamLedger only records what you confirm.
Price alerts
With Price alerts you ask the app to notify you when a security rises or falls to a certain price or by a certain percentage. The check runs about every 12 hours, together with the background price update, so it is not real time; alerts are also checked when you refresh prices manually in Investments. If Update prices in the background is off, they are checked only on a manual refresh. Alerts are available only for market securities with a ticker. With Repeat the alert can fire again after the price moves back, at most once every 24 hours. If you change the app currency, existing alerts are disabled and cannot be turned back on: delete them and create new ones.
Comparing with a benchmark
With Compare with benchmark you compare one of your investments, or the whole portfolio, with an index, another security (searched by ticker or ISIN) or a constant annual rate. You can choose the period: Since start, Year to date, 12 months, 3 years. The comparison is theoretical: it excludes costs and spreads, uses price only (no dividends) and relies on an unofficial source.
Returns, yearly summary and allocation
Tap the summary card at the top of the Investments screen to open Returns.
- Returns: gross gain, estimated taxes, estimated net, gains already realized and dividends, for each investment. It also shows the Annualized return (XIRR), for the portfolio and for each investment.
- Yearly summary: a button on the same summary card; it shows what you realized and received year by year.
- Portfolio allocation: how the portfolio is spread, By asset, By type or By currency.
👥 Chapter 5: Shared Expenses (Co-debtors & Settle)
One of the most useful features of FamLedger is splitting expenses (perfect for couples, families, or roommates) to answer the classic question: "Who owes how much to whom?".
This chapter explains splitting expenses on a single phone: you record everything and keep track of the other people's debts. If the other people also use FamLedger on their own phone, you can link the phones: in that case read Chapter 11: Family.
1. Add People
Go to Settings > People & Family, write the name in the New person field (e.g. Marco, Giulia) and confirm.
2. Record a Shared Bill
When entering an expense (e.g. grocery bill of €150 paid entirely by you):
- In the transaction form, turn on the Shared expense switch.
- In Payer choose who paid (usually you).
- In Participants select the people you split the expense with (e.g. Giulia).
- In Split percentage (%) decide how much stays with whoever paid: you can write the amount in Payer's expense, the percentage in Payer's share (%), or use the slider, which moves accordingly. With 50 in Payer's share (%) the expense is split in half between two people.
- Save the expense. The app will record that you advanced €150 and Giulia owes you €75.
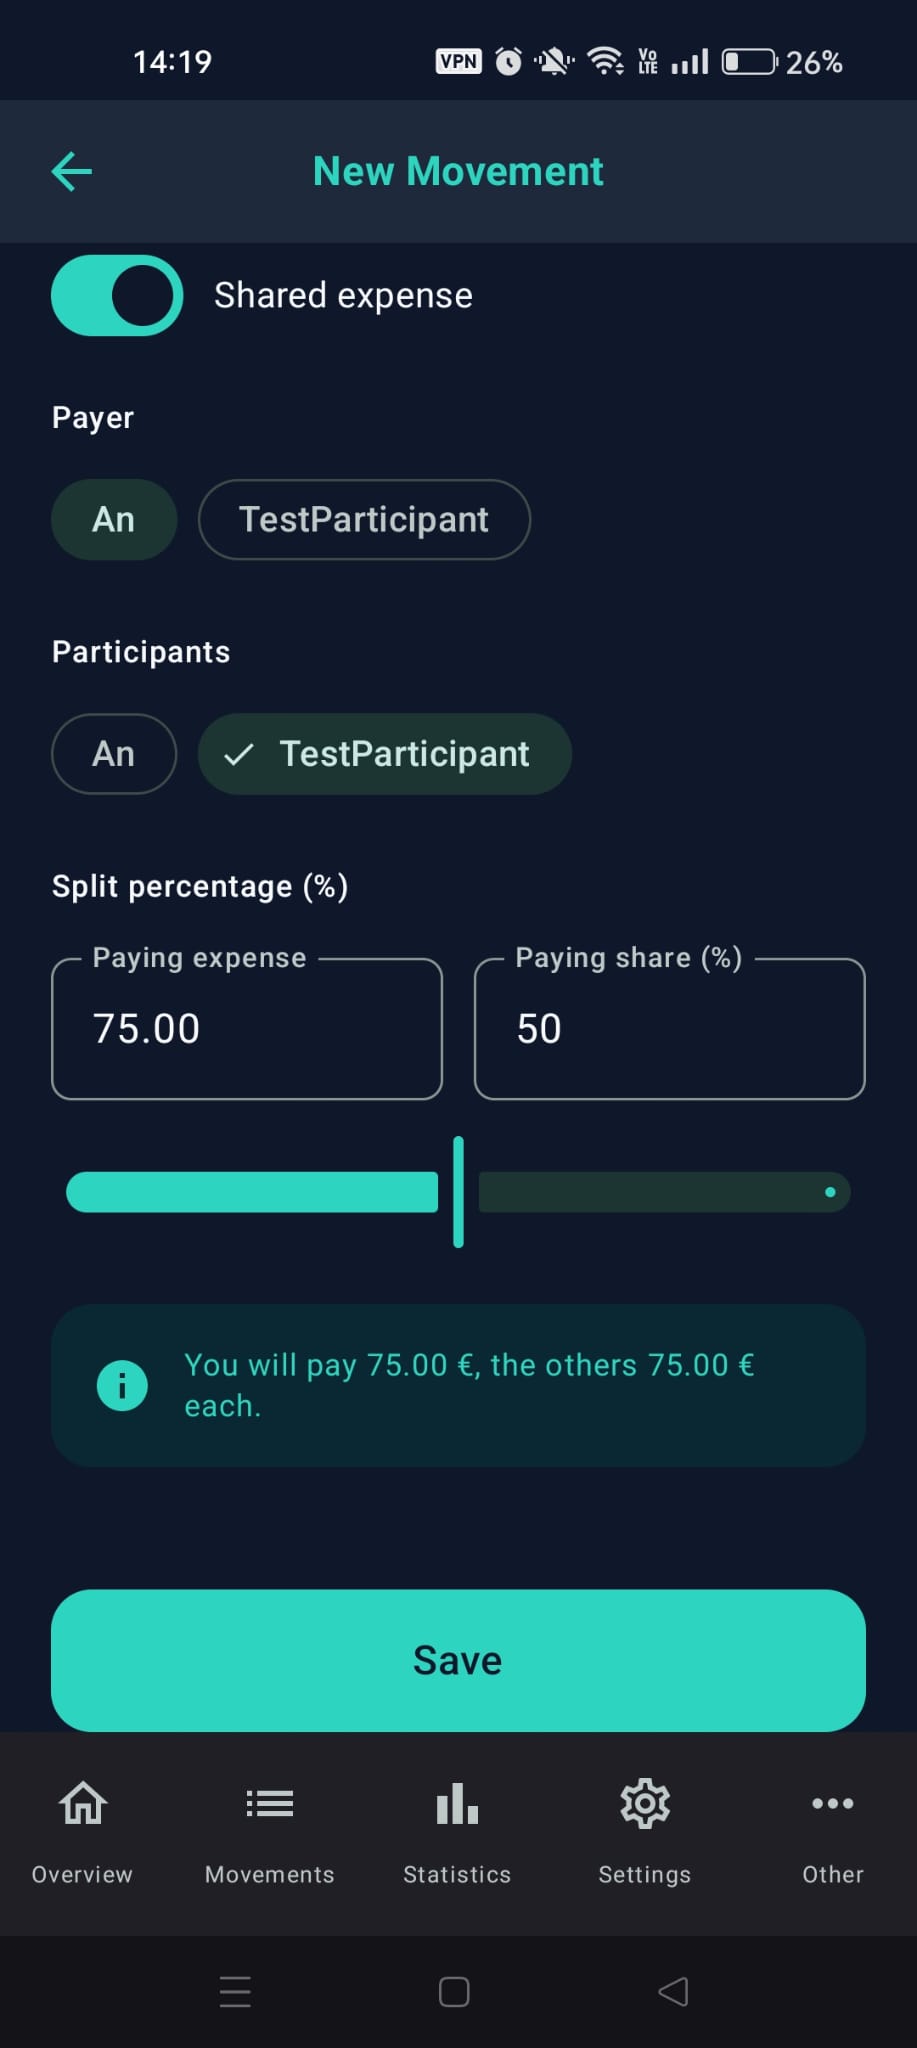
The shared expense section in the form
3. Quick Settle (Single or All)
In Overview, the Debt situation section shows a real-time summary. To settle debts, you have two options:
- Settle a single transaction: Go to Transactions and tap SETTLE on the transaction you want to clear. "Who settled?" opens: choose who settled and tap Mark as settled. If you have more than one usable account, the app asks which one to record the refund on ("Select account for settlement"); with a single account it records it right away. The app creates the refund transaction, clearing the debt.
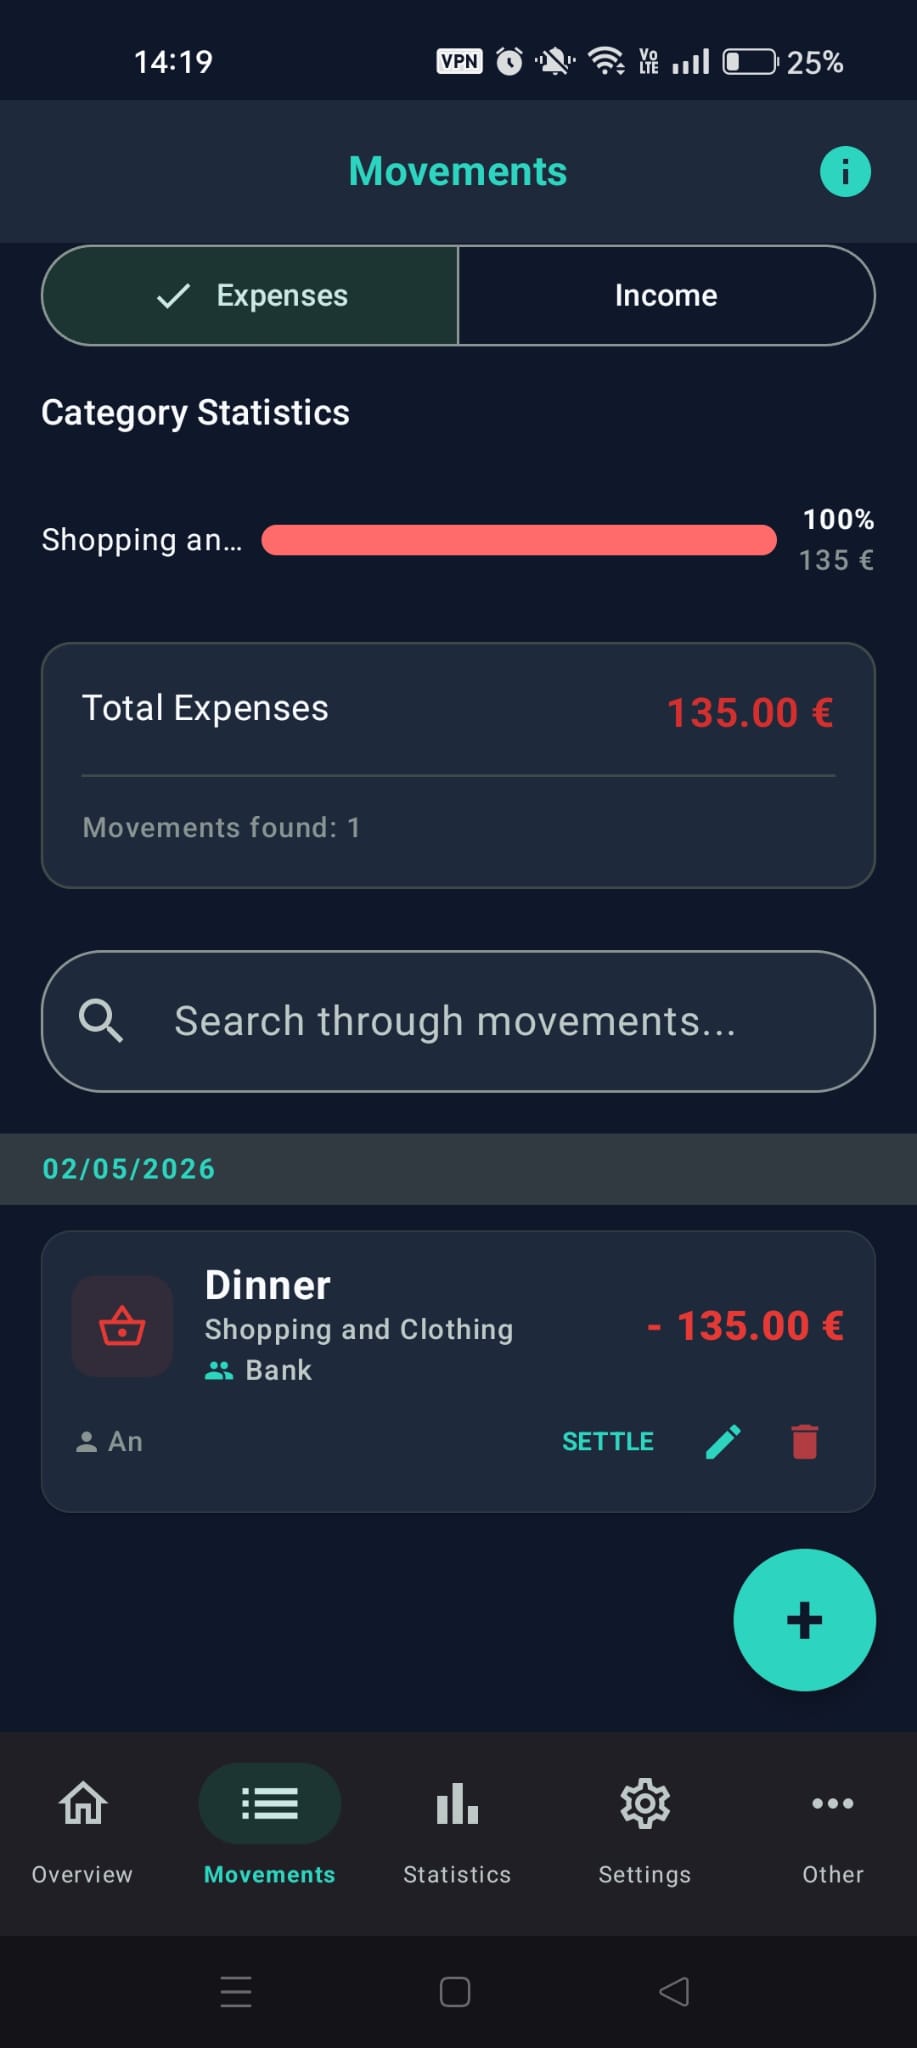
Settle single transaction view
- Mark all as settled: In Overview tap Mark all as settled on the debt card to settle all the debts with that person at once. The steps are the same: "Who settled?" and then, if you have more than one account, the choice of the account.
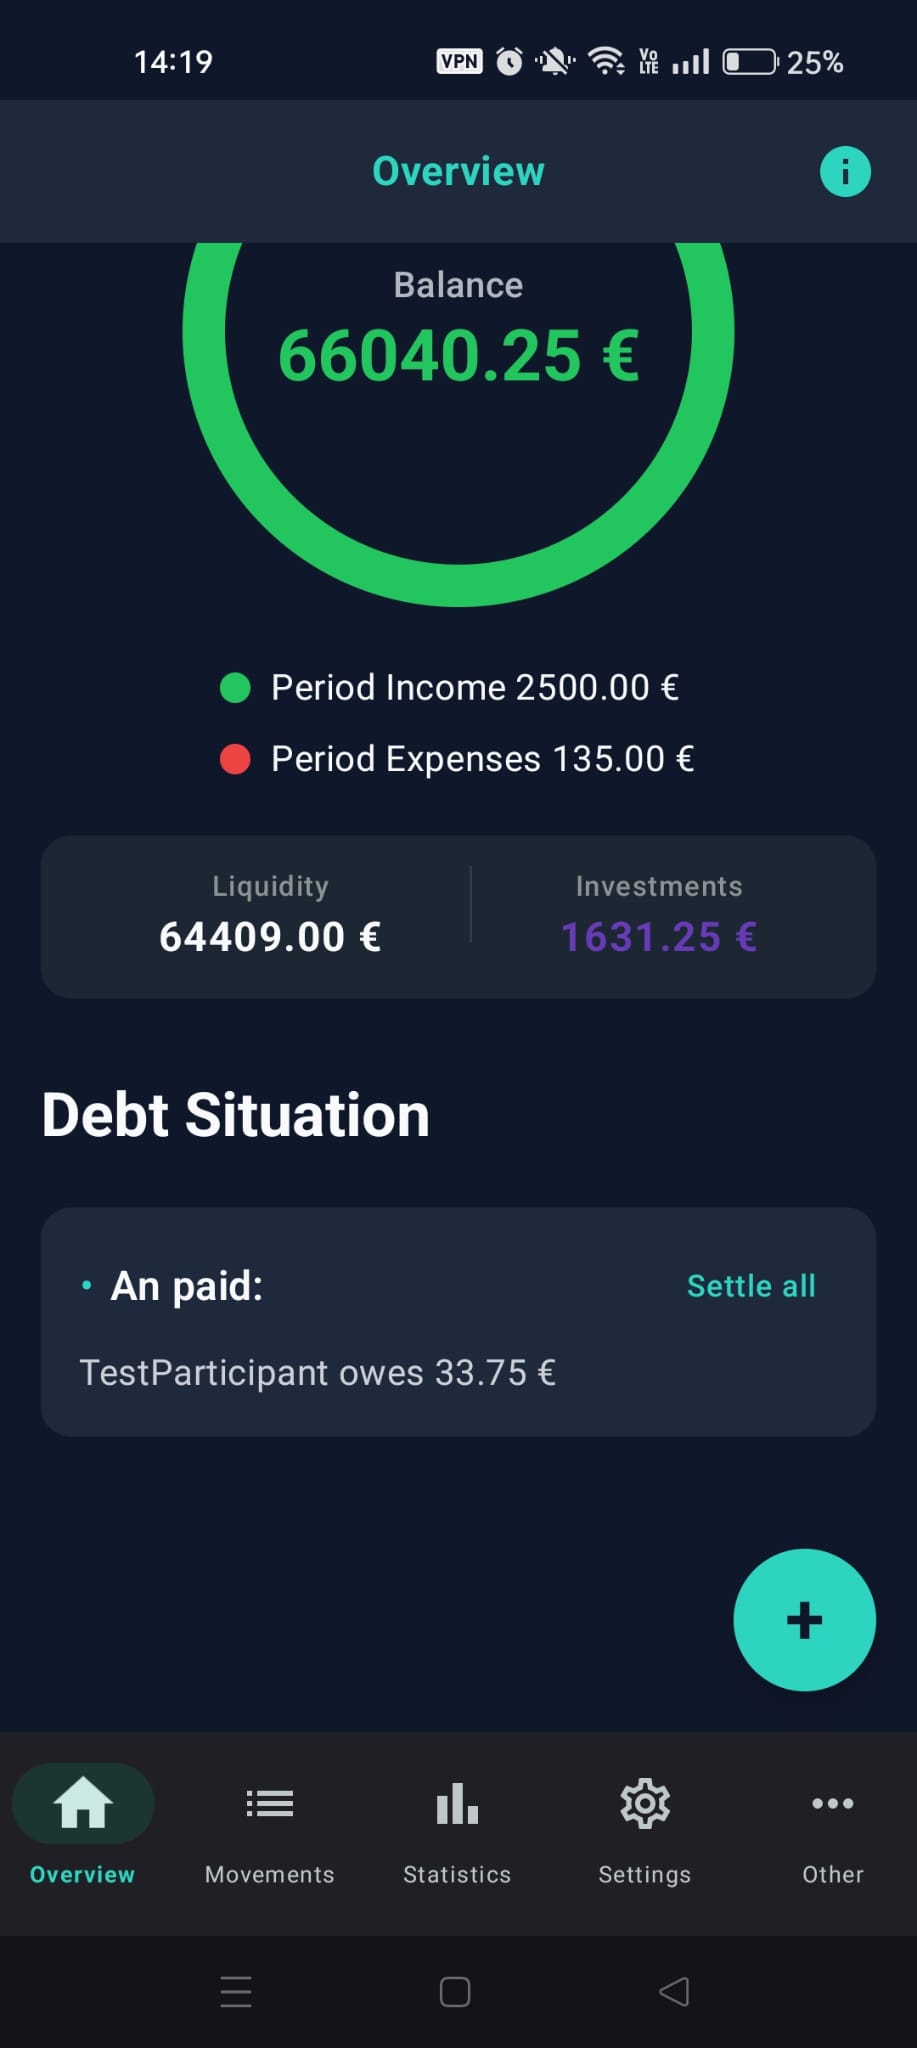
Settle all debts view
🎯 Chapter 6: Financial Goals
"Goals" allow you to plan and track your savings for concrete future projects, like buying a new car, a vacation, or building an emergency fund.
Create and Track a Goal
- Open the Goals screen from the "Other" menu of the app.
- Tap the "+" button: the New goal dialog opens.
- Write the Goal name (e.g. New Car).
- Set the Target amount you wish to accumulate (e.g. €15,000).
- If you like, set the Goal date by which you wish to complete the savings.
- In Monitor account (opt.) choose None, All assets & accounts, an account or an investment. If you choose None, the Started with field also appears, for what you have already put aside.
- Tap Save.
A goal linked to an account, an investment or all your assets follows the balance by itself. For a goal that is not linked, tap MANAGEMENT on its card: in the dialog that opens, Deposit and Withdraw update the amount put aside. The application shows progress with a percentage bar.
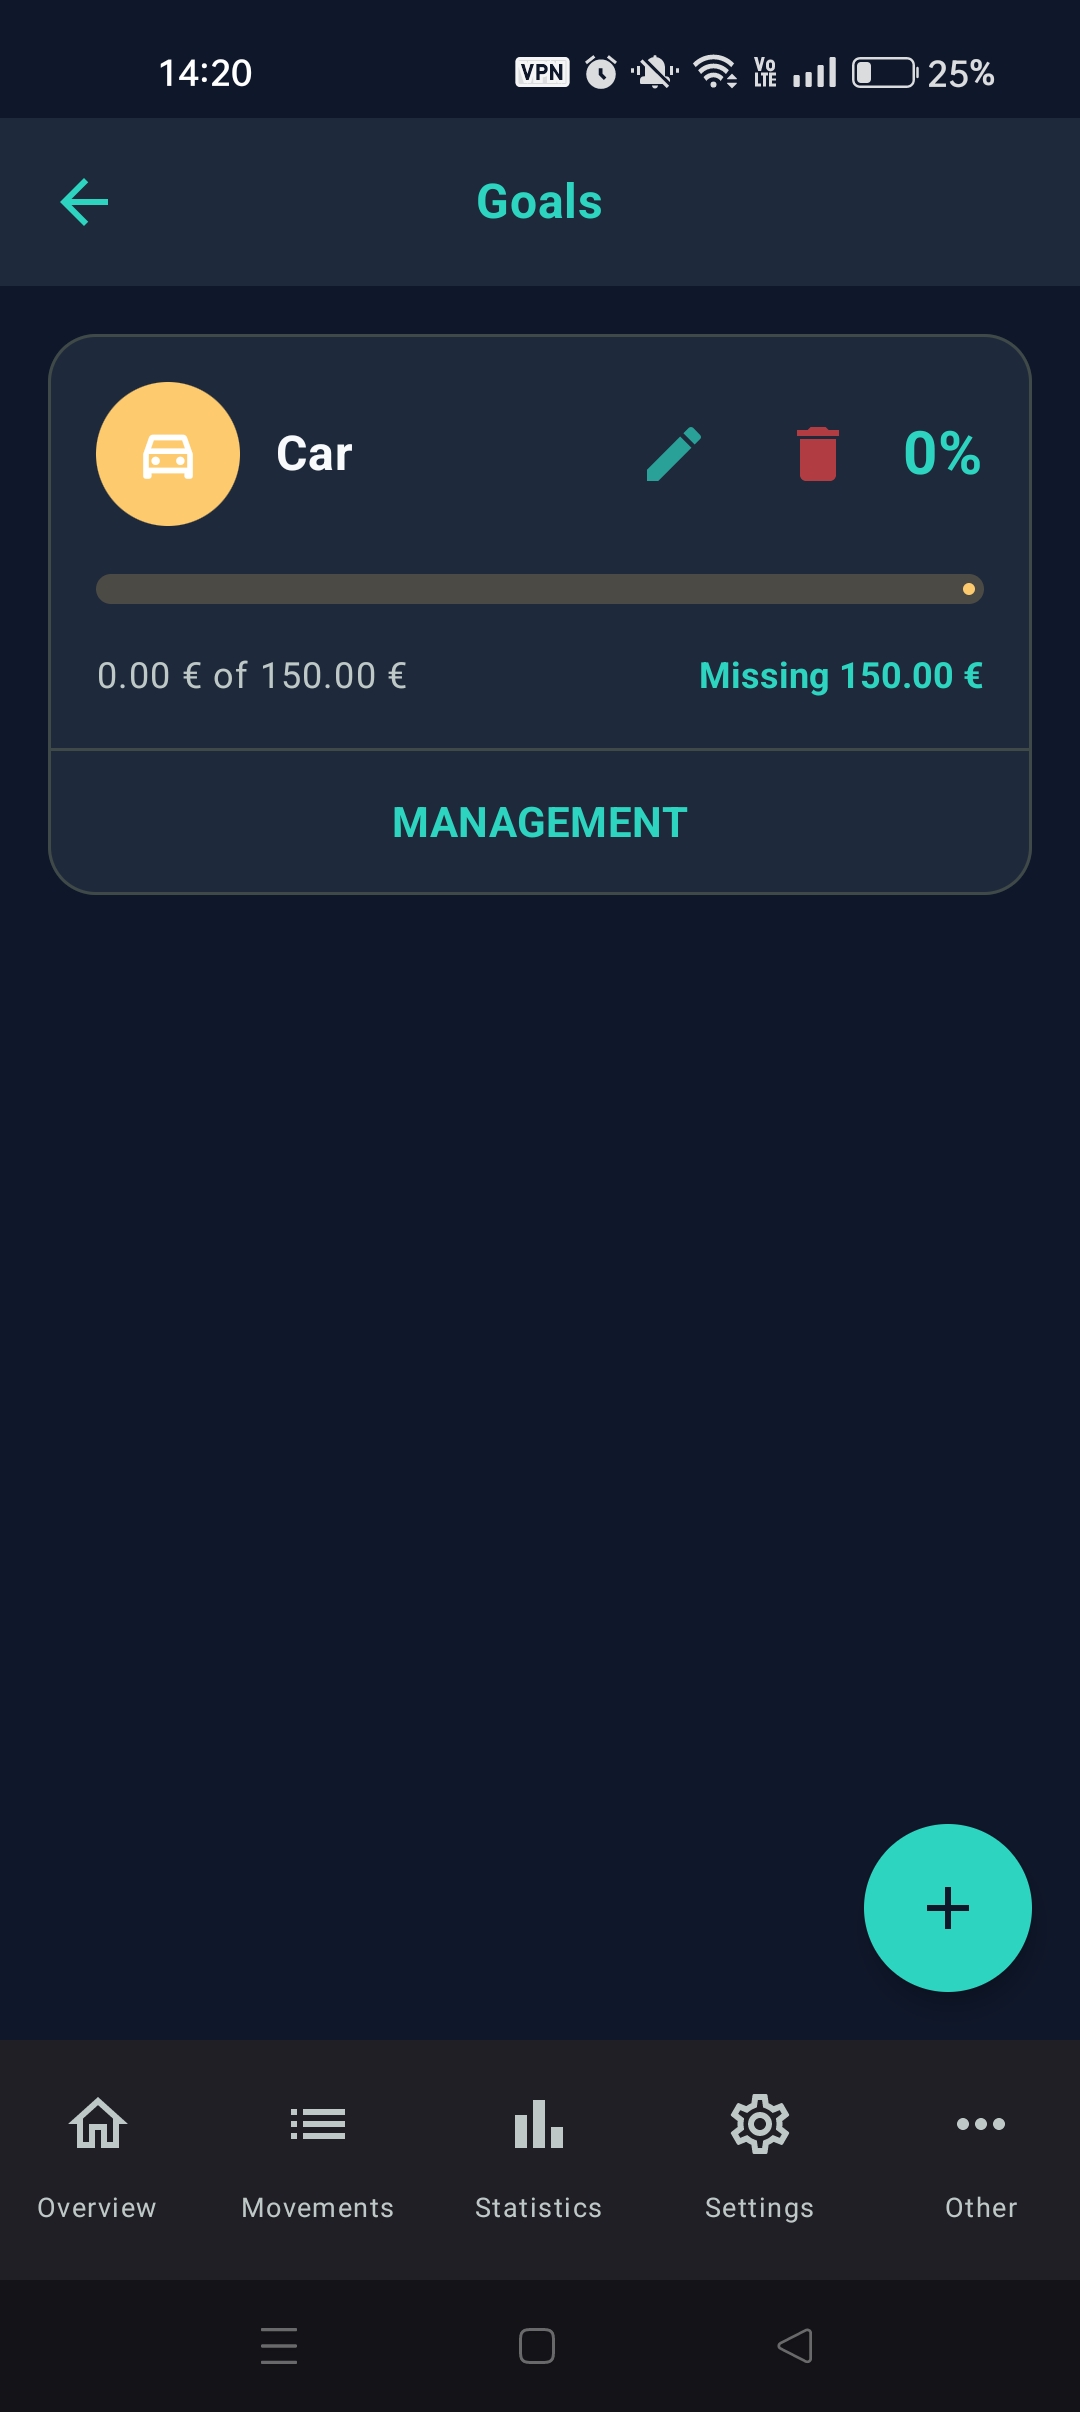
The savings goals screen
🏆 Chapter 7: Gamification and Milestones
FamLedger makes managing personal finance fun and stimulating thanks to a "Gamification" system.
Unlocking Financial Medals
As you use the application in a healthy and consistent way, you will unlock milestones and receive virtual medals. Medals are awarded when you open Other > My achievements: the app checks the current month and the previous one. Monthly medals can be won more than once and go up in level: Bronze the first time, Silver at 3, Gold at 6 and Platinum at 12. "One-Time" medals are won only once.
- Budget Sniper: Awarded if you stay within your Monthly budget with precision: the month's expenses, net of refunds, are between 90% and 100% of the budget.
- Quality Leap: Unlocked if in a single month your savings surplus (Income - Expenses) is at least 30% of your total monthly income.
- Goal Crusher: Achieved as soon as you successfully complete at least one of your savings goals.
- Clean Slate: Unlocked when you have settled all the debts you owe others. It needs at least one shared expense.
- Consistent Saver: A reward for your consistency, unlocked by maintaining a positive surplus (income greater than expenses) for 6 consecutive months.
- Early Bird: Awarded if you record at least one transaction in the first 5 days of the month for 3 consecutive months.
- Mindful Planner: "One-Time" medal unlocked when you first configure a monthly spending budget (see section 9.6).
- Debt Settled: A special "One-Time" milestone unlocked when you have settled all the debts you owe others. It also needs at least one shared expense.
- Net Worth Milestones (One-Time): Five gold medals celebrating the growth of your overall net worth (your accounts plus the value of your investments, net of estimated taxes):
- Start of the Journey: Reach a net worth of at least 10,000.
- Capital Builder: Reach a net worth of at least 50,000.
- Six-Figure Wealth: Reach a net worth of at least 100,000.
- Financial Freedom: Reach the milestone of 250,000 in total net worth.
- Financial Independence: Reach the milestone of 500,000 in total net worth.
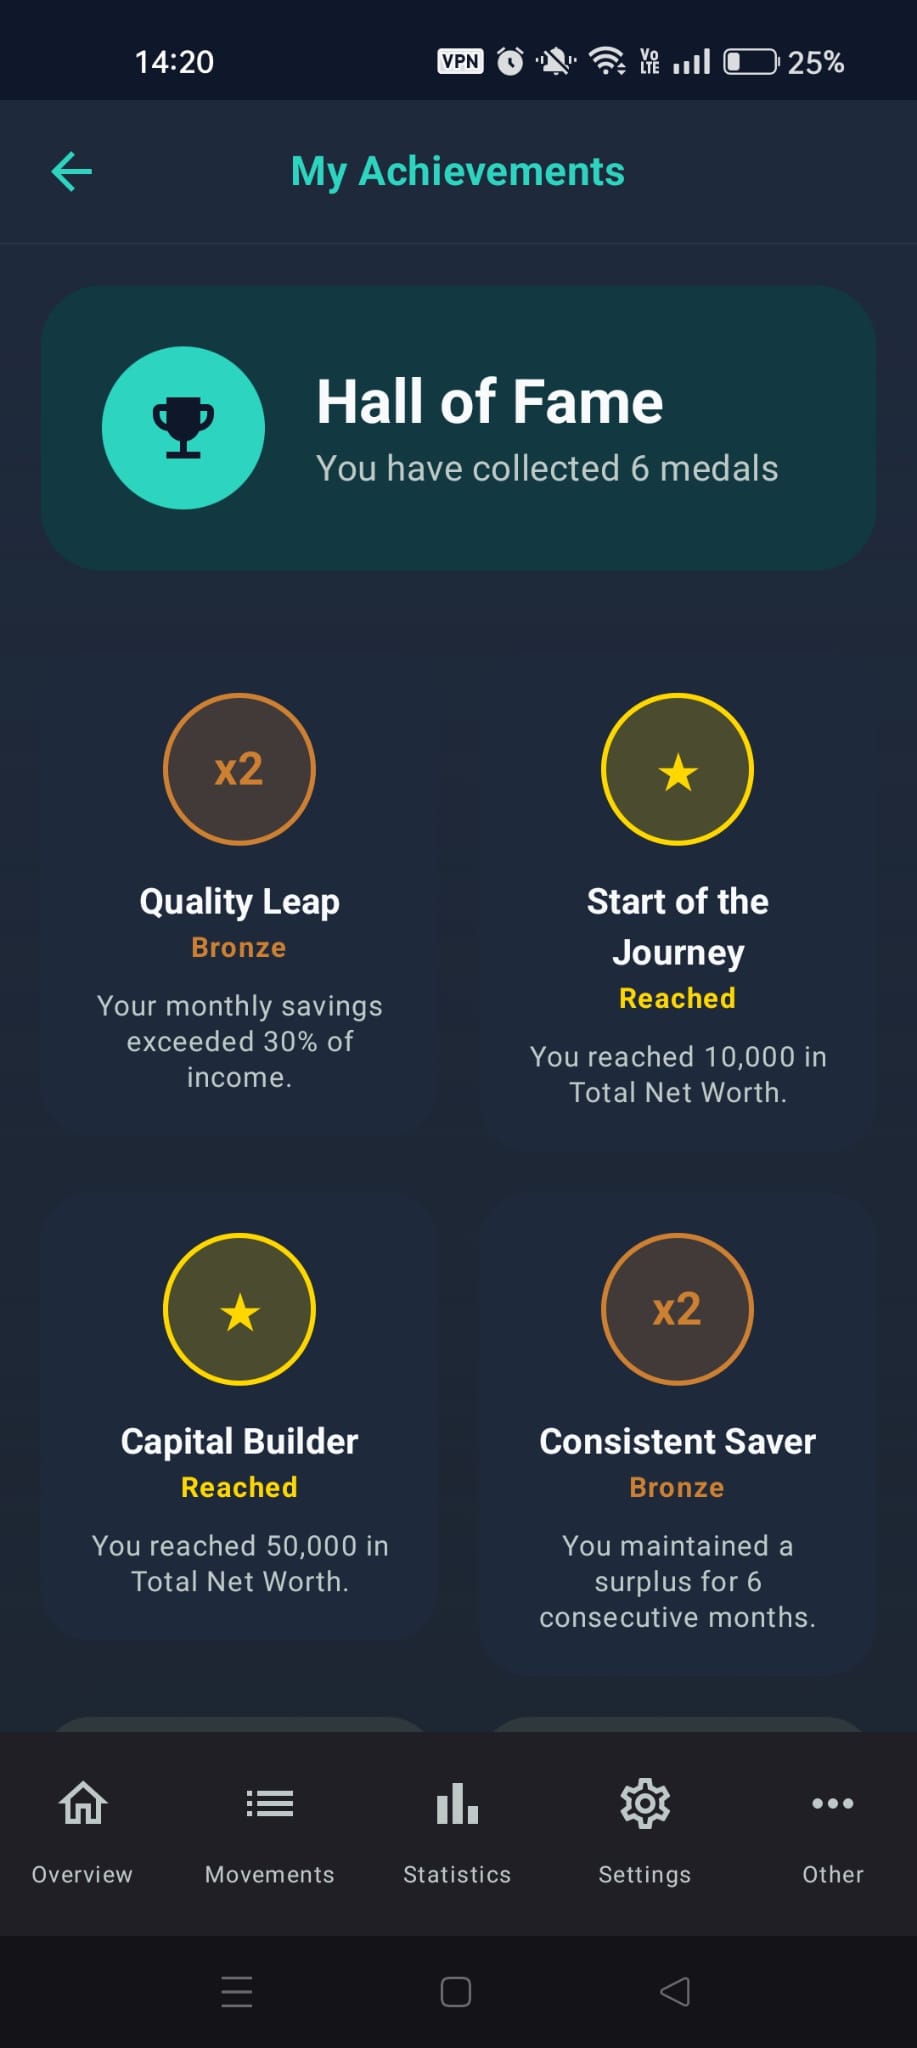
The achievements showcase screen
🔍 Chapter 8: Spending Anomaly Detection
The Anomalies screen acts as a sentinel for your family budget. Instead of just displaying a list of expenses, the application compares every single expense of the current month with your historical average spending per transaction in that specific category (by default analyzing history up to the previous 24 months; you can change the value in Settings > Anomaly thresholds > Anomaly analysis months).
If a specific transaction exceeds this historical average beyond a certain tolerance percentage, the app will flag it as an anomalous expense.
How does the detection algorithm work?
The app analyzes the registered transactions and processes three different severity levels for the overrun, based on the configurable percentage thresholds in Settings > Anomaly thresholds:
- 🔵 Low Anomaly: Triggered if the expense exceeds the category's historical average beyond the set minimum threshold (e.g. greater than +10%). Displayed with a blue badge.
- 🟡 Medium Anomaly: Triggered if the expense exceeds the historical average beyond the intermediate threshold (e.g. greater than +30%). Highlighted in yellow/orange.
- 🔴 High Anomaly: Detected when a single transaction records an exceptional peak exceeding the average beyond the maximum threshold (e.g. greater than +50%). Displayed with a red badge to call your attention immediately.
An expense that reaches the threshold exactly already counts as an anomaly. Transfers, investments, refunds and initial balance are not analyzed, and a category with no expenses in its history is never flagged.
Within the Anomalies page, you can use the filters at the top to analyze specific periods (selecting Year and Month) or to filter the anomalies displayed based on their severity level (All, Low, Medium, High). If you want to be notified, turn on Anomaly alerts in the notifications (section 9.5). The notification uses a simpler check: it arrives only when you save a new expense by hand that is above its category's average of the last 6 months by more than the low threshold. So it may not match what you see on the Anomalies screen.
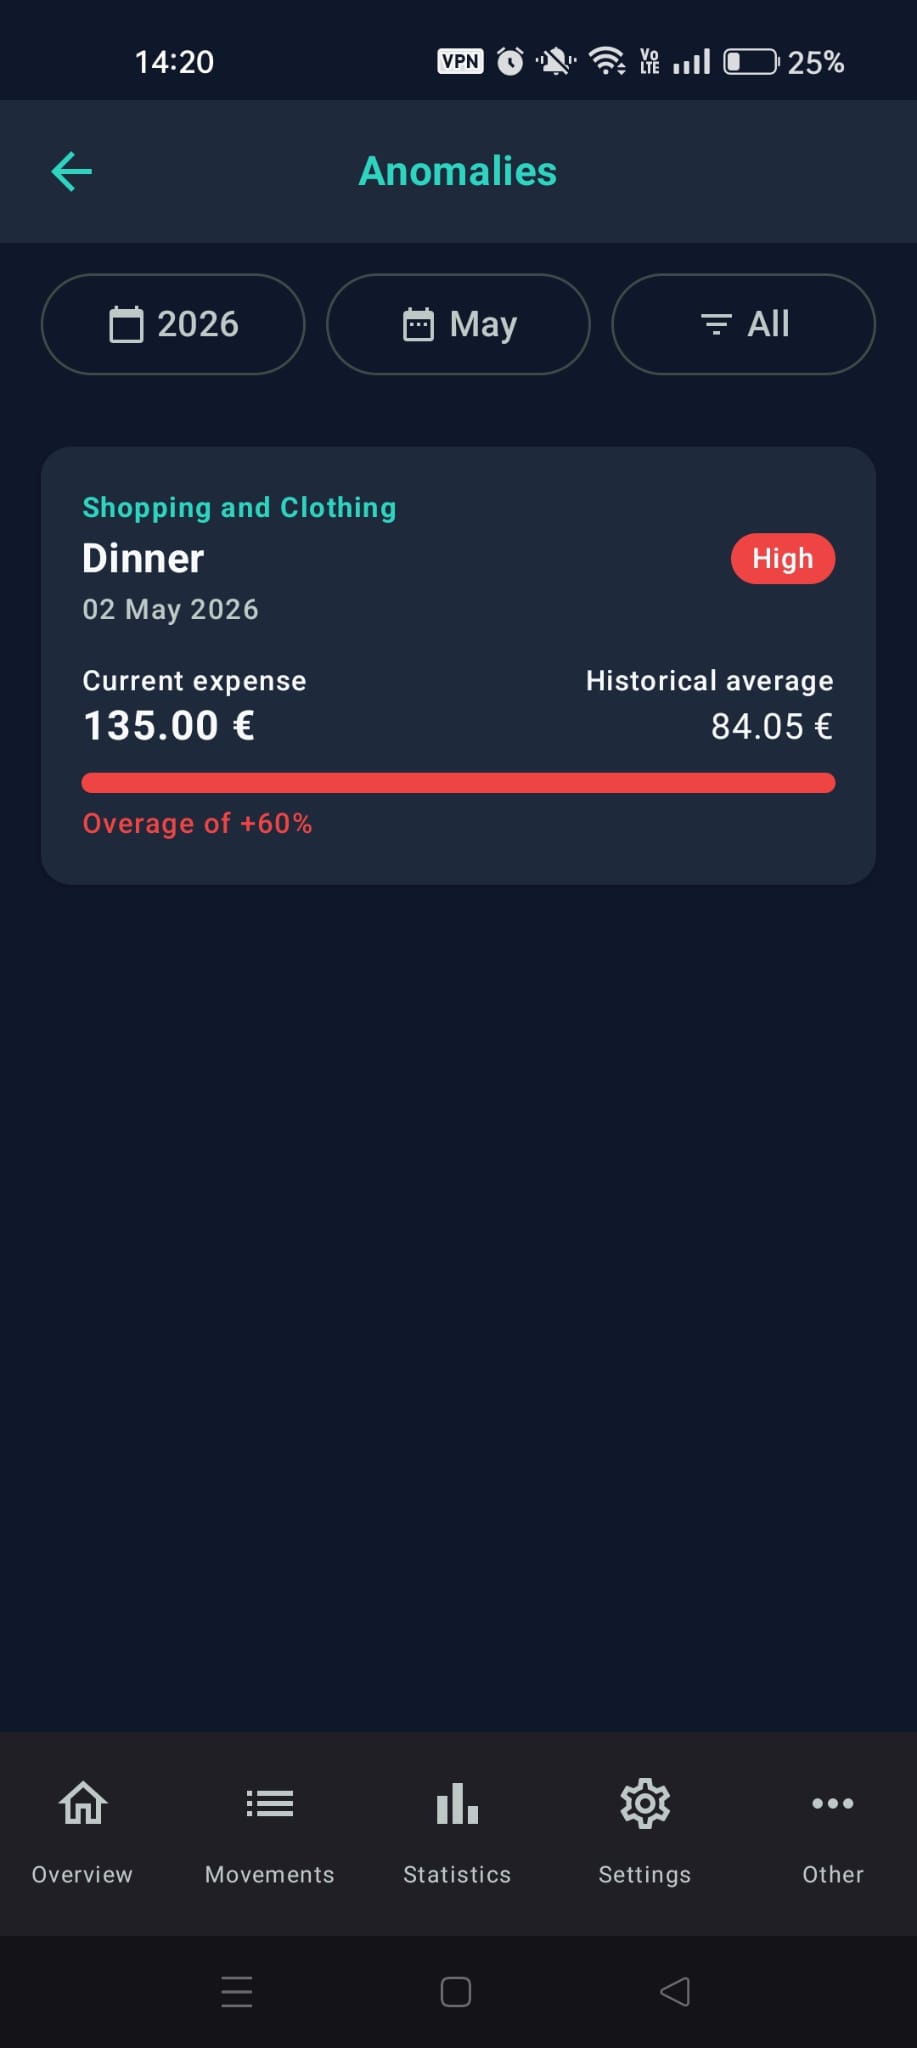
The anomaly analysis screen
⚙️ Chapter 9: Application Settings
The "Settings" screen is the control center where you configure the whole behavior of FamLedger: accounts, categories, people, budgets, notifications, security and preferences.
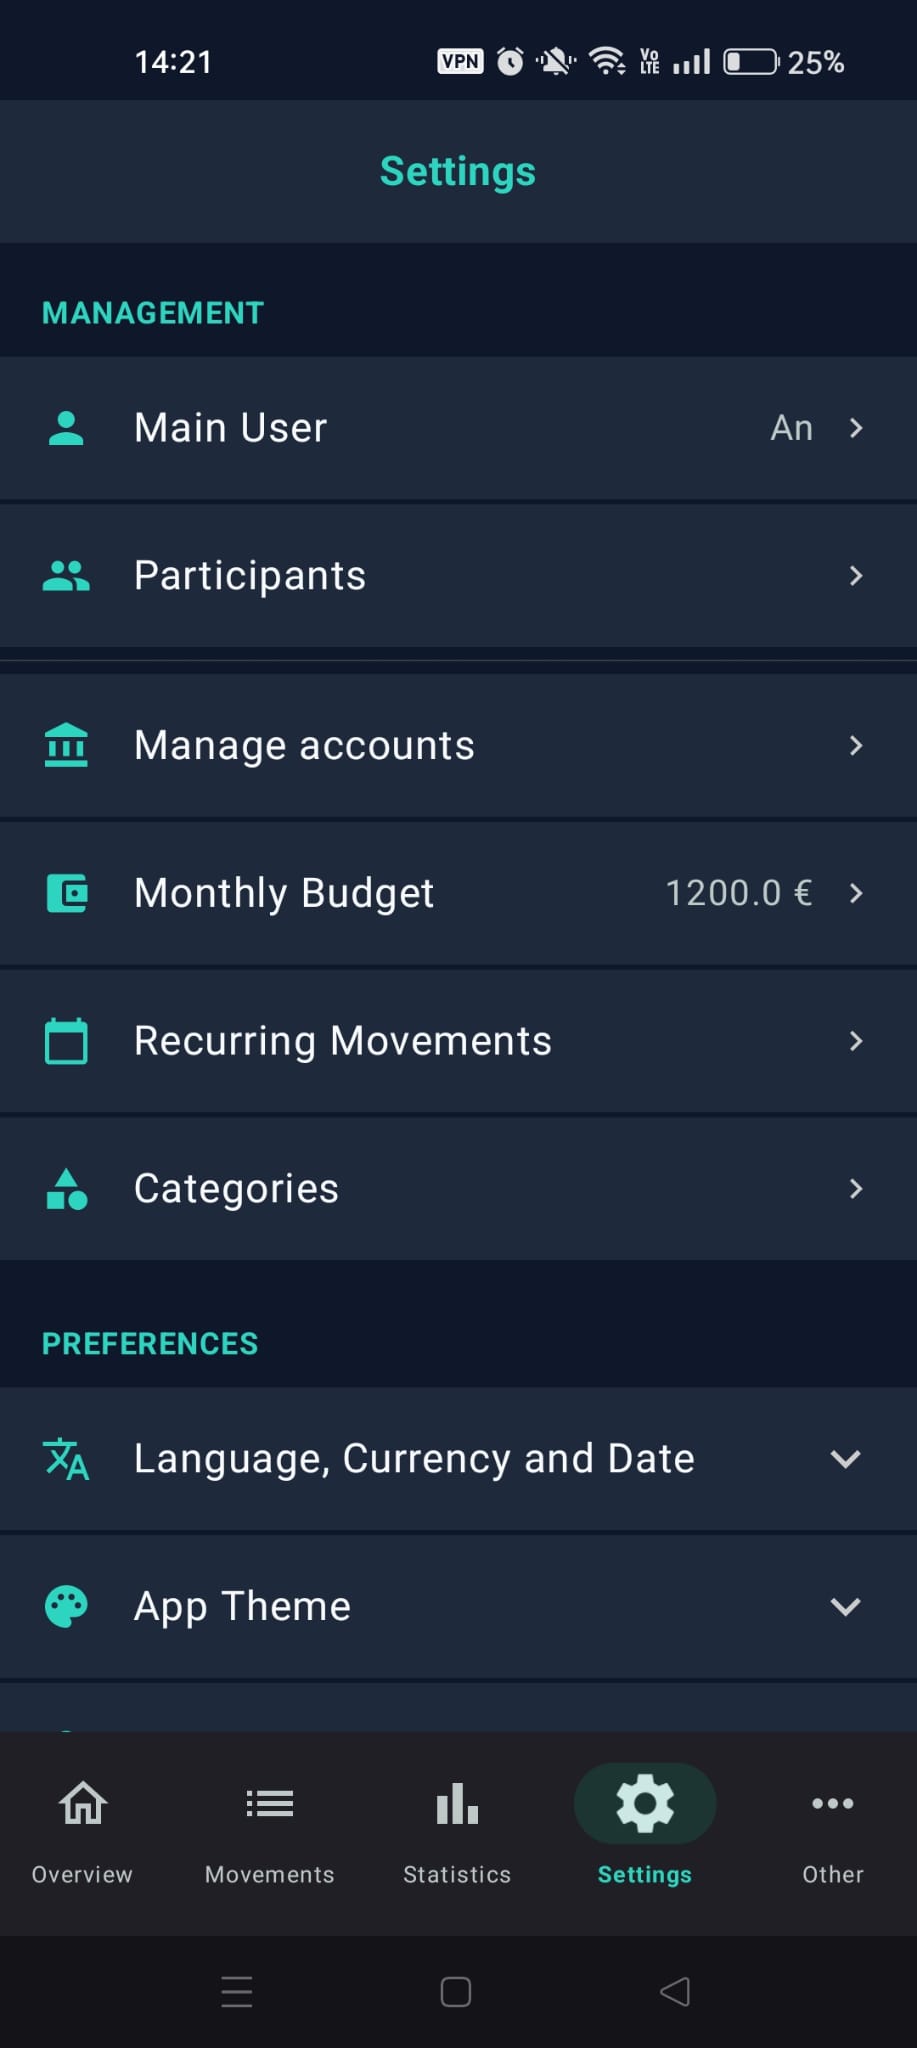
The settings screen
🏷️ 9.1 Managing Custom Categories
In FamLedger you are completely free to create the expense and income categories that best fit your real life. The app does not impose a rigid template!
Creating a Custom Category:
- Open the Categories section (from the Settings > Categories menu).
- You will find the creation/modification panel directly at the top of the screen.
- Enter the name in the Category name field (e.g. Gym or Restaurants).
- Choose the category type between Expenses or Income. The identifying color (red for expenses and green for income) is paired automatically by the app.
- If you want to create a subcategory, choose the Parent category it belongs to (e.g. Restaurants under Leisure).
- Tap the circular icon button on the left of the form and choose the icon you prefer.
- Press the Add button (or Save if you are editing an existing category).
You can modify or delete created categories at any time (except for system ones) using the edit (pencil) and delete (trash) icons next to each item. A few rules to remember:
- A subcategory cannot have subcategories of its own, and its type must be compatible with its parent category's.
- You cannot delete a category that has subcategories, transactions or recurring transactions.
- The names of the system categories are reserved: Transfer, Loan, Refund, Salary, Initial balance, Other and Investments (or Investment). You cannot create a category with one of these names, in any of the app's languages: the message "This name is reserved for a system category. Choose another one." appears. System categories cannot be edited, deleted or used as Parent category. (From version 1.2.5.)
FamLedger includes some special System Categories that cannot be modified or deleted as they are required for the correct operation of the app's automation:
- Transfer: Used automatically when you move funds between two accounts.
- Refund, Initial balance, Investments, Salary, Other: Default categories used by automatic entries.
- Loan: The category for money you advance, explained in Chapter 5.
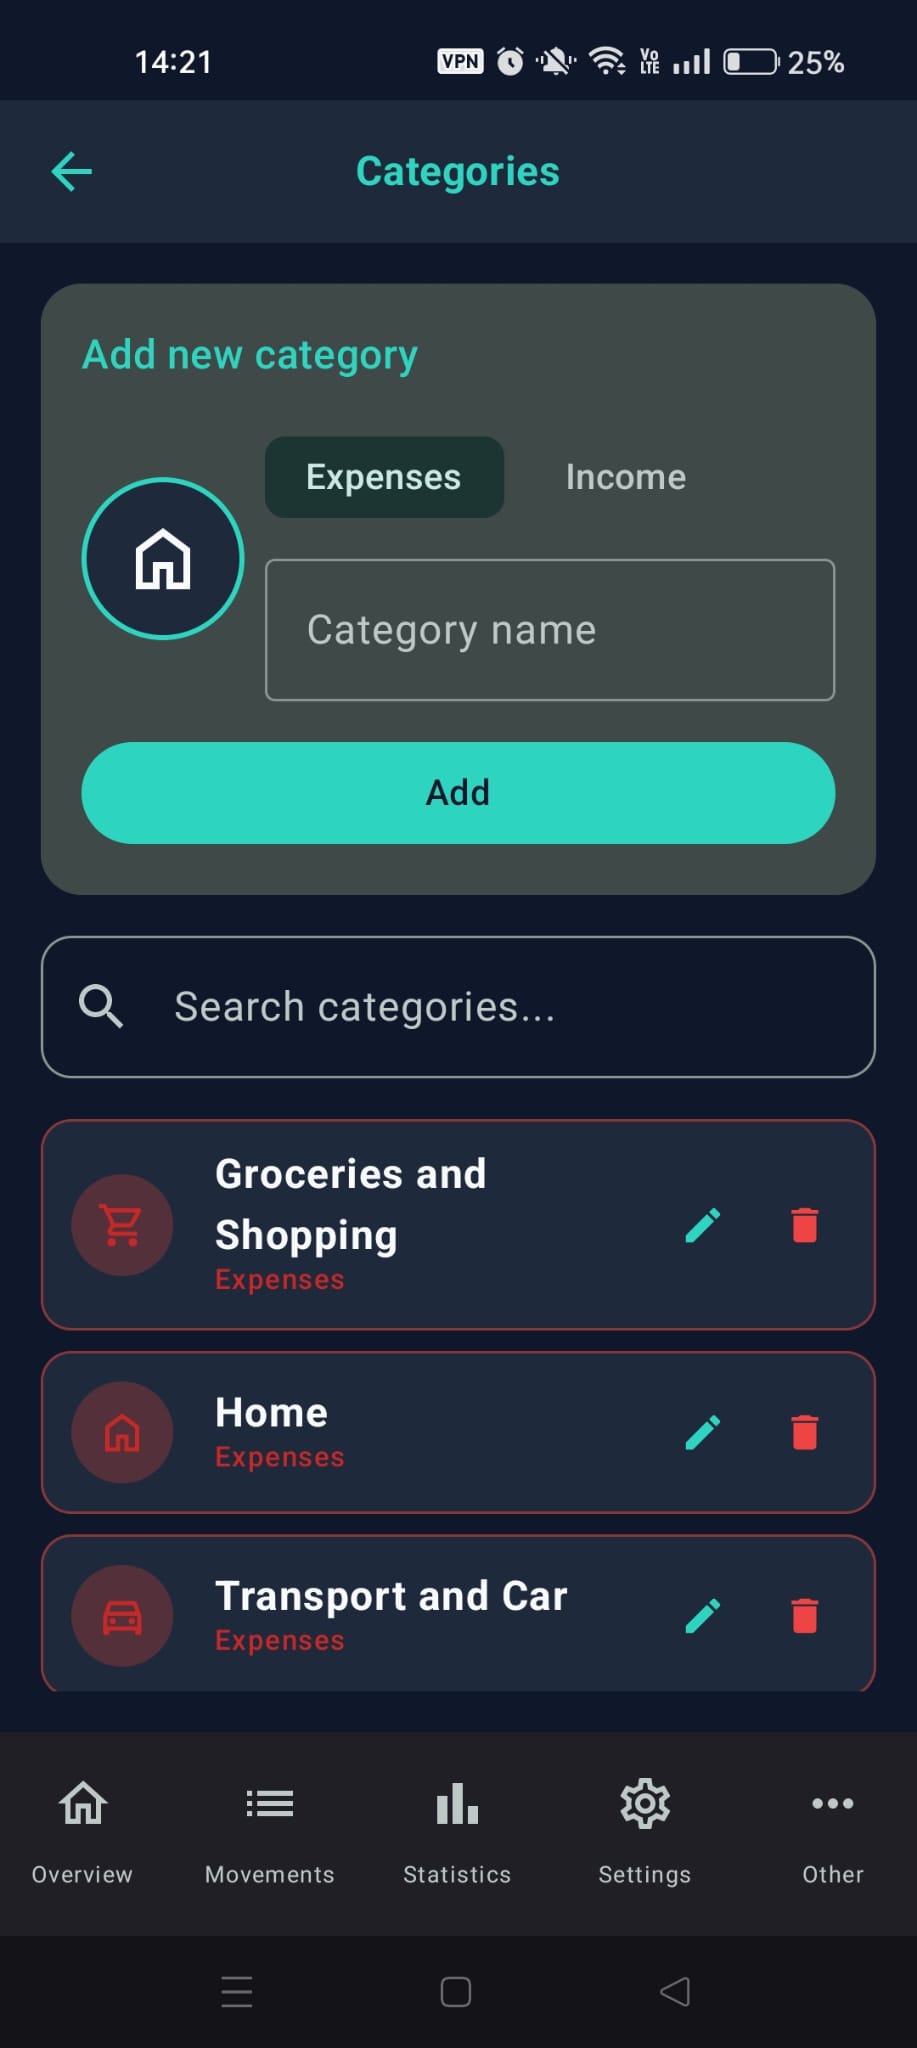
The category management screen
🔄 9.2 Recurring Transactions and Automations
Stop entering the same transactions by hand every month! For utility bills, subscriptions, rent, or salaries, set a recurring rule:
- In Settings > Recurring transactions, press "+".
- Fill in the details (amount, description, account, and category).
- Set the frequency choosing from Weekly, Monthly, or Annual, the Start date and, if needed, the End date (opt.).
- FamLedger records the transactions automatically when you open the app (and right after you save the rule), including the ones already due since the start date.
If you edit a rule, the change applies only to future transactions: the ones already recorded stay as they are.
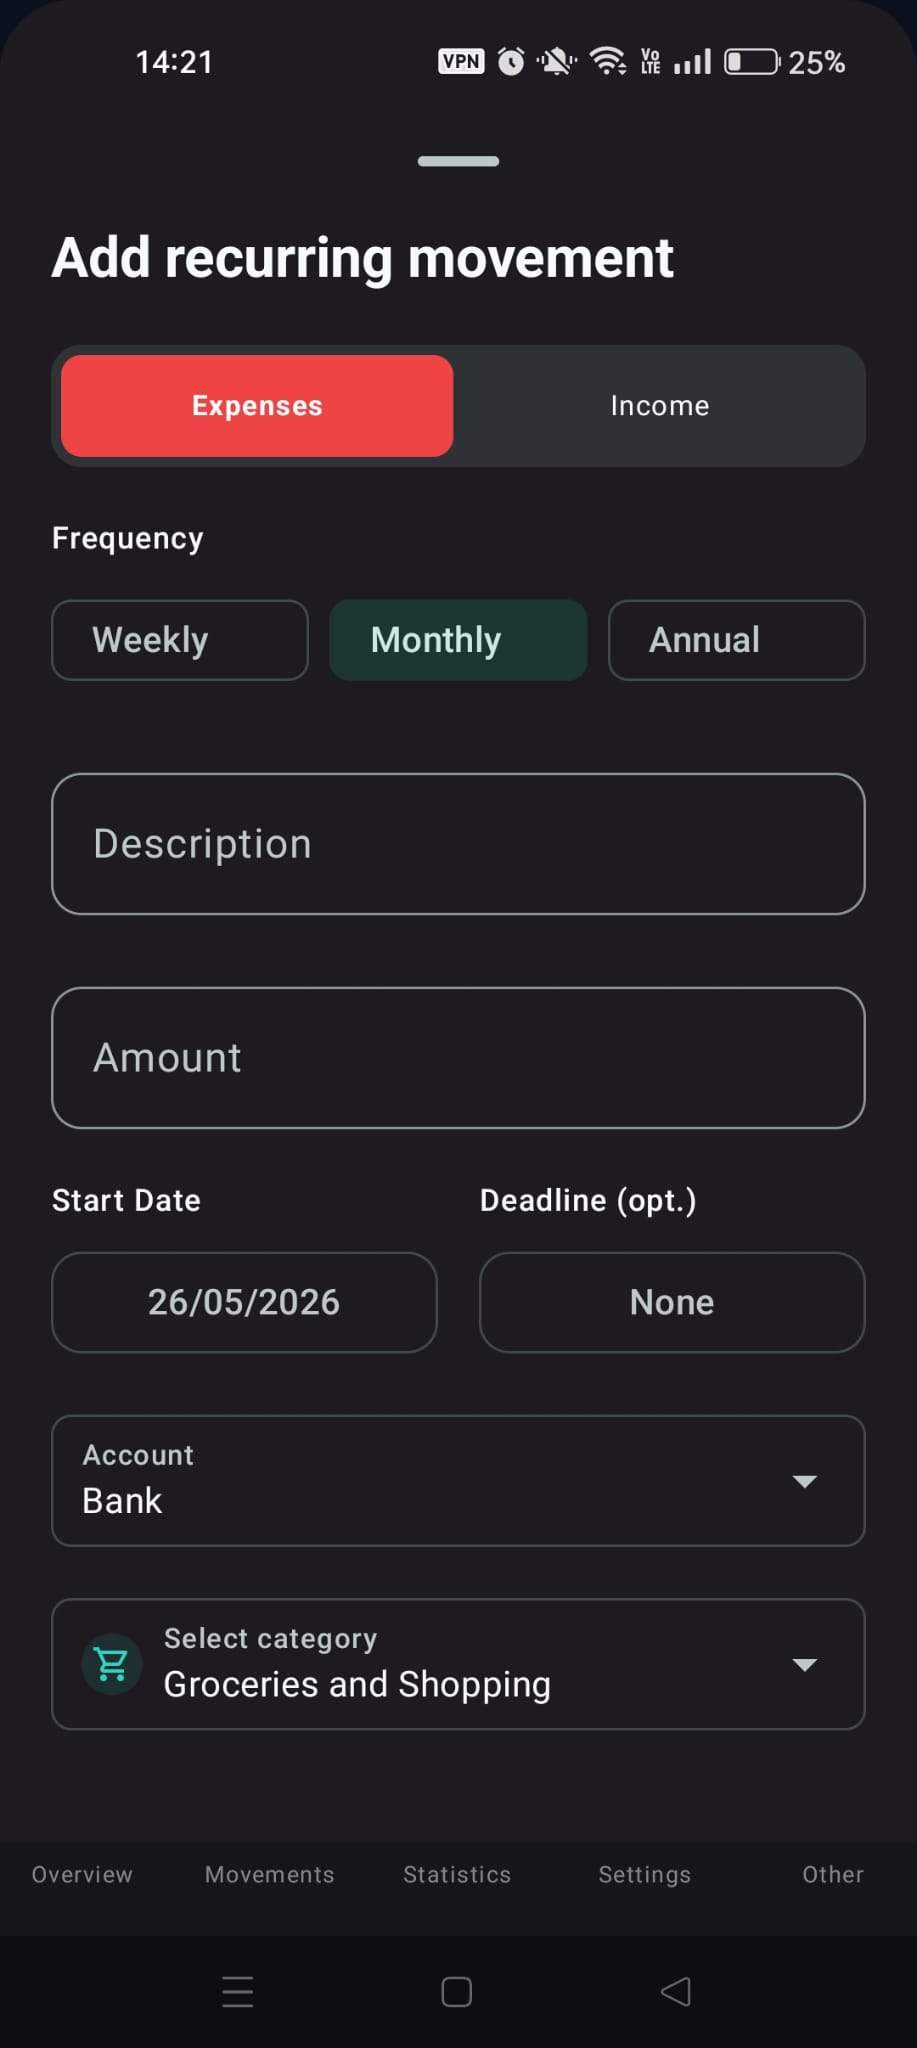
The recurring transactions screen
🔒 9.3 Security and Privacy (Password, Biometrics & Obfuscation)
FamLedger offers three tools to protect your data when you use the app in public or leave your phone unattended:
- 🔒 Unlock password: If enabled, it protects access to the application by requesting the password at launch. If you enter a wrong password, the hint you configured is shown from the very first wrong attempt. The password rules are in Chapter 1.
- 👆 Fingerprint unlock: Use your fingerprint to unlock the app (on the few phones with secure face recognition, your face too). To turn it on you must first have set the app password, have a fingerprint enrolled on the phone, and confirm your password. The password always remains valid as an alternative. On Android 11 and later the unlock prompt also accepts the phone's PIN or pattern. If you change the fingerprints enrolled on the phone, the app asks you to sign in with your password and re-enable it. Changing or removing the app password also turns fingerprint unlock off: turn it on again.
- 🕶️ Obfuscate amounts (Privacy): With this switch on, figures are hidden throughout the app and replaced with discreet dots (e.g. ••• $): perfect when opening the app on public transit or around other people! Tapping an amount does not reveal it: to see the figures again, turn the switch off.
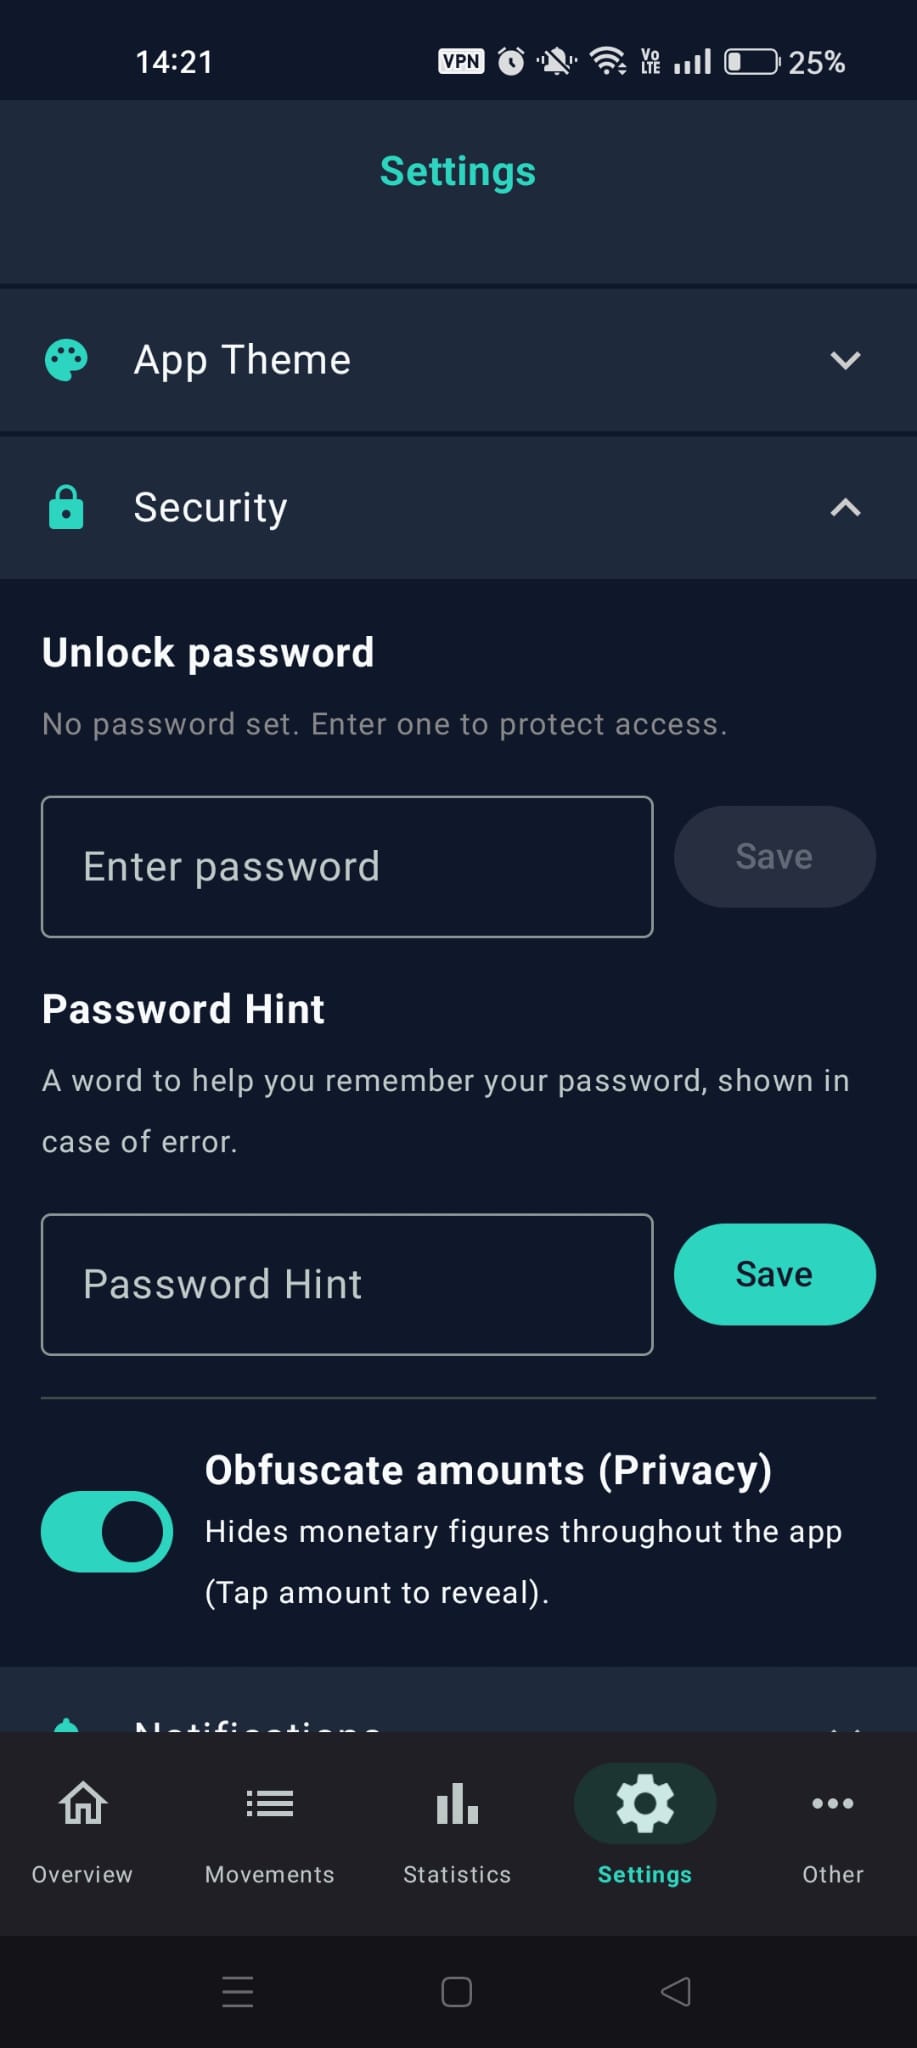
The security settings screen
💱 9.4 Profile, People, and Local Preferences
- Your name: Change your name at any time.
- People & Family: Add or delete the people you split expenses with (they can't be edited) and, if you like, create or join a family. You can't delete a person who is the payer of some transaction or has open debts. See Chapter 5 and Chapter 11.
- Language, currency and date: Choose the language from the 6 available (Italian, English, Spanish, French, German, Portuguese) or System, to use the phone's language, the currency and the Date format. After you confirm a language change the app restarts; for best results, close and reopen it manually.
- App theme: Choose between System, Light and Dark.
FamLedger uses a single base currency for the whole app. When you change it, the Currency exchange dialog asks whether to convert the amounts already recorded: with Convert they are recalculated at the exchange rate, with Keep they stay the same (1:1). If you are in a family the currency is shared with the other members and cannot be changed while you belong to it.
🔔 9.5 Notifications
In Settings > Notifications you decide which alerts to receive. They are all optional; on Android 13 and later the phone also asks for permission to show notifications:
- Daily transaction reminder (off at first): a reminder at the time you choose in Reminder time, to enter the day's transactions.
- Anomaly alerts (off at first): notifies you when you save a new expense by hand that is above its category's average of the last 6 months by more than the low threshold (Chapter 8).
- Maturity reminders (on at first): notifies you 7 days before and on the day an investment matures.
- Update prices in the background (on at first): about every 12 hours, when online and the battery is not low, updates the quotes and records the portfolio value.
🧮 9.6 Monthly Budget and Category Budgets
A budget is the spending cap you give yourself. FamLedger has two kinds, which you can also use together:
- Monthly budget: a single amount for all the month's expenses. You set it in Settings > Monthly budget.
- Category budgets: a cap for each expense category (e.g. €400 for Food). You set them in Settings > Category budgets.
Adding a category budget:
- Open Category budgets and use the arrows to choose the month.
- Tap the "+" button (Add budget), choose the category and write the amount. Only expense categories can be used, not system ones (including Other).
- If you want what you don't spend to be added to the following month, turn on Carry over the remainder to next month: on the budget card you will see it as Carry-over. It also works the other way: if you overspend, the difference is taken off the next month.
- The note "Applies from this month onward" reminds you that the budget repeats every month until you stop it. To stop it, open the budget with the pencil and tap Stop from this month.
For each budget the app shows how much you spent out of what is available: it counts the gross expenses of that exact category, without its subcategories. From 80% it warns you that you are getting close to the limit, and at 100% Budget exceeded appears. The warnings also appear in Overview.
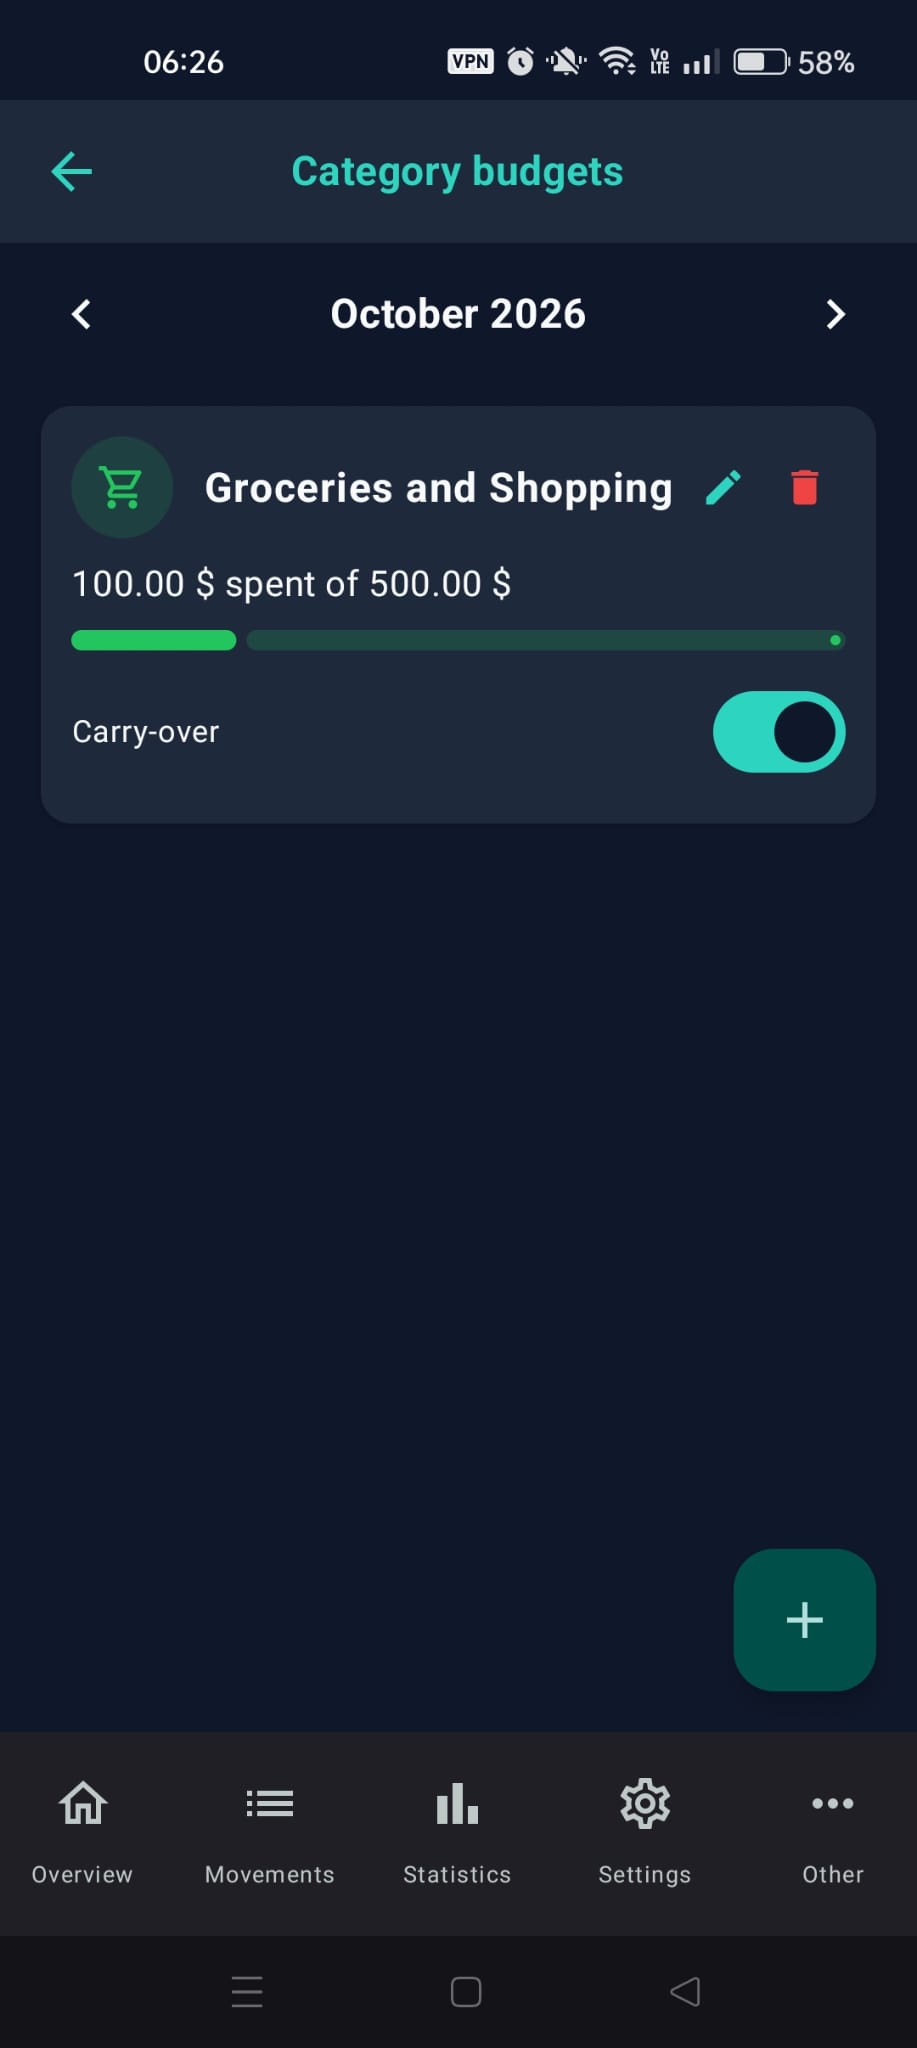
"Category budgets" with at least one budget, the progress bar and "Carry-over"
👑 Chapter 10: FamLedger PRO (Exclusive Features)
For users who wish to deep-dive into their financial situation and keep their historical data safe over time, we created "FamLedger PRO". A single one-time purchase (buy once in the Store, keep it forever) that unlocks Statistics and Data management (backup and restore) and directly supports the work of our independent team. Your purchase allows us to keep improving FamLedger, keeping it an app free from trackers and focused on your privacy. Everything else in the app, including Anomalies, Goals, Investments and Achievements, is free.
You buy PRO in Settings, in the PRO version section, with the Purchase button. If you have already bought it (for example on another phone), tap Restore purchases.
📊 10.1 Charts and Statistics
Understanding how your finances evolve over time is key to making wise decisions.
The section is divided into five tabs:
- Monthly: the month's expenses by category.
- Trend: how your expenses change over time, in total or for the categories you choose (income is not shown).
- Comparison: the comparison between the months of two years of your choice.
- Accounts: the Account distribution and the Net worth trend, that is, how your wealth changes over time: the liquidity of your accounts plus the current value of your investments.
- Investments: the value and return of your investments.
In Trend and Comparison you can filter by category, in Accounts by account. If you are in a family, the Only mine / Mine + joint / All selector explained in section 11.11 applies here too.
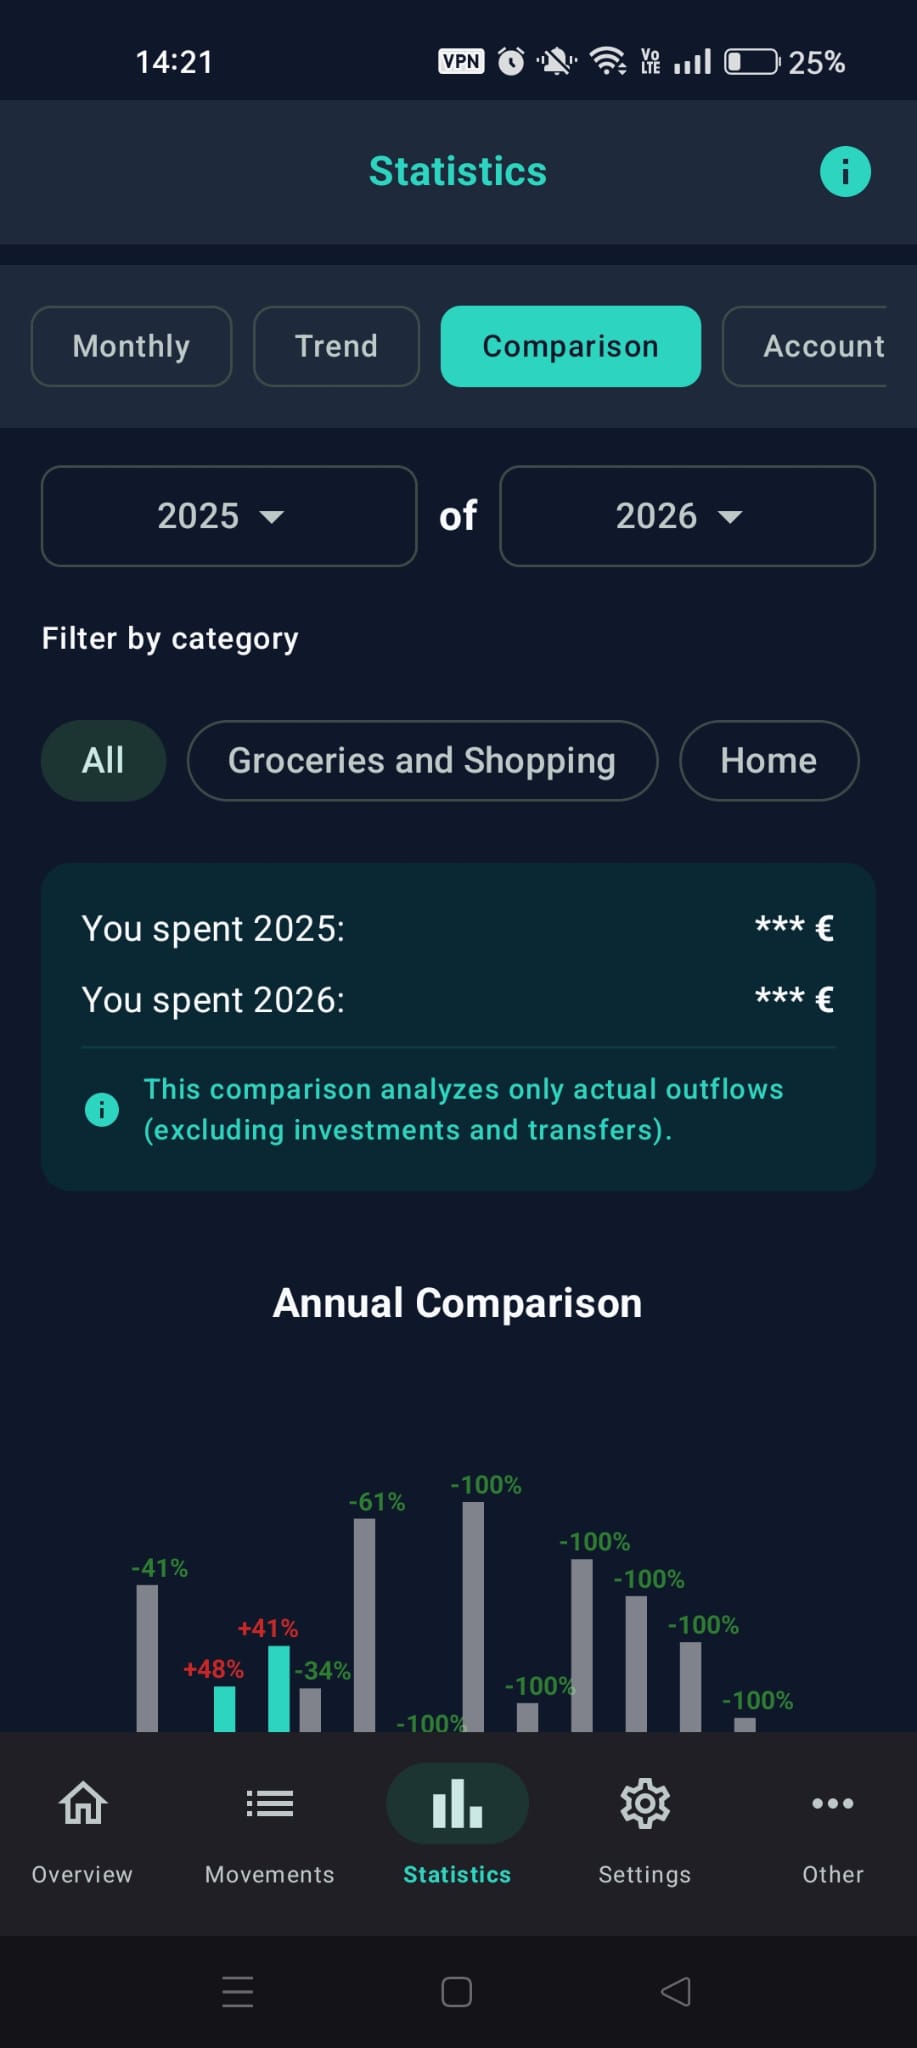
The PRO statistics and charts screen
💾 10.2 Backup, Restore and Migration (JSON/CSV)
Since FamLedger keeps the data on your phone, making backups is crucial. If you change phones or format the device, you will need this file to avoid losing your financial history. You find it in the Other menu, under Data management.
Each card has two buttons:
- Full backup (JSON): Create backup creates a file with all the app's data, to save on Google Drive, send via email, or keep on your computer. With Restore you restore the data from a file created earlier.
- Export/import transactions (CSV): with Export and Import you export or import the list of transactions in a format compatible with Excel or Google Sheets. The CSV is meant for reading and editing your transactions in a spreadsheet, but it does not replace the backup: it does not keep the link between the two halves of a transfer, account sharing or debt shares. To save everything, use the Full backup (JSON). The file is in the app's language: in English it uses a comma as separator and a dot for decimals; in Italian and the other European languages it uses a semicolon and a comma for decimals. Dates are always in DD/MM/YYYY format. Import detects the format by itself. Importing a CSV adds the transactions to the ones you already have and creates any missing accounts and people; it does not check for duplicates, so don't import the same file twice.
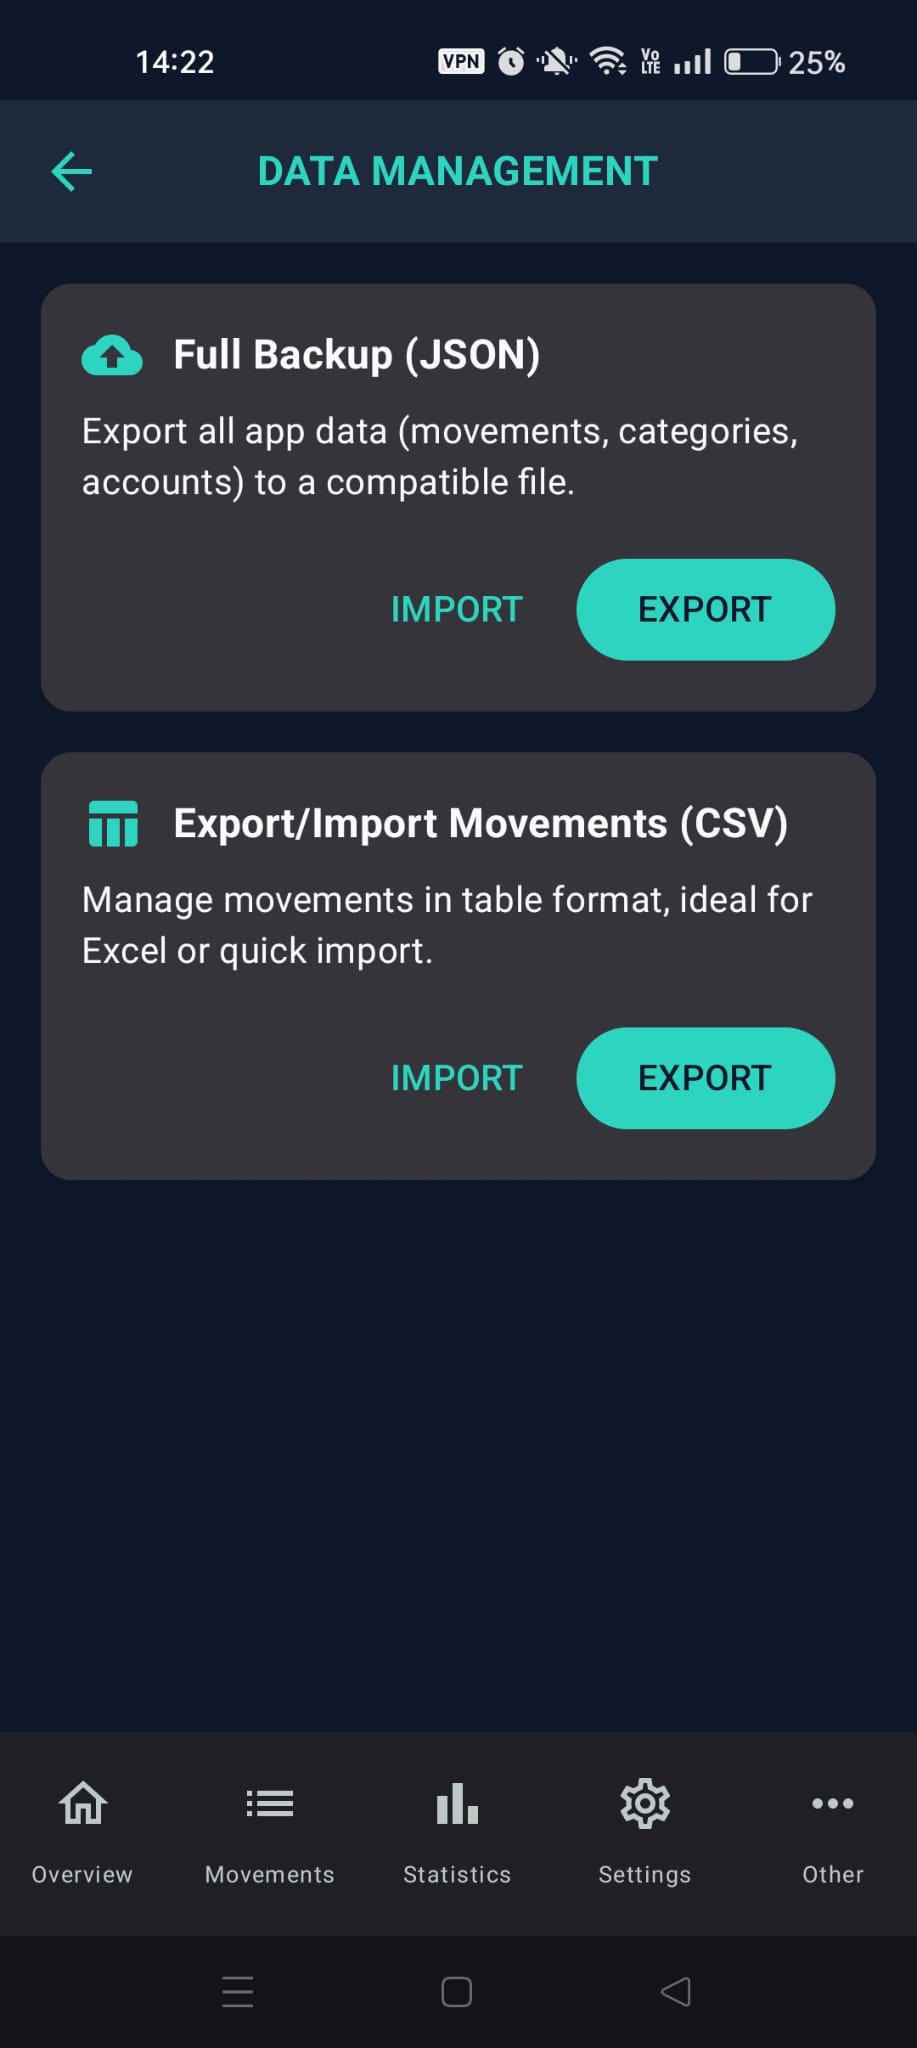
The backup and import/export screen
👨👩👧 Chapter 11: Family (sharing across several phones)
💡 11.0 What it is for
With the Family feature you link the phones of the people you manage money with: each one uses FamLedger on their own phone, and the app keeps the accounts you choose to share, the transactions, budgets, goals and the debts between you aligned.
Data travels only between your phones, on the same Wi-Fi network: nothing goes to the cloud and no registration is needed.
The words used in this chapter
- Member: a person who uses FamLedger on their own phone and is part of your family.
- Person (or participant): anyone you added in "People & Family" to split expenses with.
- Guest: a person who is not a member (a friend, a colleague). You find them in the Friends & others group and they exist only on your phone.
✅ 11.1 Before you start
- The phones must be connected to the same Wi-Fi network and have compatible versions of the app. If "App update needed" appears, update FamLedger on both phones.
- Everyone must use the same base currency. The family uses the currency of whoever creates it, and it can't be changed while you are in the family.
- The app asks for the "Allow local network access" permission: it is used only to find your family's phones on your Wi-Fi. Tap Continue and then Allow in the phone's dialog, which mentions "Nearby devices" or "Local network" depending on the Android version. If you choose Not now, sync stays off ("Sync disabled") until you grant the permission in the phone's settings. On Android 12 or earlier this permission is not needed.
- Whoever joins must allow the camera, which is used only to read the invite QR code.
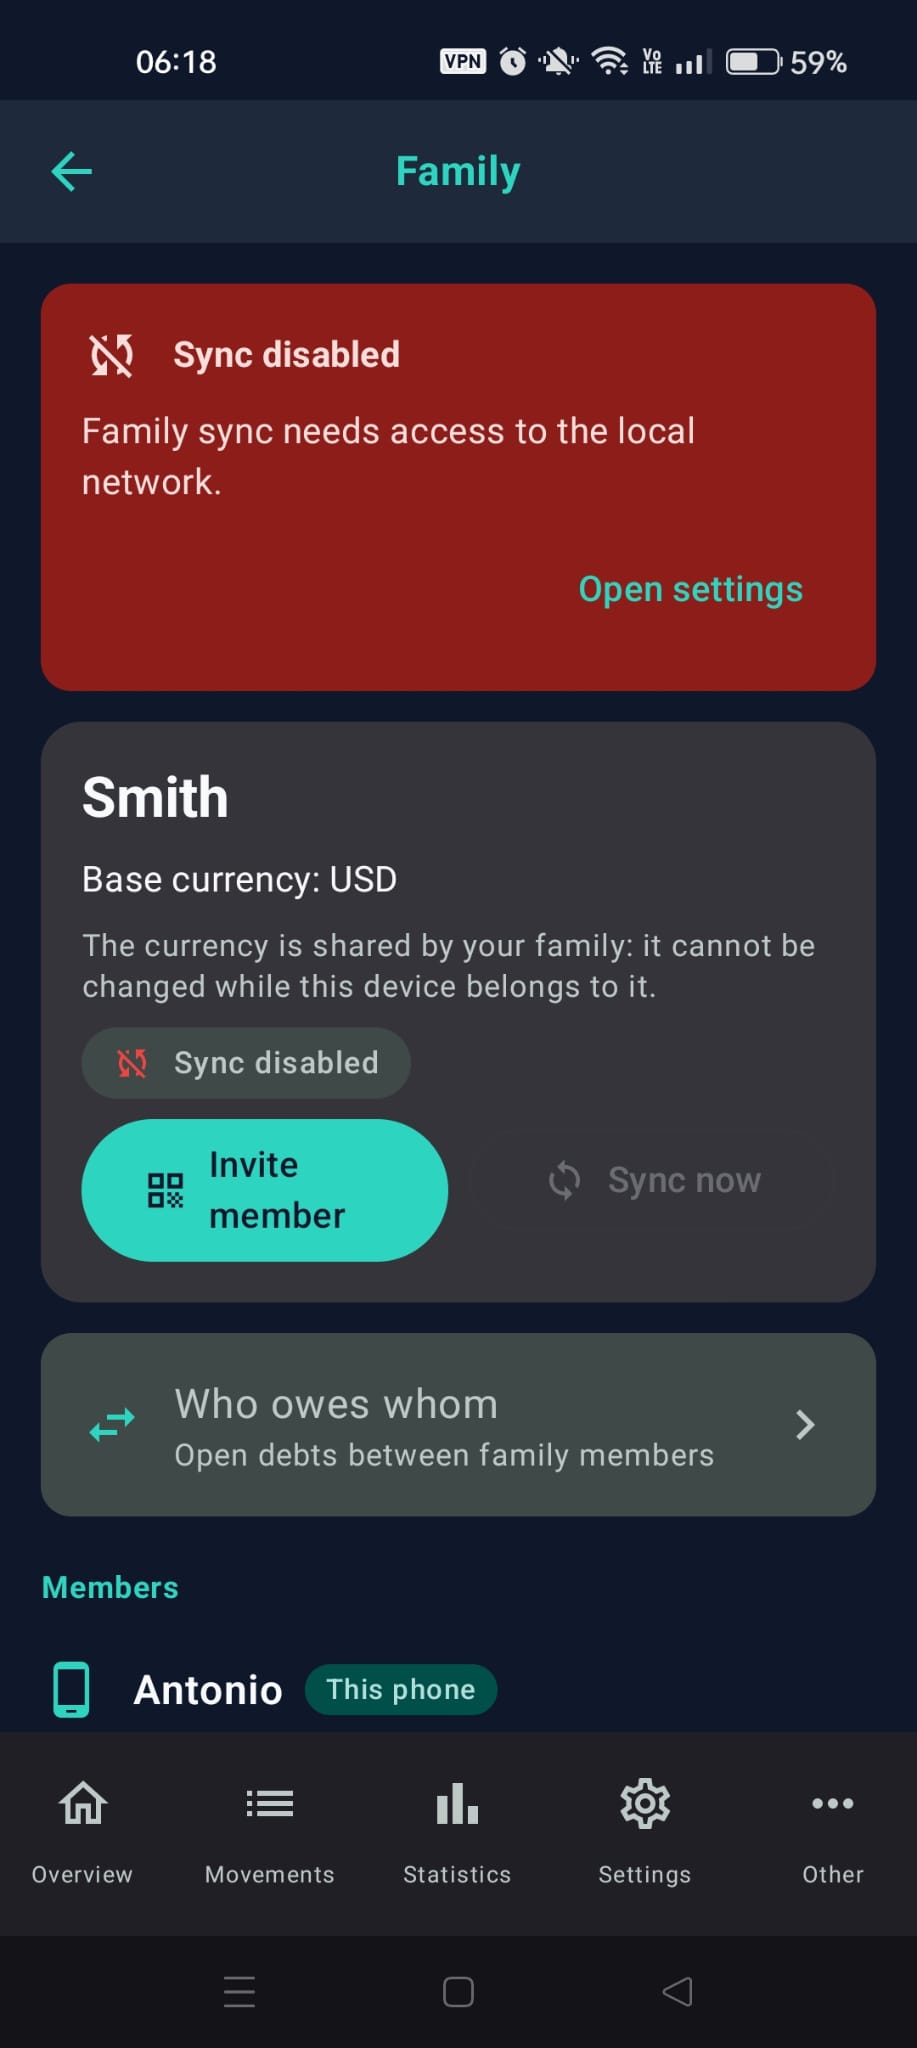
If the permission is missing, the Family screen shows "Sync disabled" with "Open settings"
🏠 11.2 Creating the family
Only one person does this, on their own phone:
- Go to Settings > People & Family and tap Create or join. If you hid that card, use the Family row (with "Create or join" under it).
- Tap Create family.
- Write the Family name and check Your name: it is how the other members will see your phone.
- Tap Create.
- The app immediately offers to create an account for everyone's expenses: "Create a joint account for household expenses?". The suggested name is Household expenses. Tap Create, or Skip if you prefer to do it later.
- Right after that, the "Which accounts do you want to share?" panel opens, only once: tick the accounts to share and tap Save, or Skip.
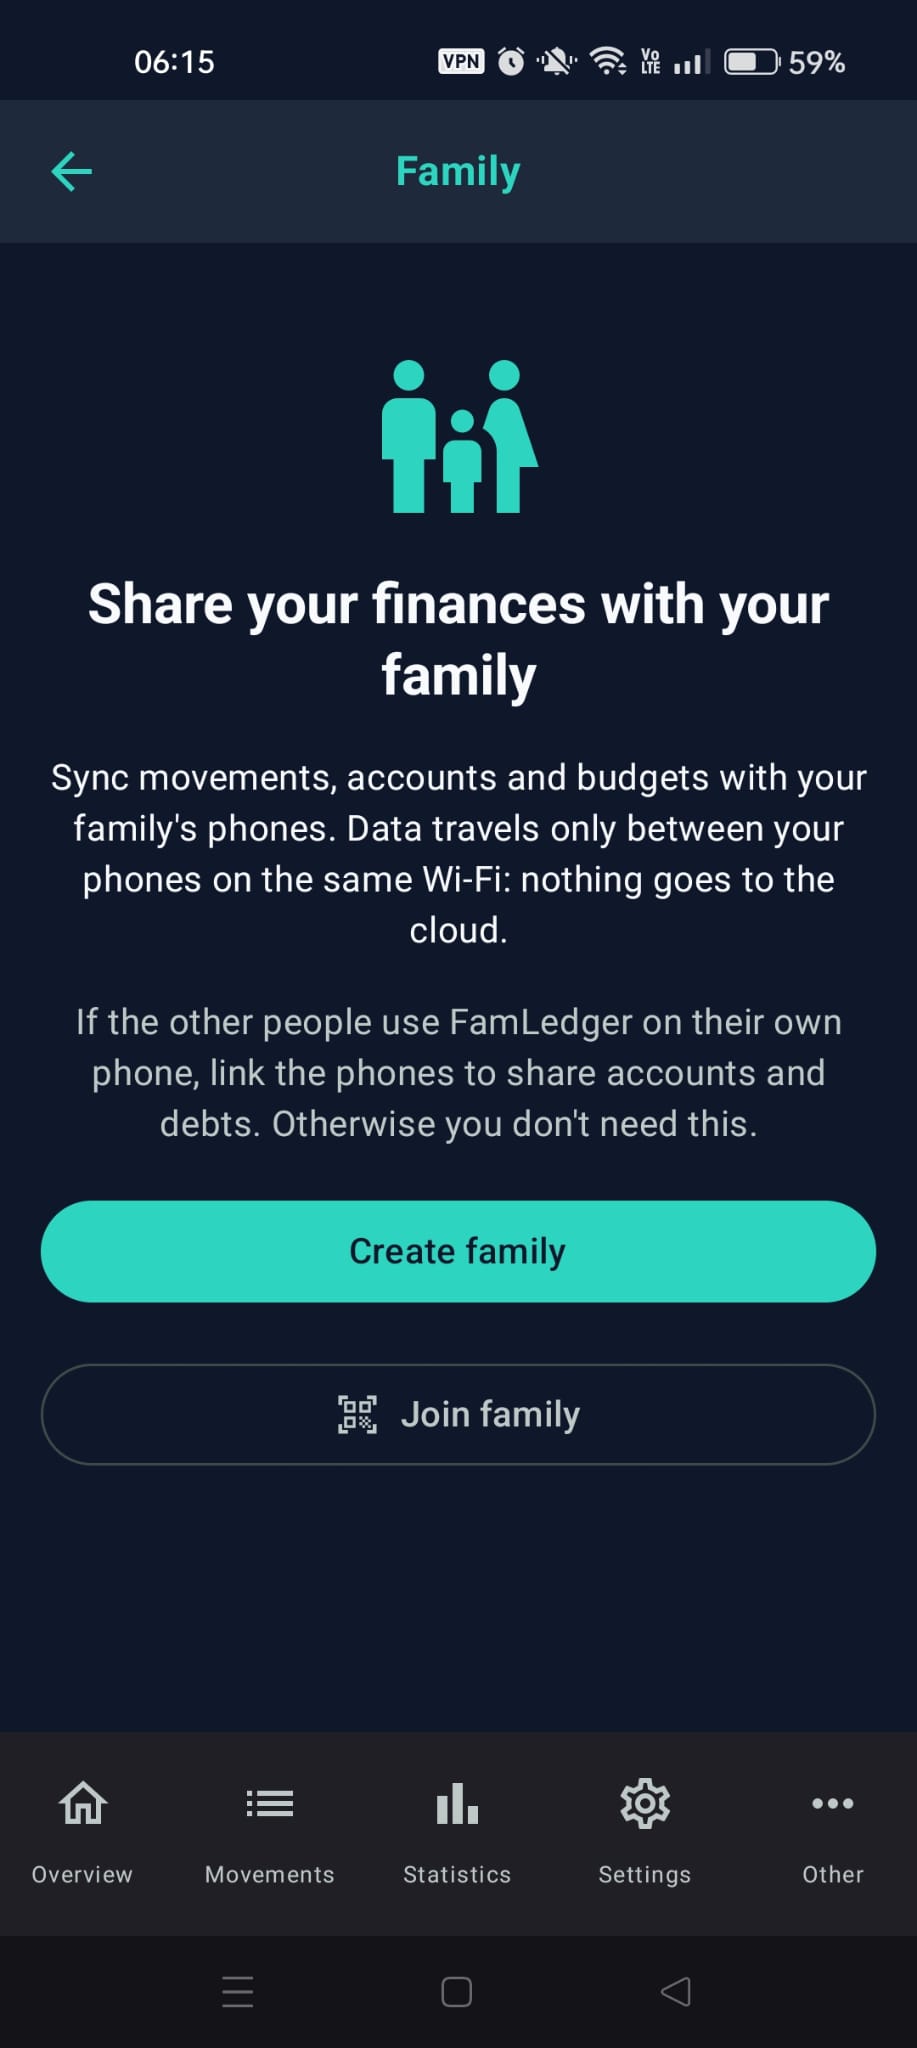
The Family screen before creating a family, with "Create family" and "Join family"
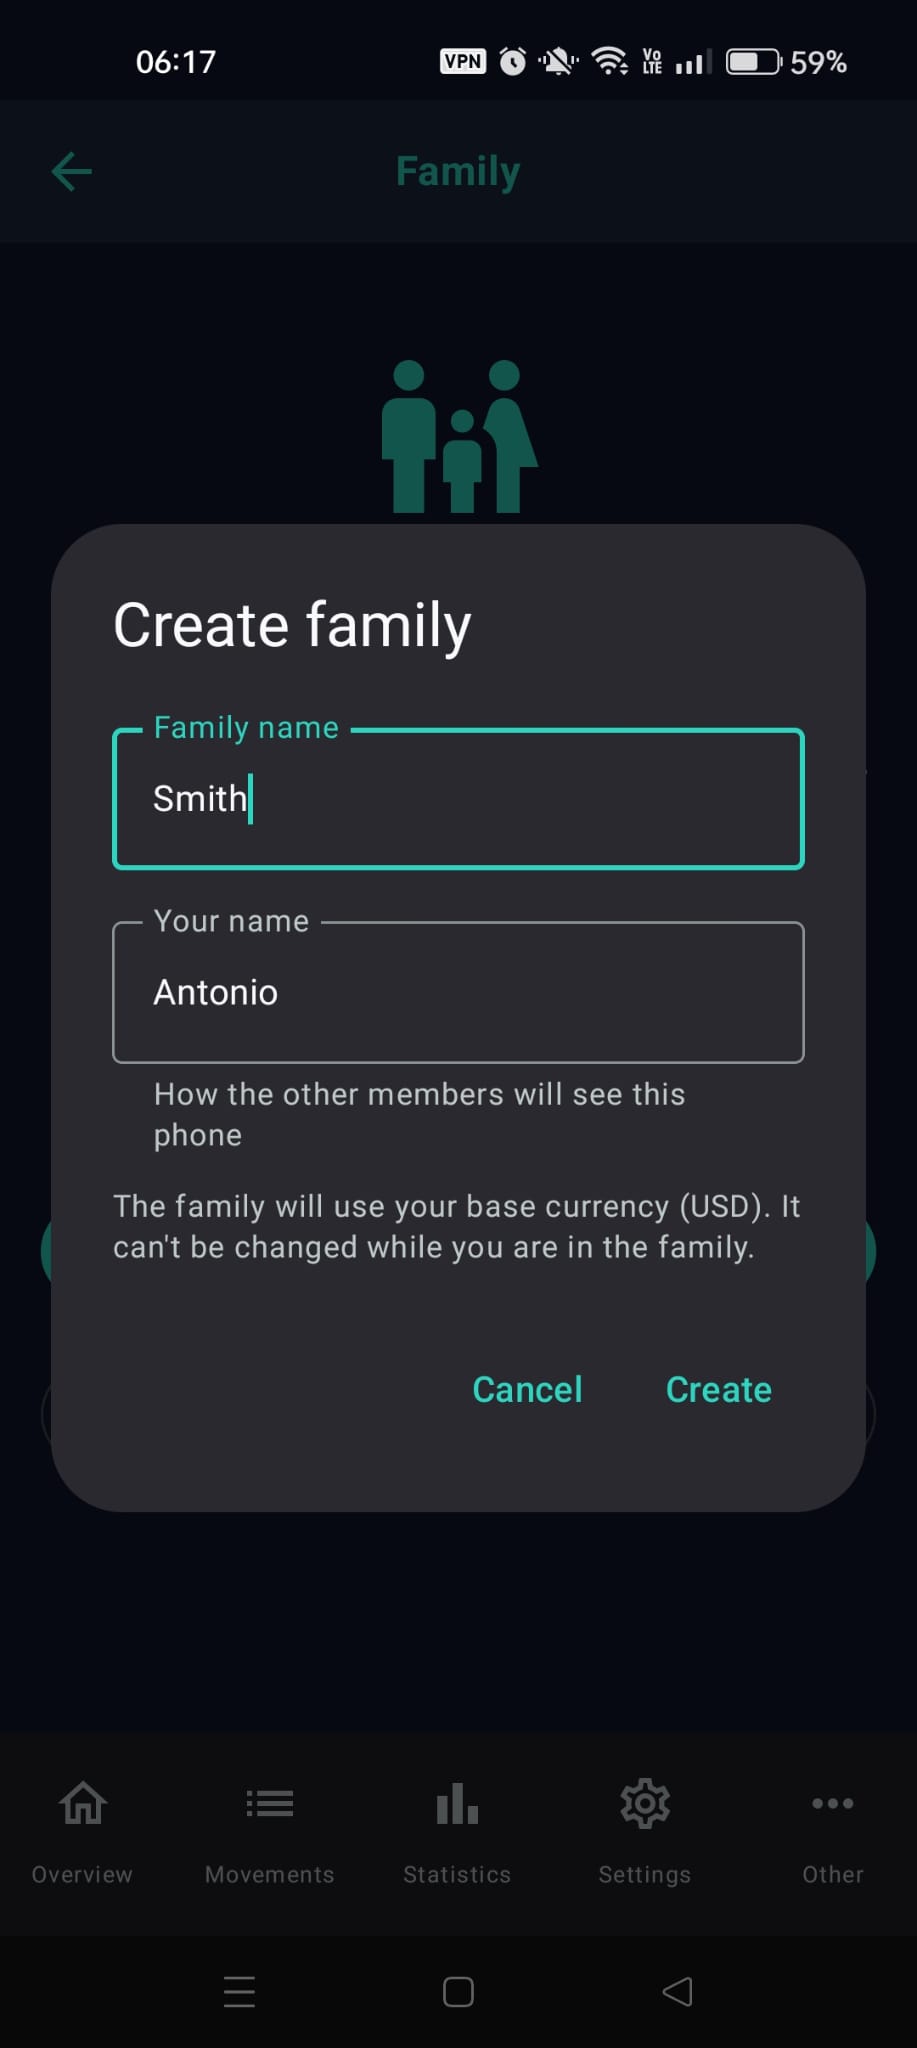
The "Create family" dialog filled in
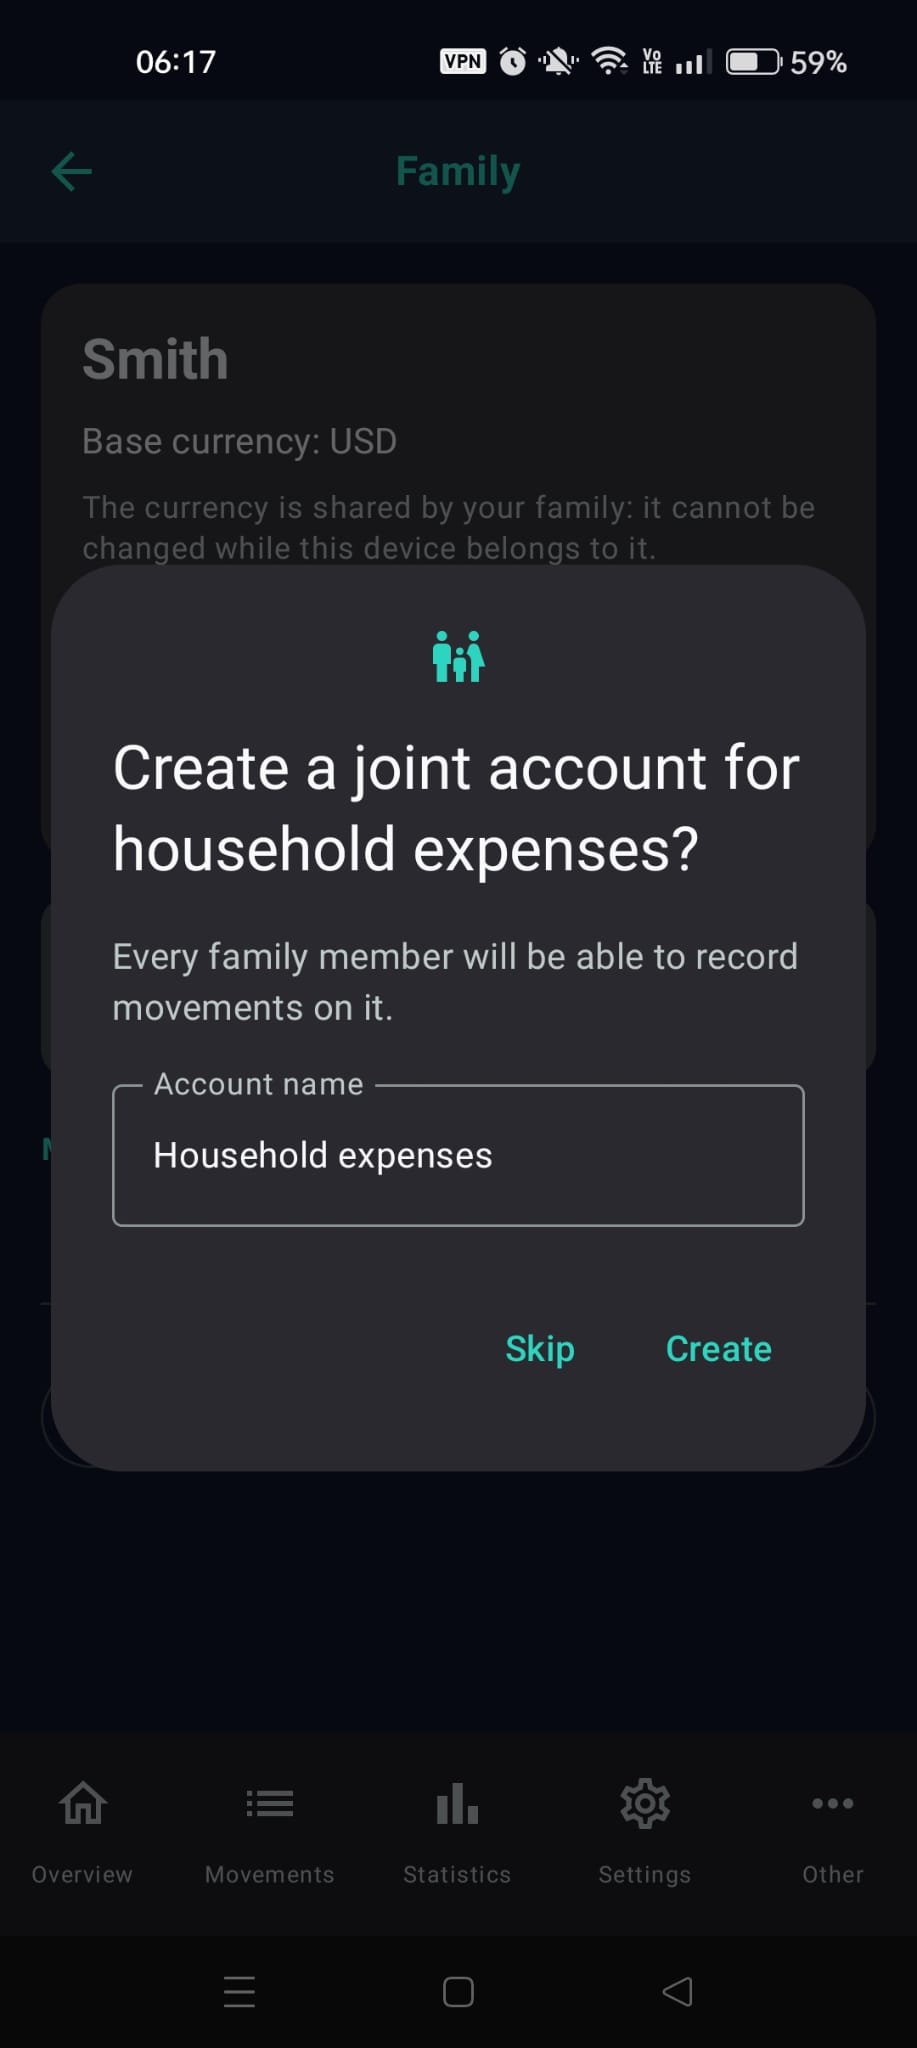
The "Create a joint account for household expenses?" dialog
📷 11.3 Inviting a member and joining
You need both phones, close to each other and on the same Wi-Fi.
On the phone of whoever invites
- Go to Settings > People & Family > Manage family.
- Tap Invite member: a QR code appears with "Expires in …". The code works only once. Keep the screen open.
On the phone of whoever joins
- Go to Settings > People & Family, tap Create or join (or the Family row, if you hid the card) and then Join family.
- Tap Scan QR and frame the code shown on the other phone.
- Check Your name and tap Join. "Waiting for approval on the other phone…" appears: keep the screen open.
Back on the phone of whoever invites
- The Join request appears: tap Allow (or Decline). If you don't answer within 2 minutes, the request is declined automatically.
- On the joining phone "You joined the family!" appears: tap Done. After the first sync, the "Which accounts do you want to share?" panel opens here too, only once.
The invite is valid for 10 minutes. Keep FamLedger in the foreground on the inviting phone: if the app goes to the background, the invite closes. If the invite has expired or closed, or the request was declined, tap New invite and repeat.
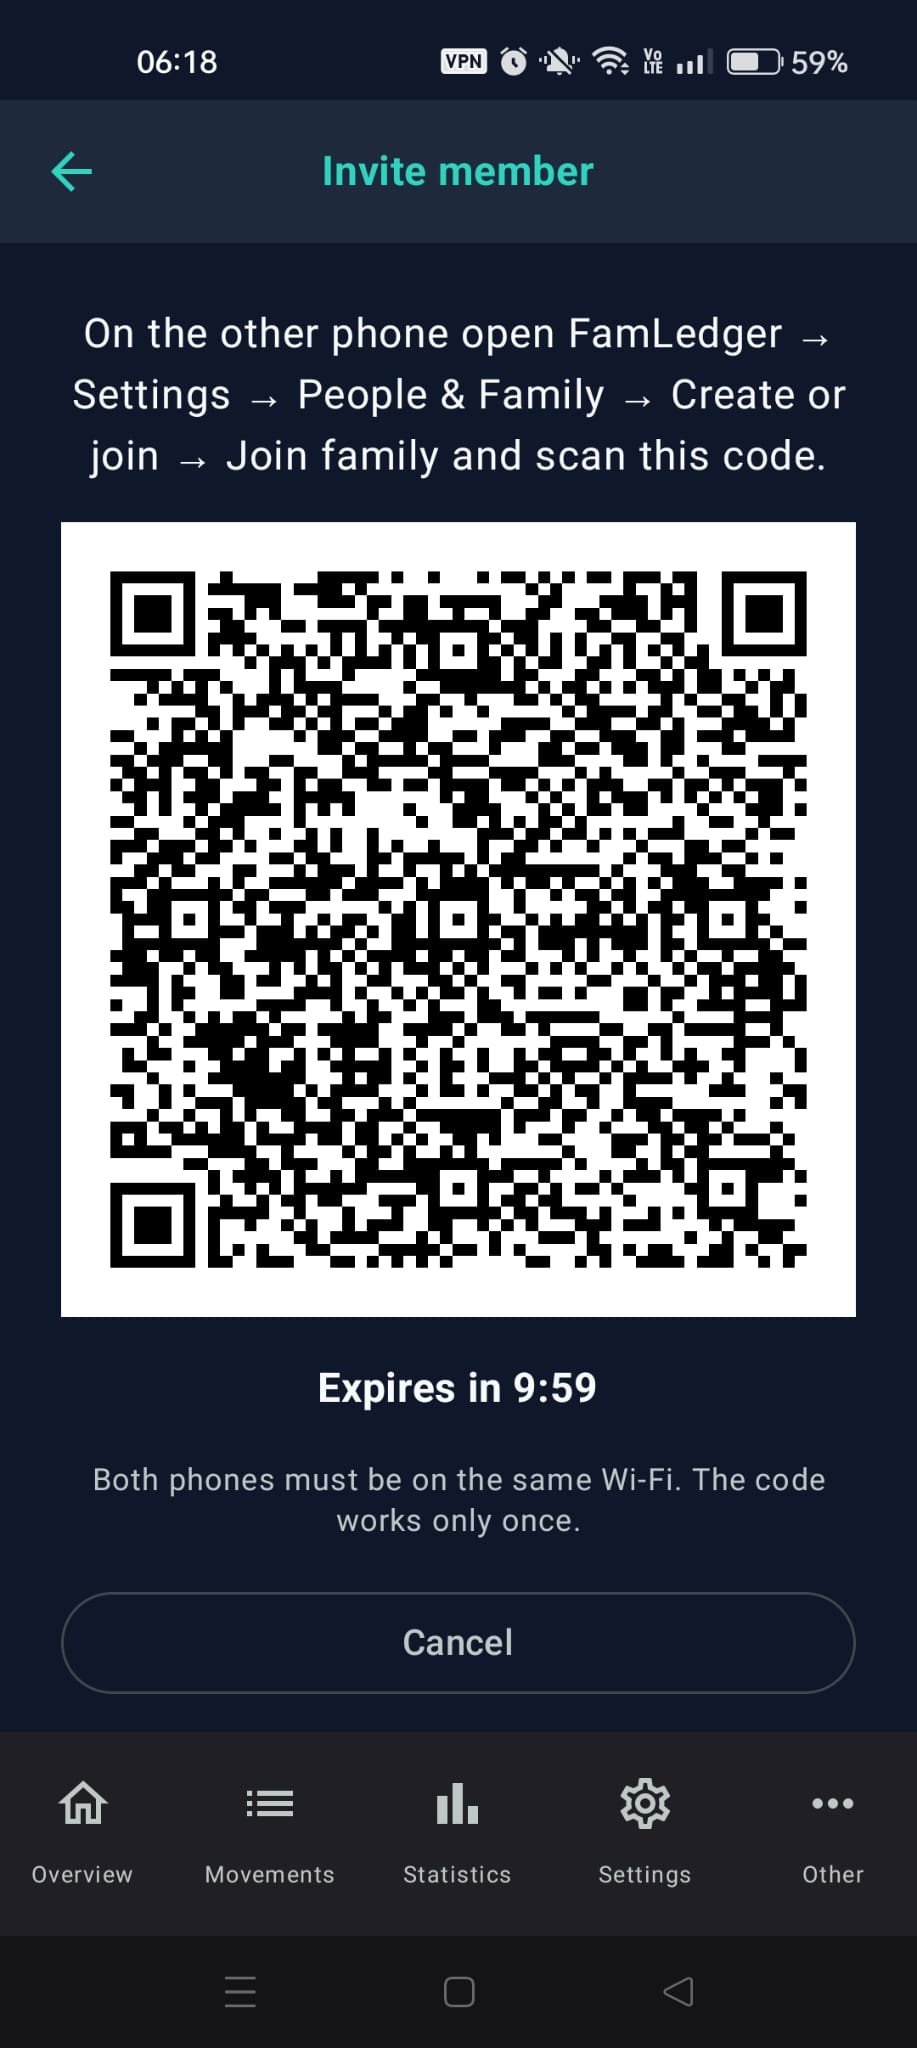
"Invite member" with the QR code and "Expires in …"
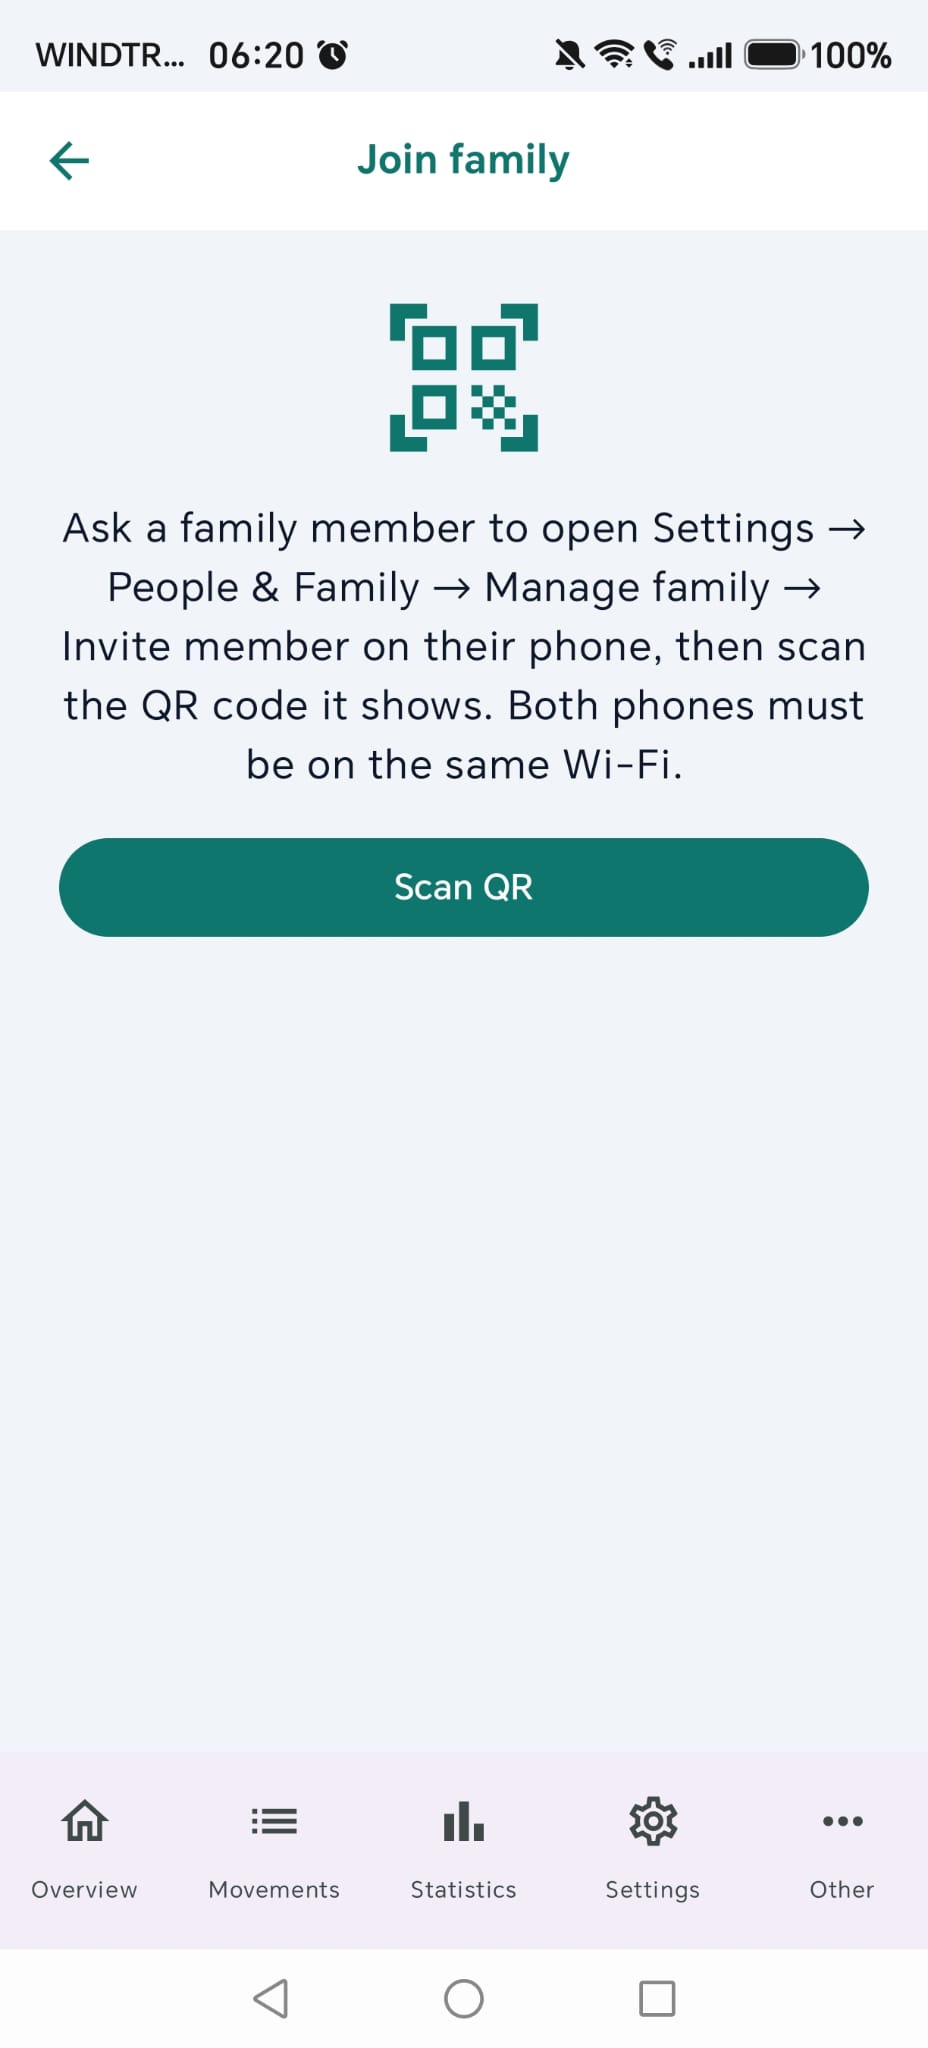
"Join family" with "Scan QR"
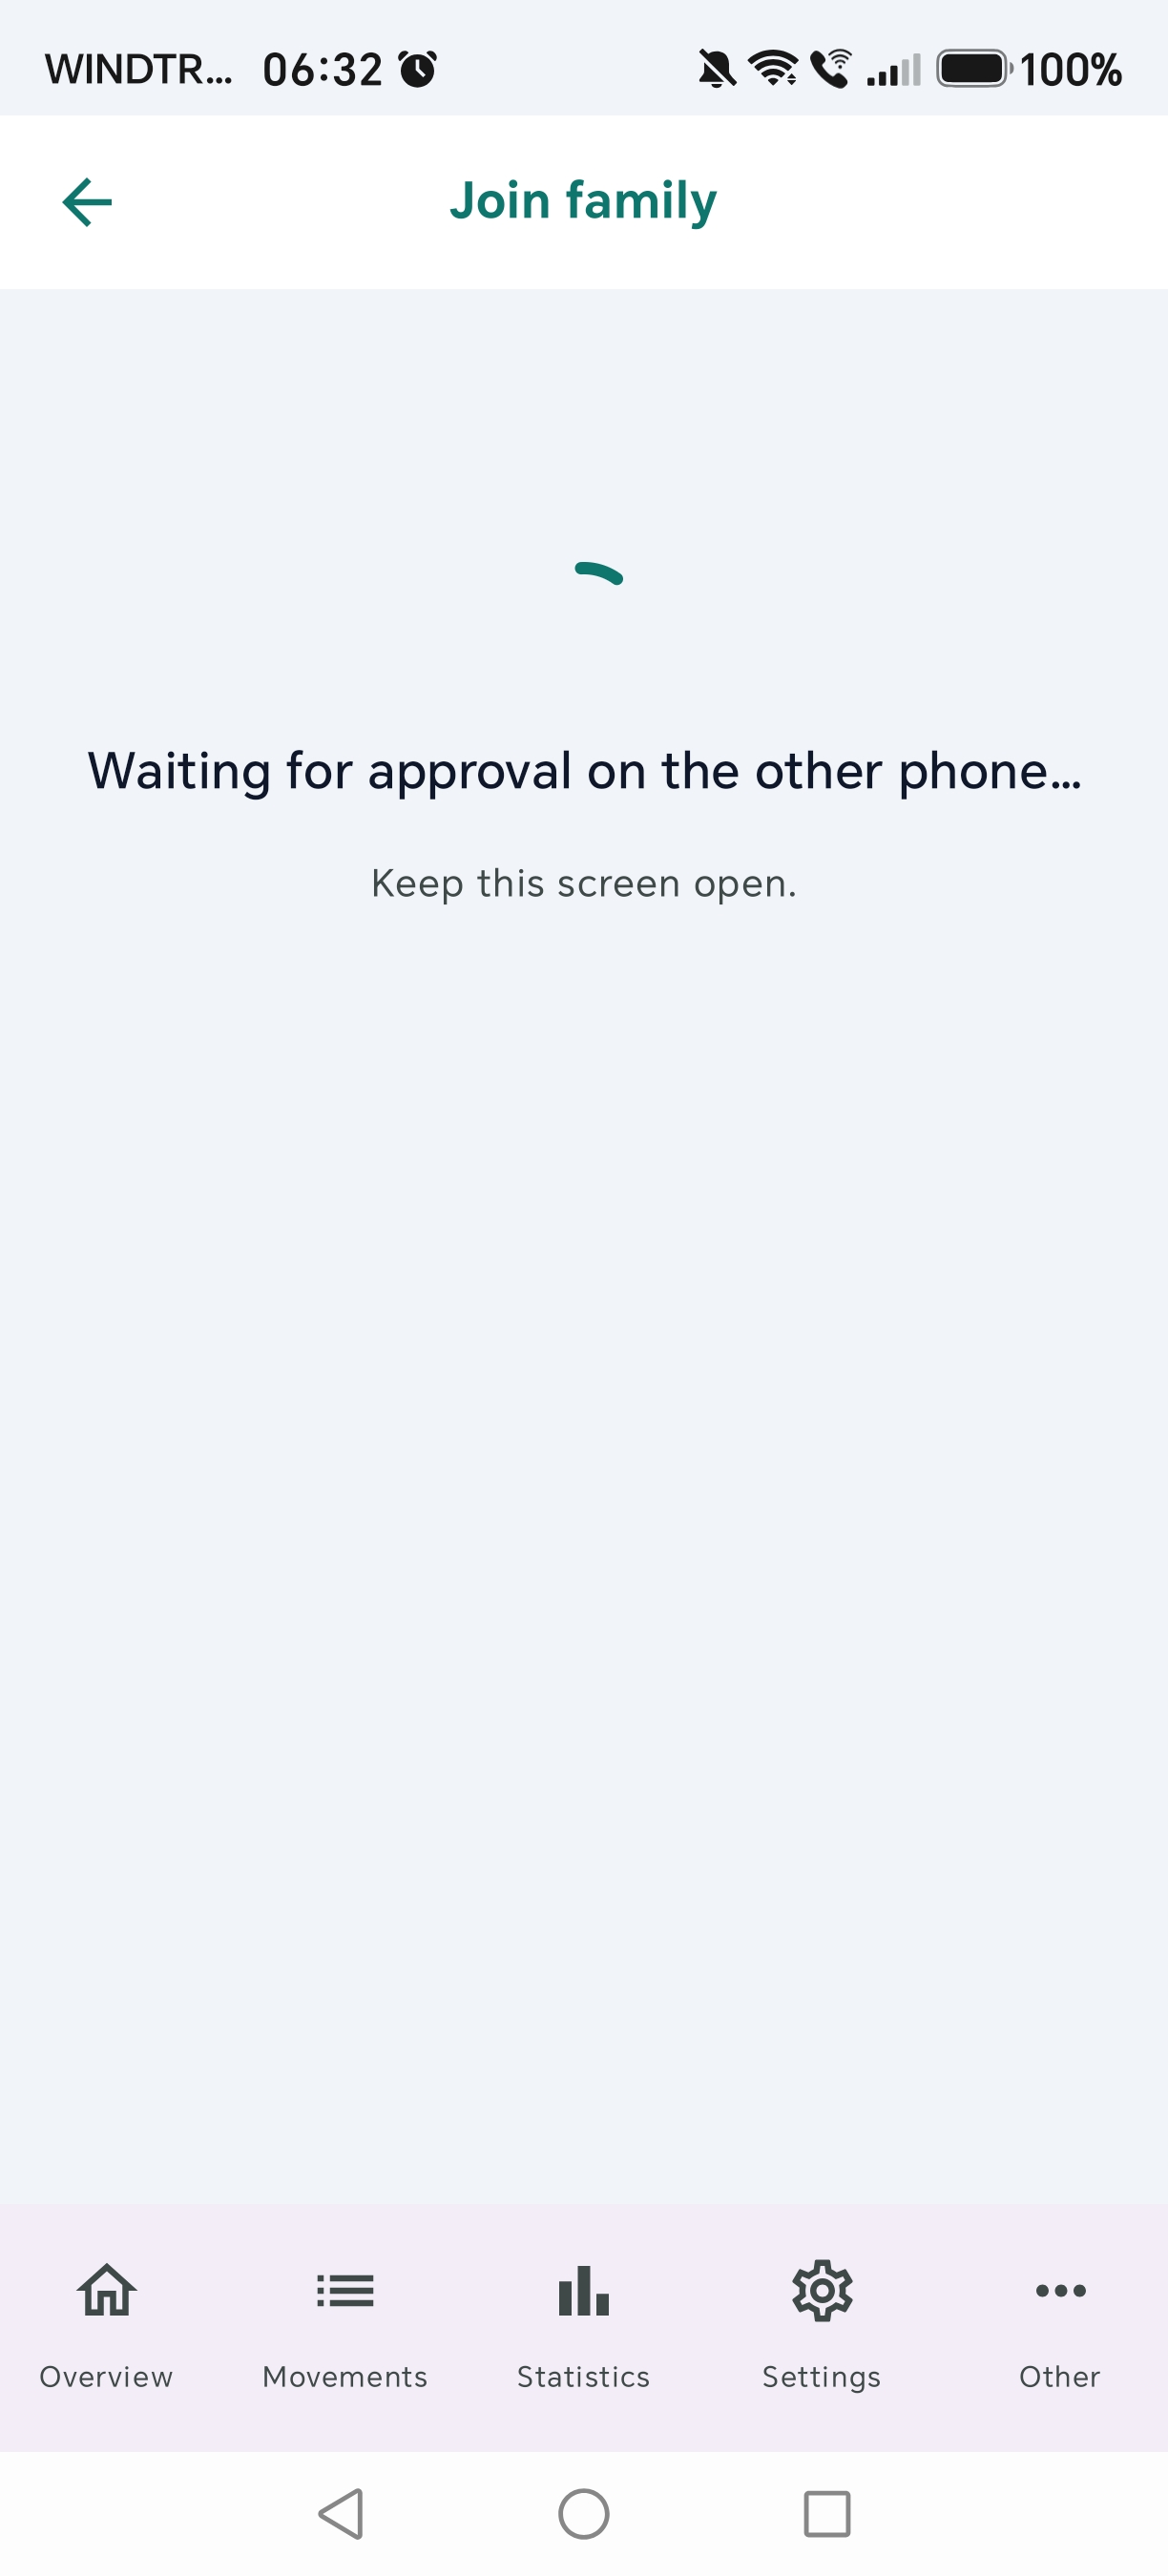
"Waiting for approval on the other phone…"
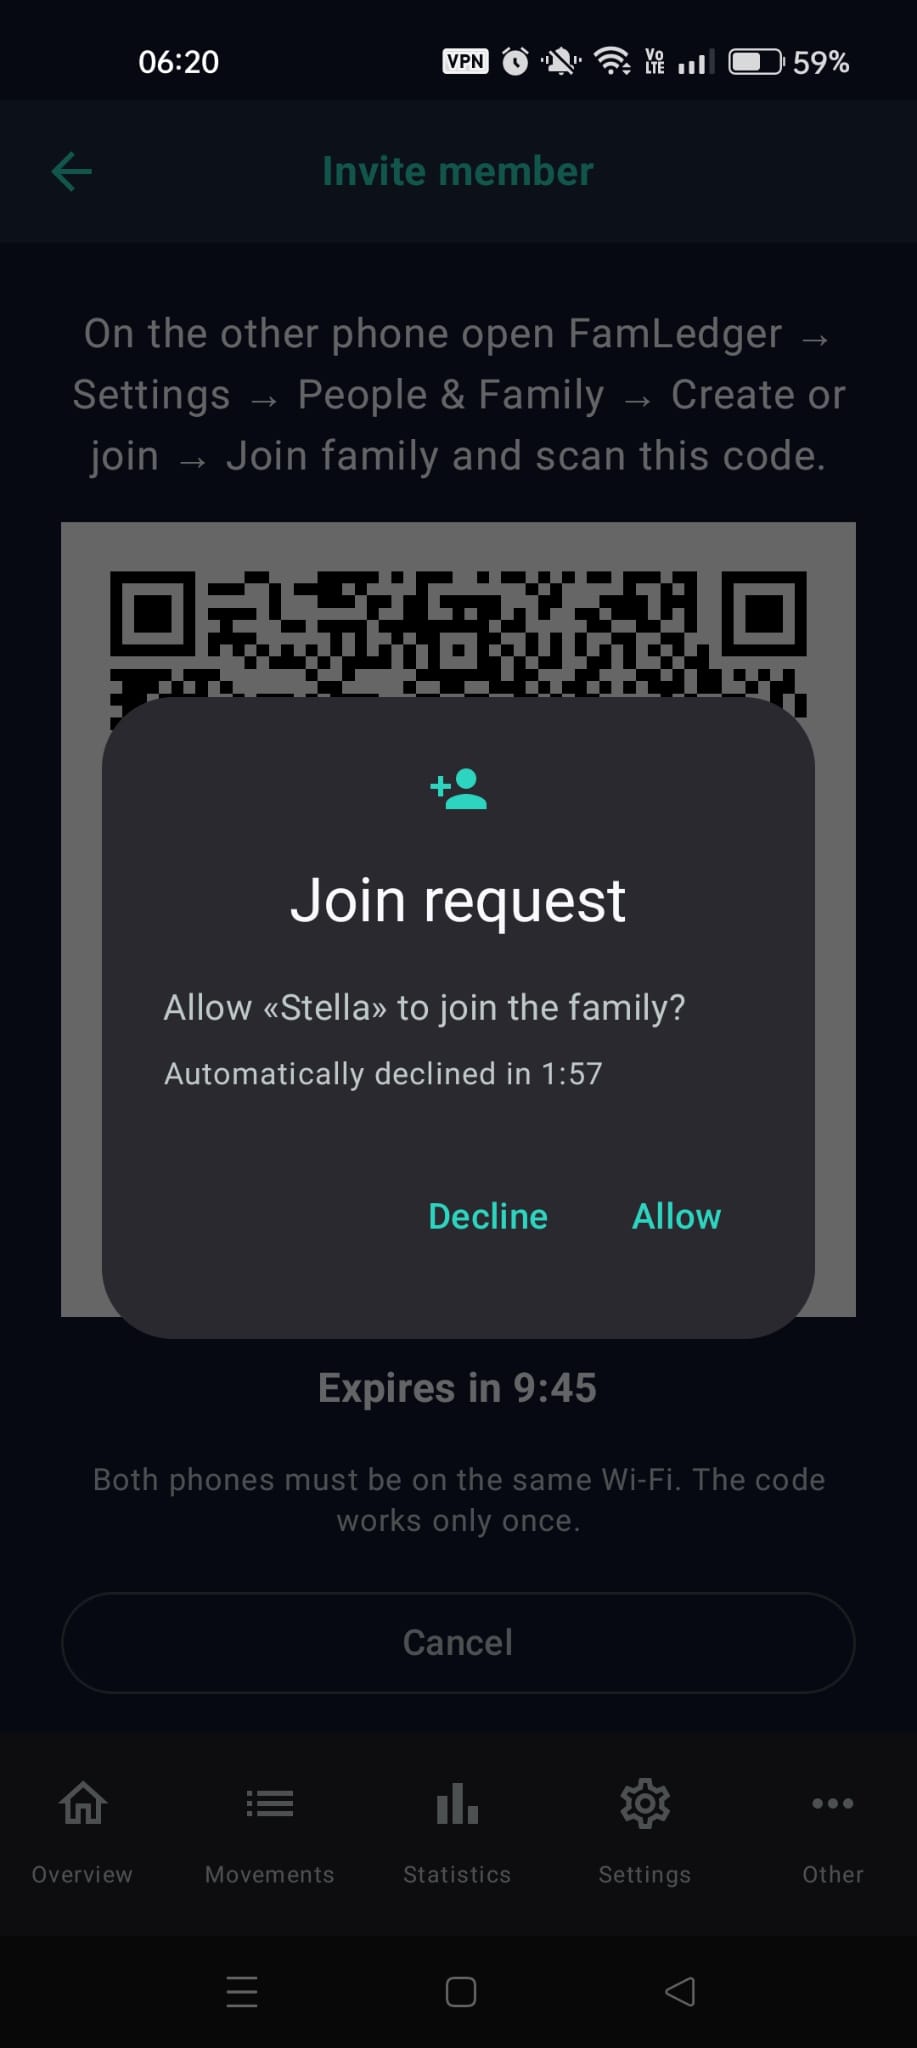
"Join request" with "Allow" and "Decline"
| If you see this message | What to do |
|---|---|
| The invite has expired or has already been used | Ask for a new QR code. |
| The QR code is not a FamLedger invite | Frame the code shown in "Invite member". |
| The family uses a different base currency | Set the family's currency in Settings, then try again. |
| This phone already belongs to a family | A phone can be in only one family at a time. |
| Couldn't reach the inviting phone | Make sure both phones are on the same Wi-Fi and the invite is still open. |
| The invite comes from a different app version | Update the app on both phones. |
👥 11.4 People & Family: members and guests
After creating the family, People & Family is split into two groups:
- Family: the list of members (your phone is marked "This phone"), with the Sync now, Who owes whom and Manage family buttons.
- Friends & others: the guests, that is, people who don't use FamLedger with you. You add them from the New person field.
Guests stay only on the phone that created them. If you split an expense on a shared account with a guest, the app tells you: "… is a guest: the family will only see "Others"". The other members see the share, but not the name.
If you had already added a person who then joined the family, you can merge the two with Link to a family member, which you find in Sync now > Edit, in the People section: their debts will be shown under that member in "Who owes whom", on every phone. The app also suggests it by itself in the sync panel ("Is … on FamLedger?"). When it links a person automatically, the app tells you with a message ("Linked … to …") that has an Undo button.
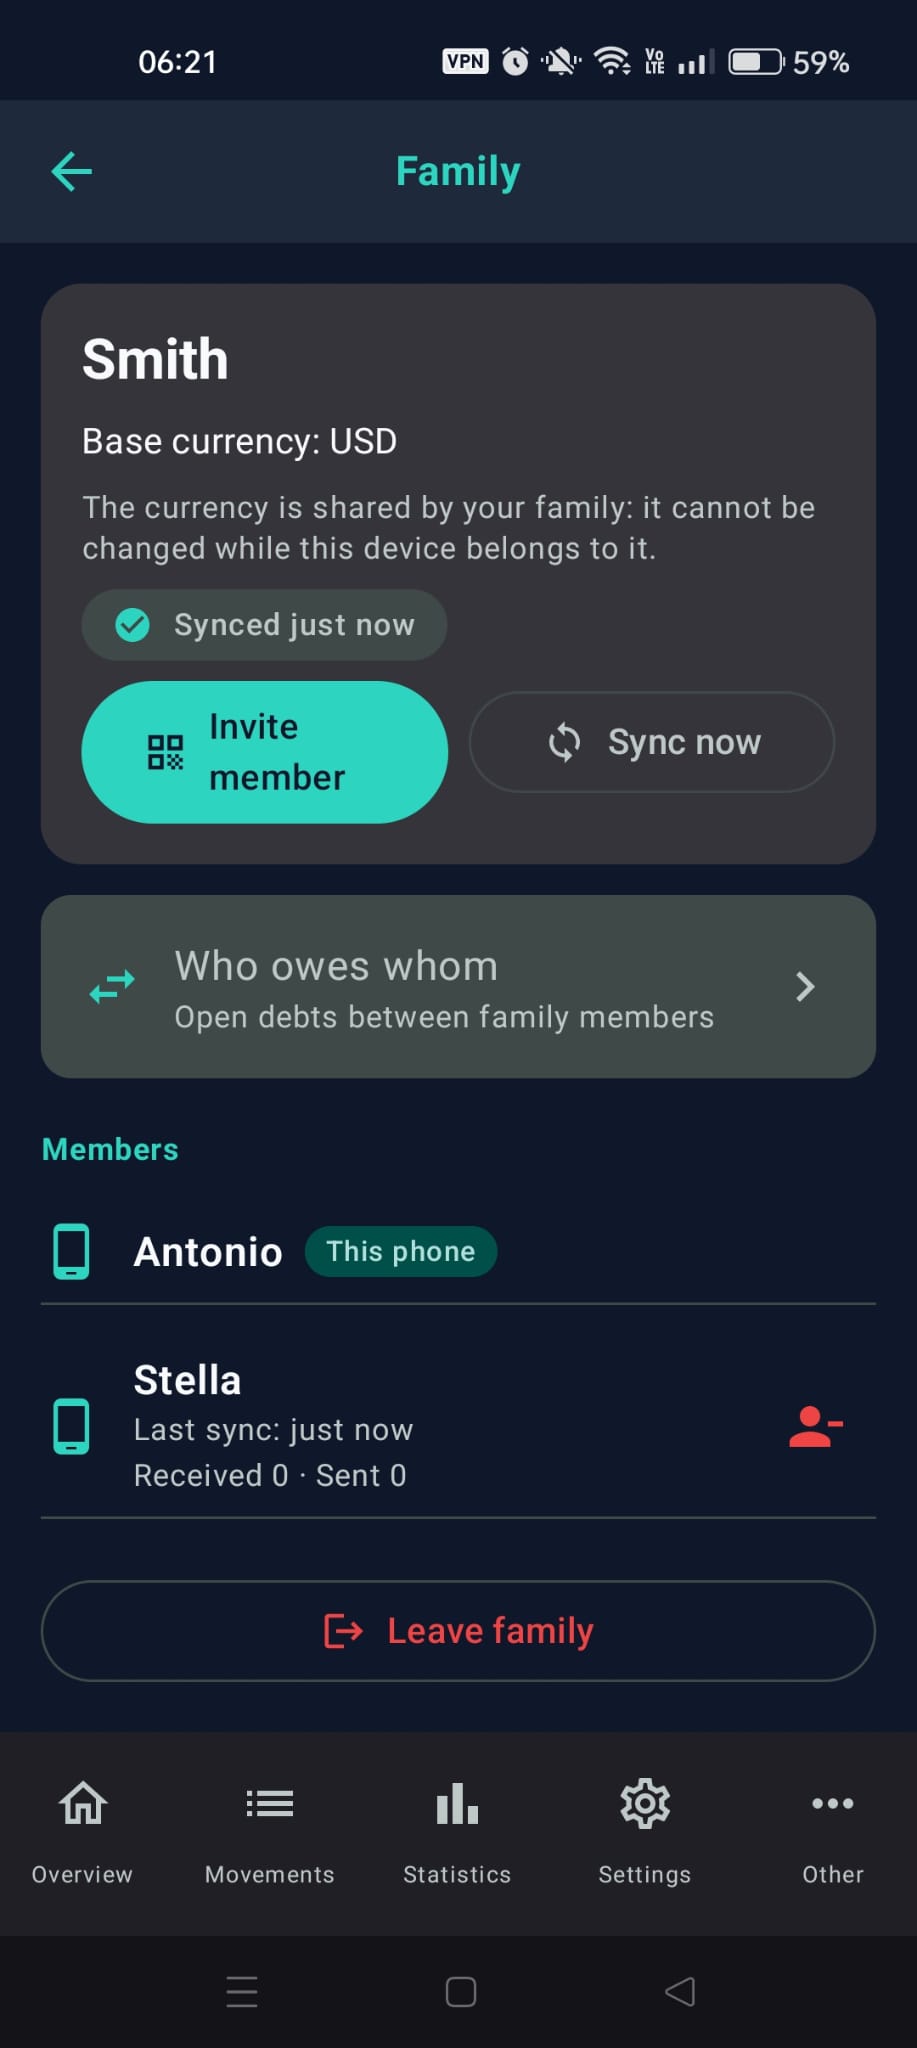
The Family screen with the two members, "This phone" and "Last sync"
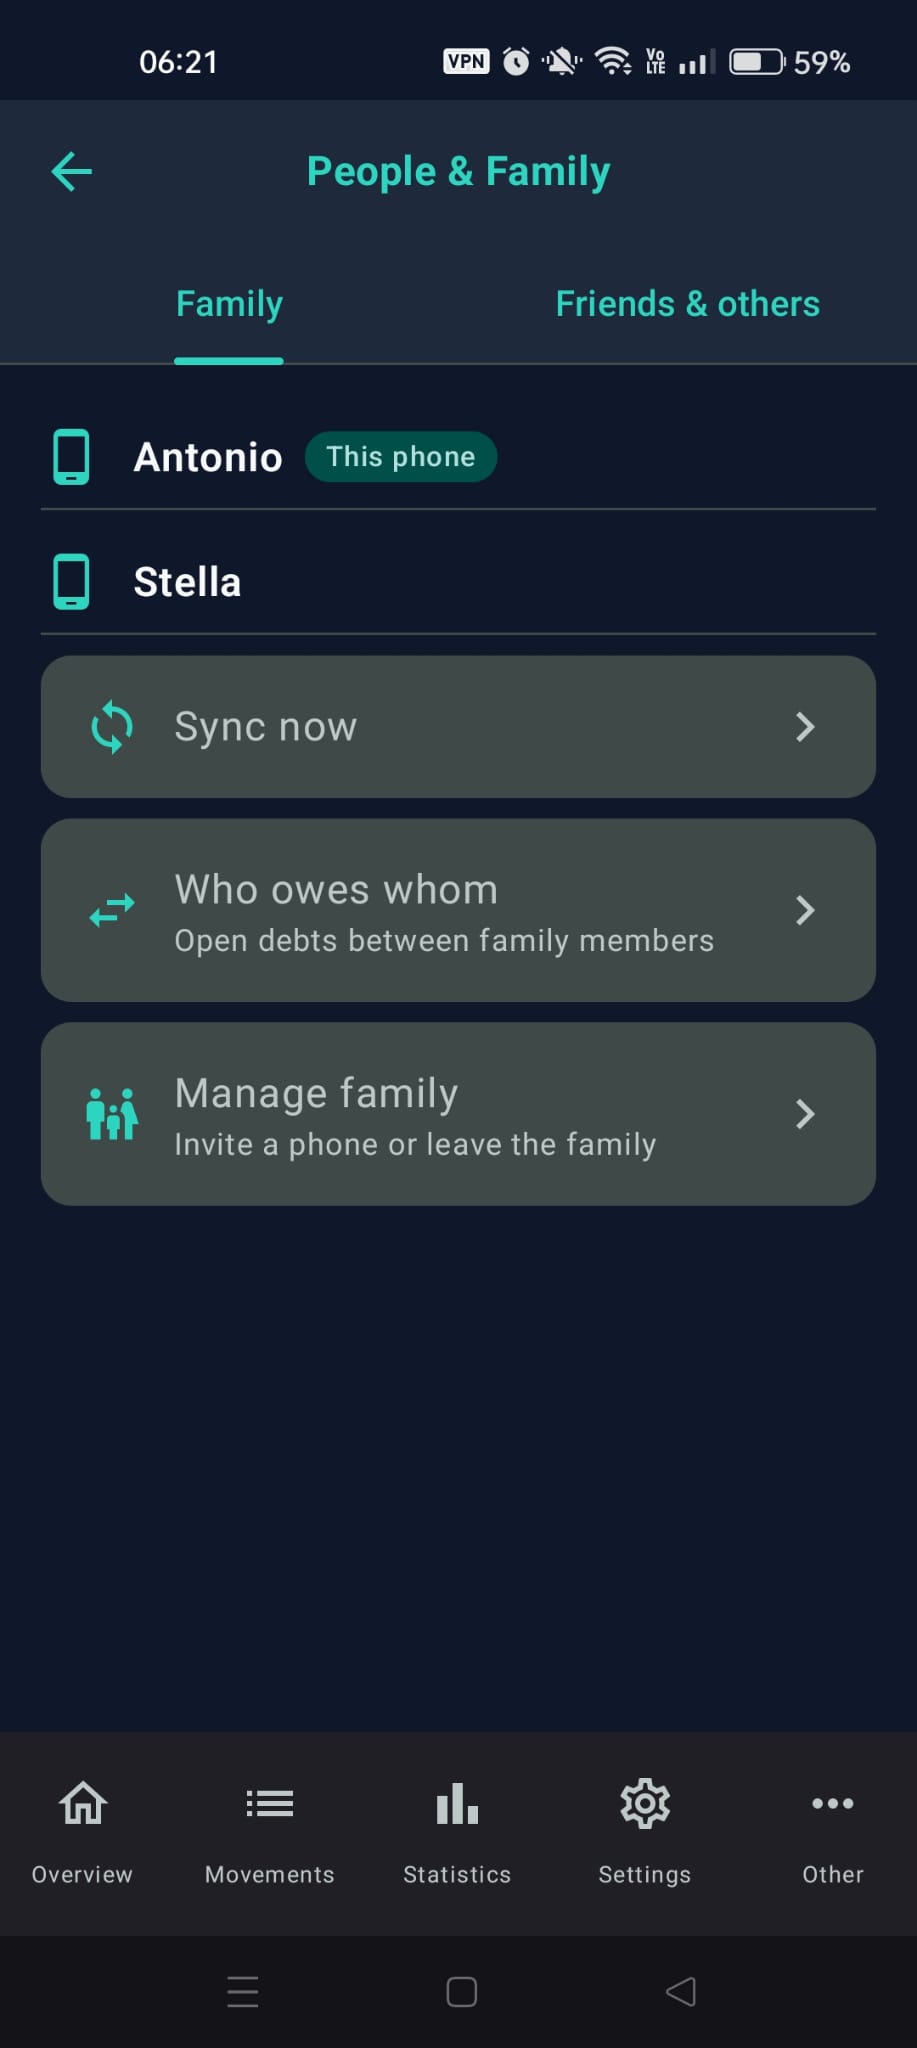
People & Family with the "Family" and "Friends & others" groups
🤝 11.5 Sharing an account
Joining a family does not share anything automatically: you decide, account by account. When you create a new account in Settings > Manage accounts, the Sharing field offers:
- Personal: the account stays on your phone only.
- Family, in two ways:
- Visible to the family: only you record transactions on it; the others can see it. On their phone it shows "View only".
- Joint account: every family member can record transactions on it. It is the right account for household expenses.
An account you already have is shared from the sync panel: in Settings > People & Family tap Sync now, then Edit and, in the What section, tick the account. The app asks "Also share past transactions?". With Yes, share them the family also receives the history; with Only from now on it receives only new transactions. Tap Sync to save your choice. (The Sync button on the Overview row, instead, starts syncing right away and does not open the panel.)
In What an account may show "Was the joint account": it was the family's joint account. Tick it to share it again, instead of creating a new one.
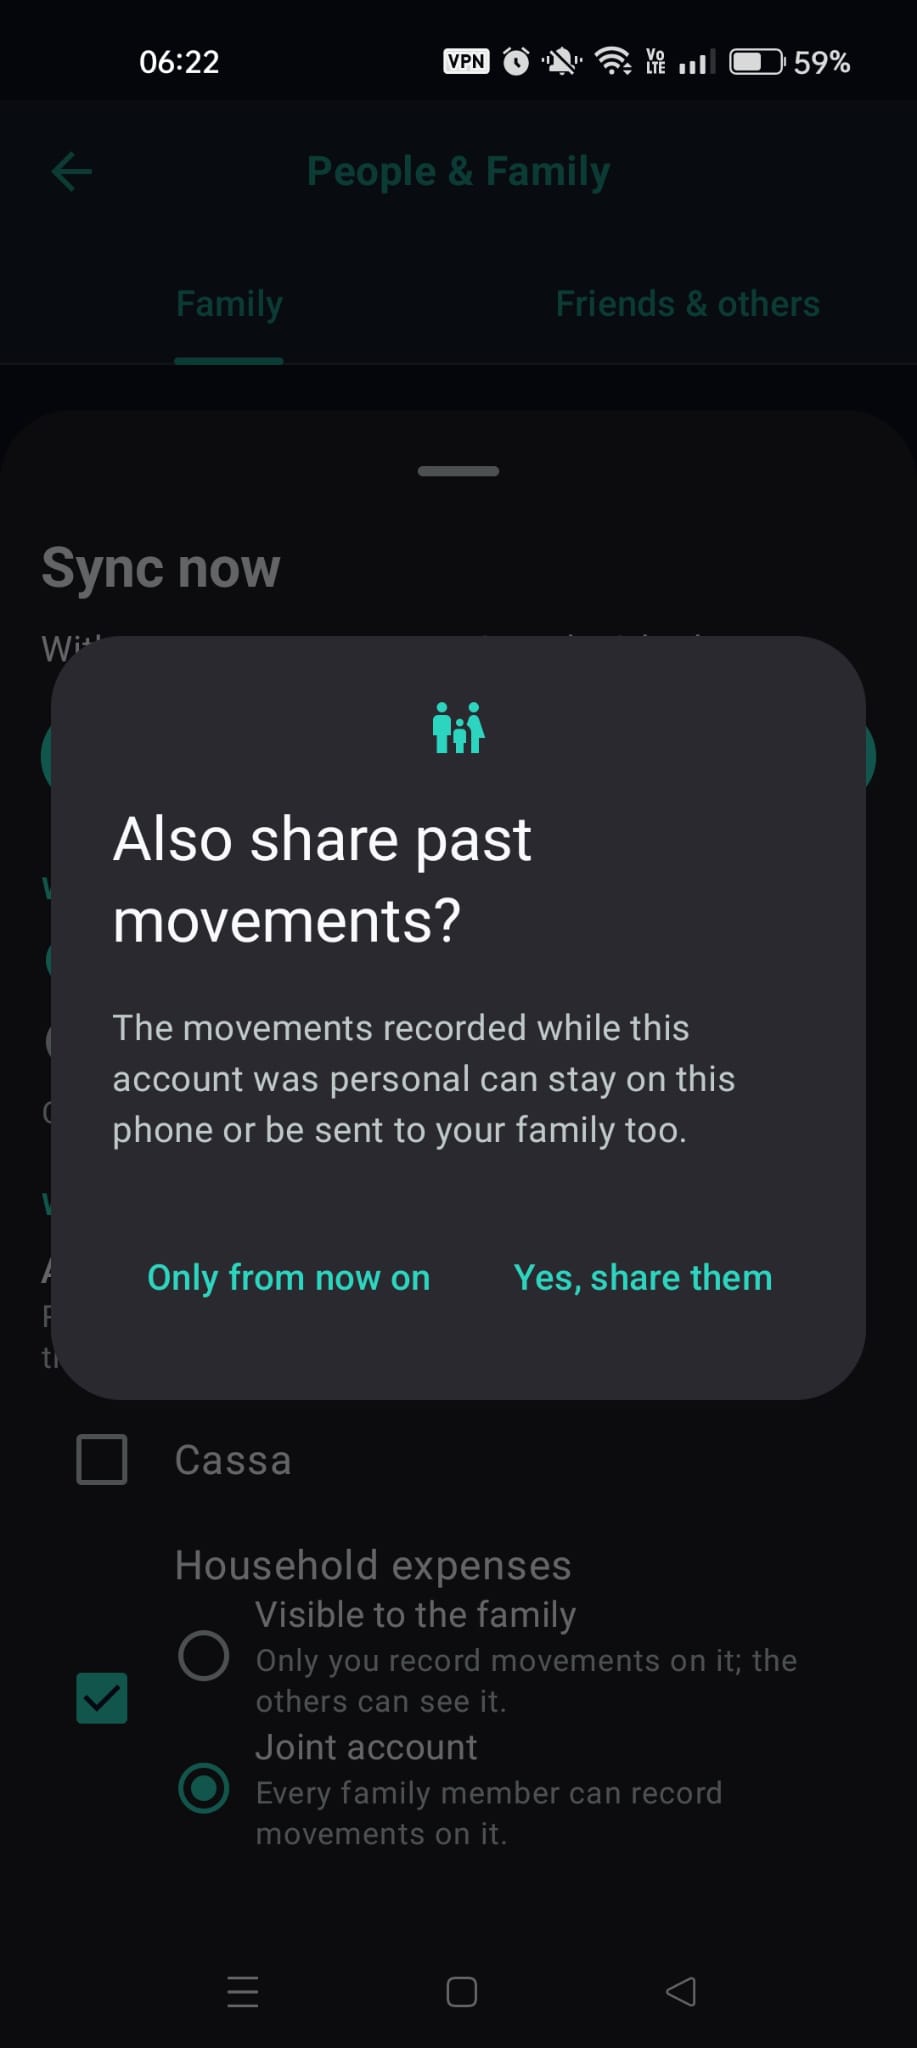
The "Also share past transactions?" dialog
In Overview, accounts are grouped into My accounts, Shared with the family and Other people's.
Expenses on a joint account
On a joint account the money is already the family's: an expense does not create debts between members. If you turn on Shared expense, you can split it only with guests.
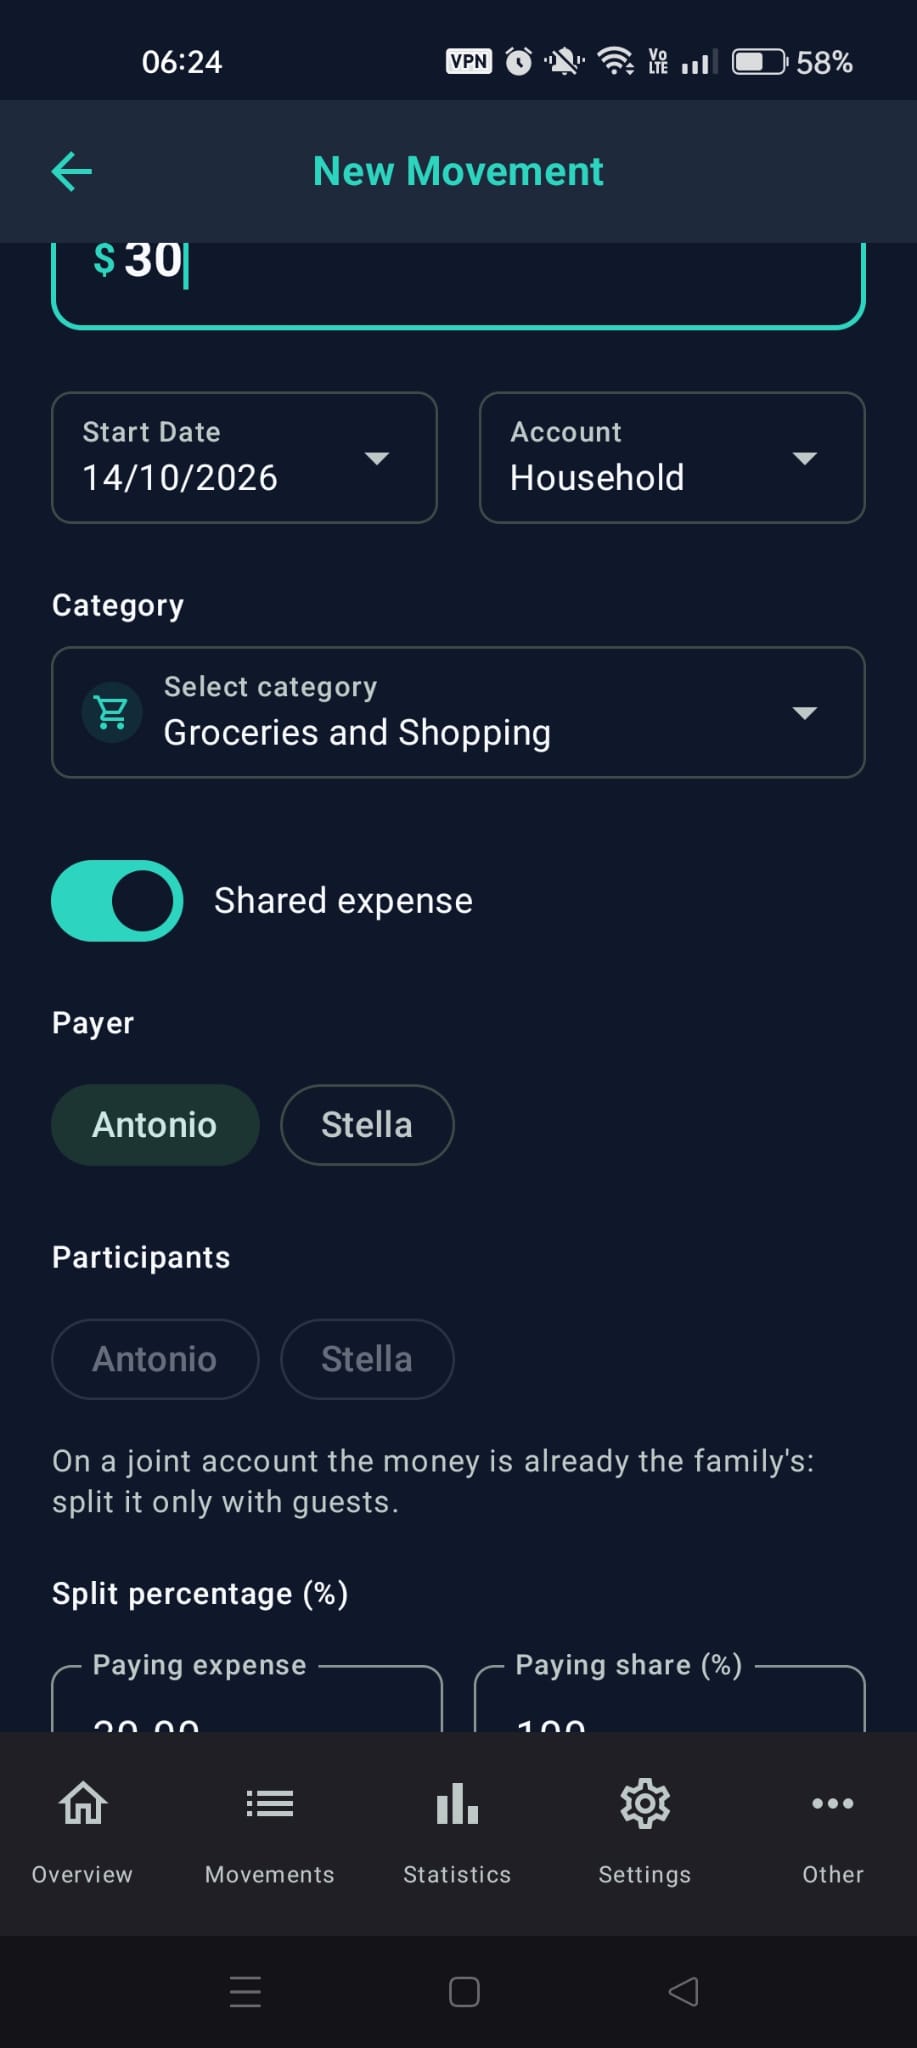
A transaction on the joint account with "Shared expense" on, "Payer" and the note "split it only with guests"
Stopping sharing
Only the owner can stop sharing an account. In Settings > People & Family tap Sync now, then Edit, untick the account in What, confirm with Stop sharing and tap Sync. (The Sharing field in Manage accounts is there only for new accounts.) From then on changes are no longer sent; the data already sent stays on your family's phones. On the others' phones the account shows as No longer shared, is no longer counted in any total, and whoever had received it can remove it with Remove from this phone. The button is there only for an account received from another member and no longer shared. First any open debts linked to that account must be settled and your own transactions not yet sent must be synced; then the app asks for confirmation and reminds you that the account and its transactions are removed from your phone only, while nothing changes on the owner's phone.
🔄 11.6 Syncing
With the app open and visible on both phones, FamLedger syncs by itself: a few seconds after opening (about 20) and about a minute after your last change. There is no periodic background sync. You can still start it whenever you want.
The row in Overview
In Overview, anyone in a family sees a row that says where sync stands (for example "Last sync with …") and, when needed, a button. The row itself cannot be tapped: use the button.
- Sync and Retry: start a sync with everyone right away, without opening the panel.
- Choose (there are choices to complete): opens the "Sync now" panel already in edit mode.
- Fix (there are transfers to fix): opens the Sync notices.
- Invite: opens Manage family, where you find Invite member.
- Allow (the local network access permission is missing): opens the app's settings on the phone.
The sync icon in the top bar of Overview opens Manage family.
The "Sync now" panel
- Tap Sync now in People & Family (or in Manage family): the panel opens with a summary ("With everyone · …"). Tap Sync to start, or Edit to choose With whom and What. On the Overview row, instead, the Sync button starts a sync with everyone right away, and Choose opens the panel already in edit mode.
- In With whom choose Everyone or a single person (choosing a single person applies to that one time only).
- In What you see the shared accounts, goals and budgets. Here you can also decide to share a new account. An account's recurrences and investments travel with it.
- Tap Sync and wait for the Result: for each member you read "ok" or the reason for the problem, with Retry.
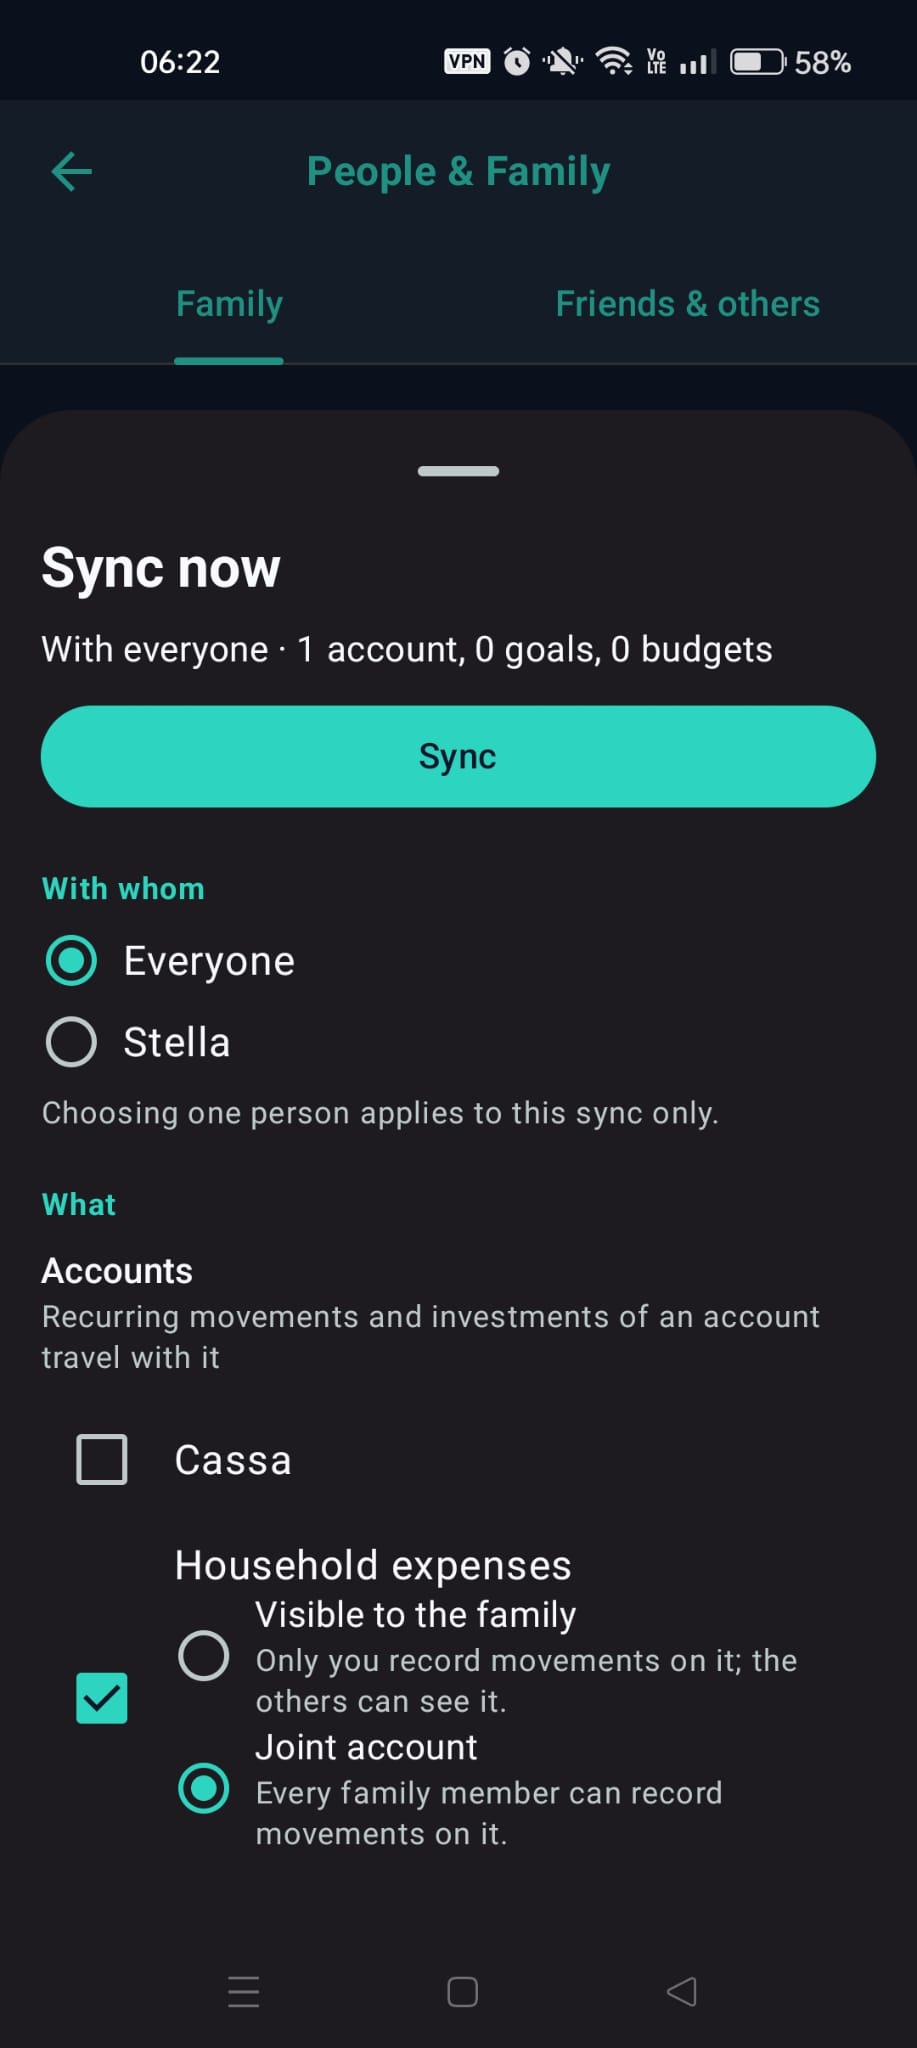
The "Sync now" panel with "With whom" and "What"
💶 11.7 Who owes whom
When a member pays an expense and splits it with another member (with Shared expense, as in Chapter 5), the debt appears on both phones. You find it in People & Family > Who owes whom and in the Debt situation in Overview.
For each pair of members the app shows the net balance: if you owe €40 and the other owes you €15, you see "You owe … €25.00", with the single expenses listed below.
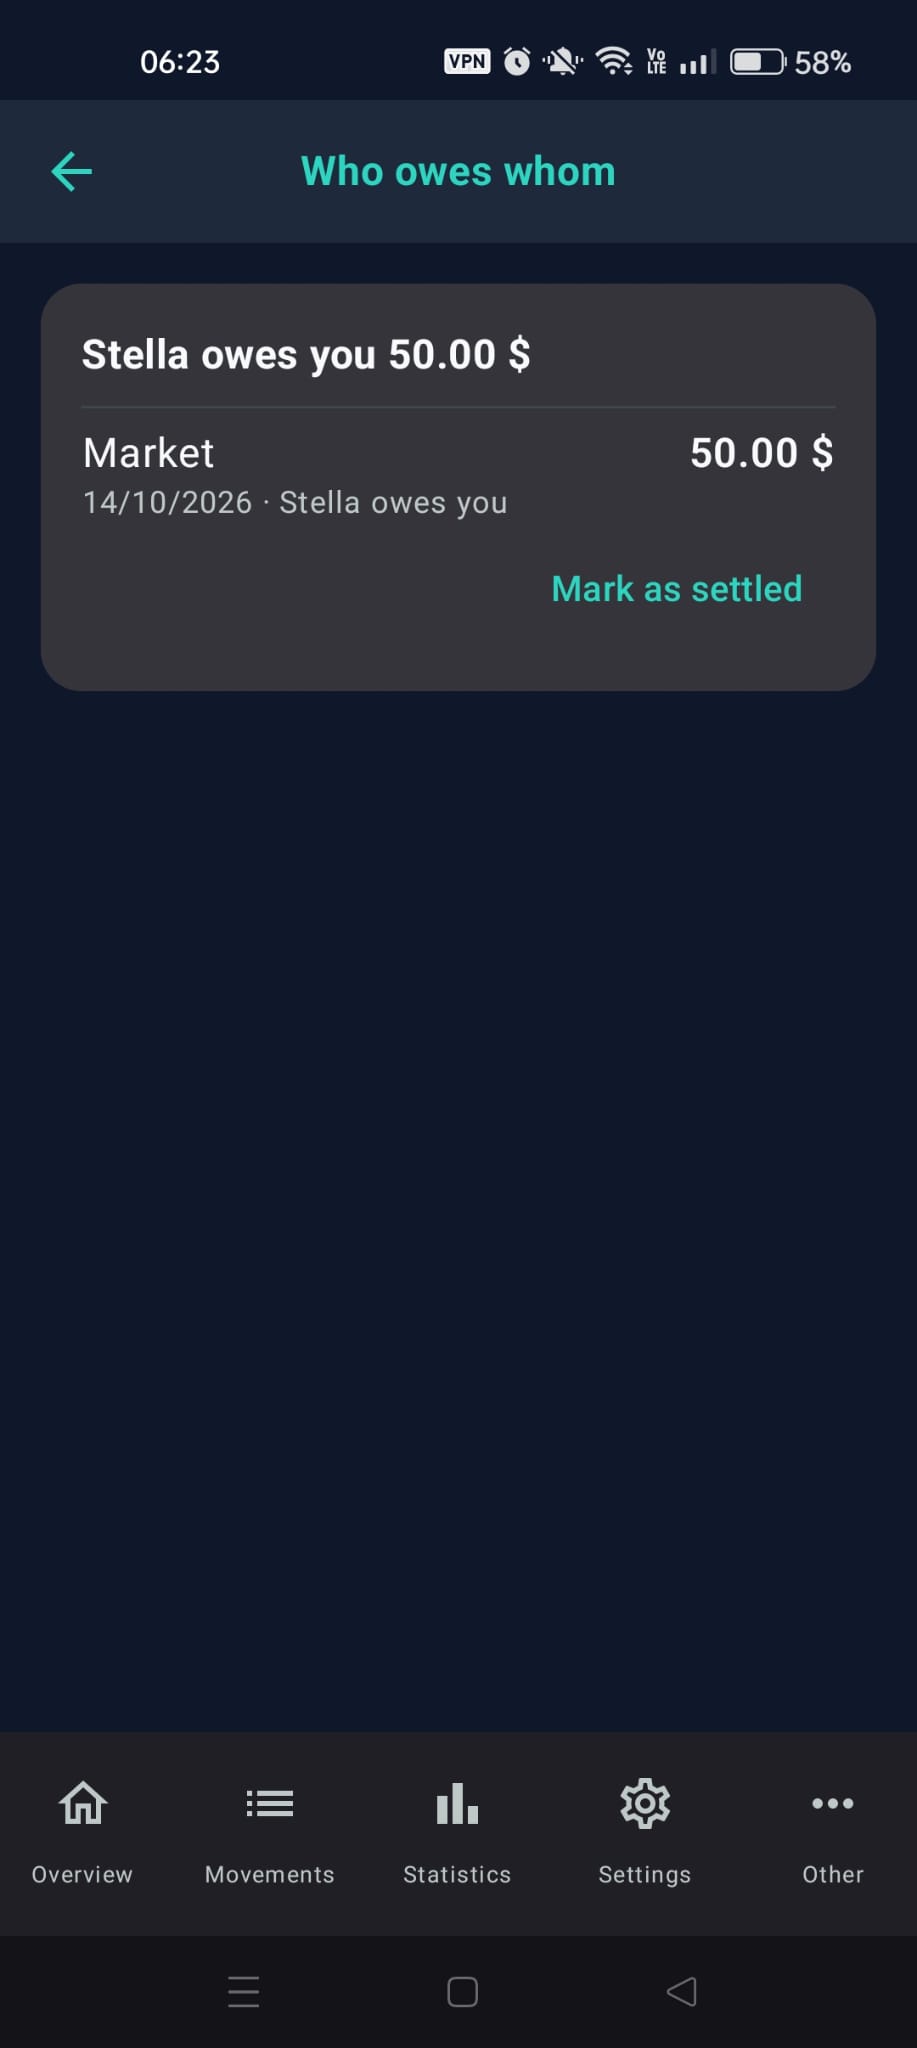
"Who owes whom" with an open debt
How a debt is closed
The rule is simple: expenses are recorded by whoever paid, and whoever receives the money confirms.
- Whoever owes the money, after paying, taps I already paid (or I already paid everything), chooses which account they paid from (or Don't record it, if they do not want a transaction created) and taps Send. The row becomes "Marked as paid on … · awaiting confirmation". If they made a mistake, they can tap Cancel notice.
- Whoever is to receive it, after syncing, reads "… says they paid you …" and answers:
- Mark as settled: they choose which account they received the money on ("Which account do you receive it on?") and tap Mark as settled. If in the list they choose Don't record it instead of an account, they close the debt without creating a transaction.
- Not received yet: the debt stays open and the other person is told.
- The debt moves to Settled in the last 90 days on both phones.
In all these windows Don't record it is one of the choices in the list, together with the accounts: the confirm button turns on only after you choose an account or Don't record it.
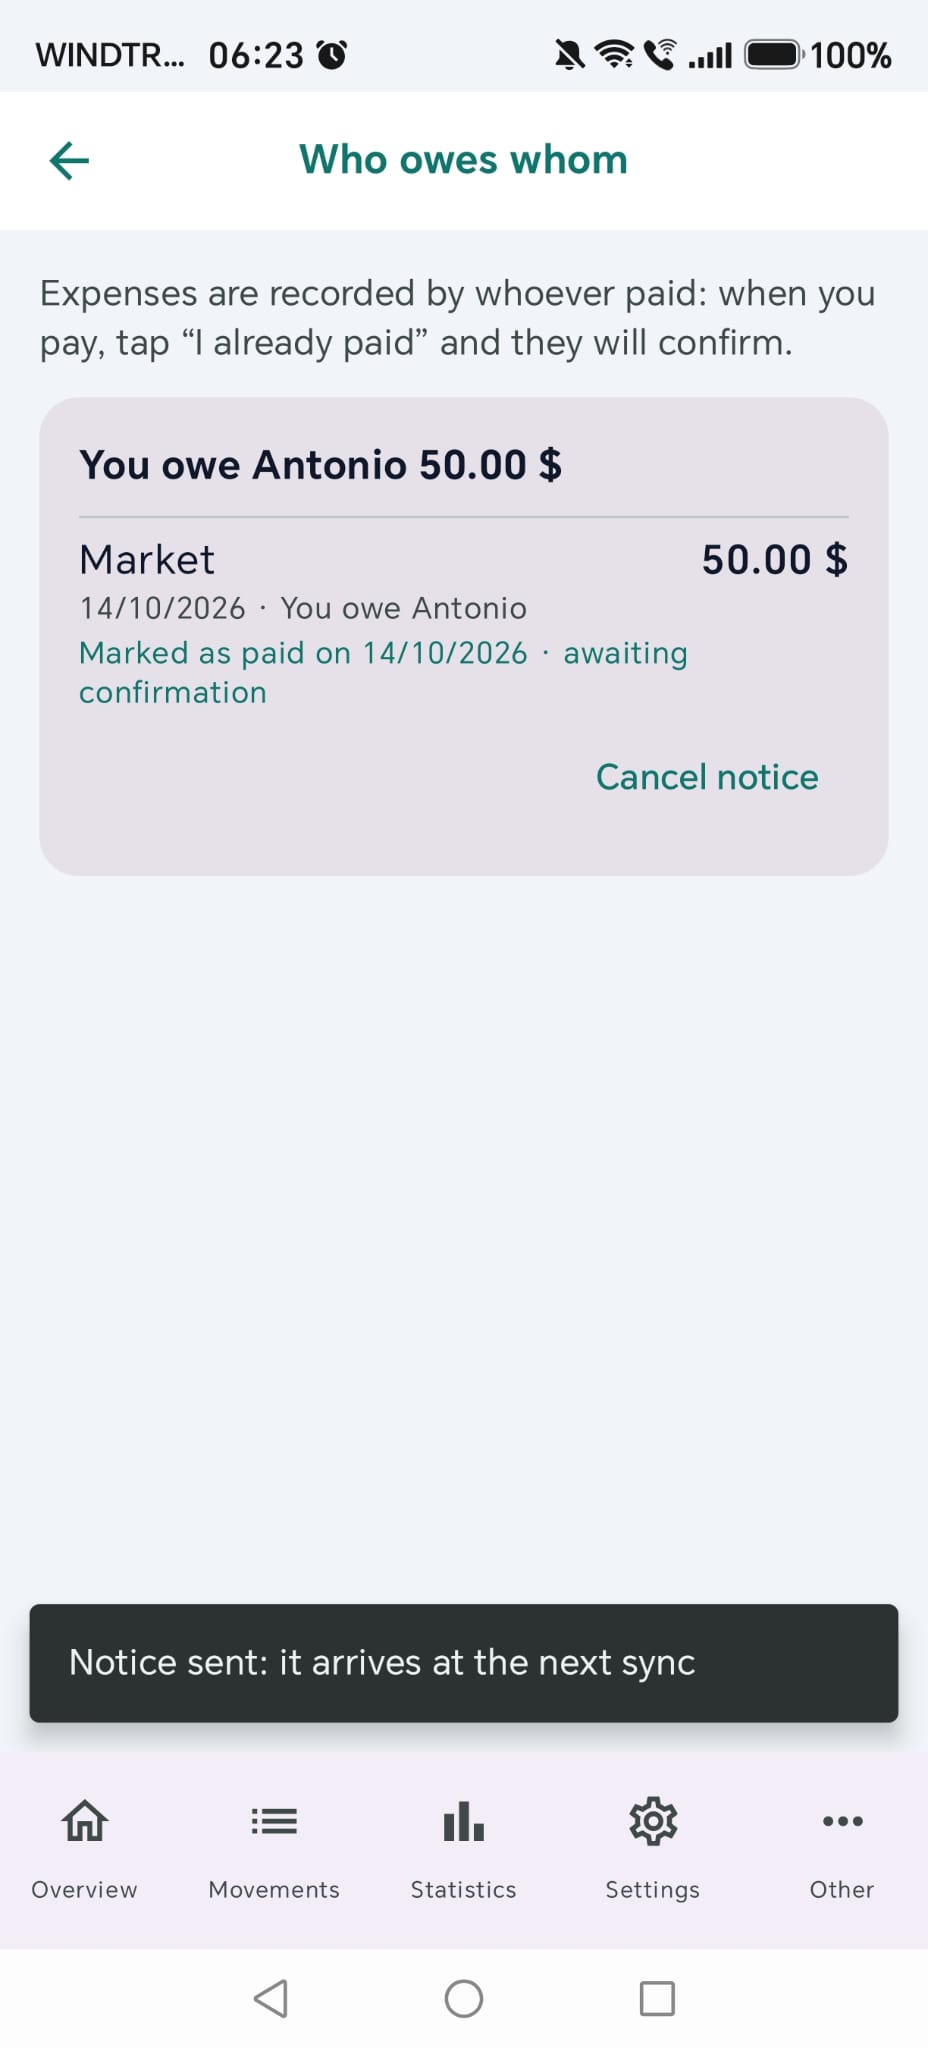
On the side of who owes: after "I already paid" the row becomes "Marked as paid on … · awaiting confirmation"
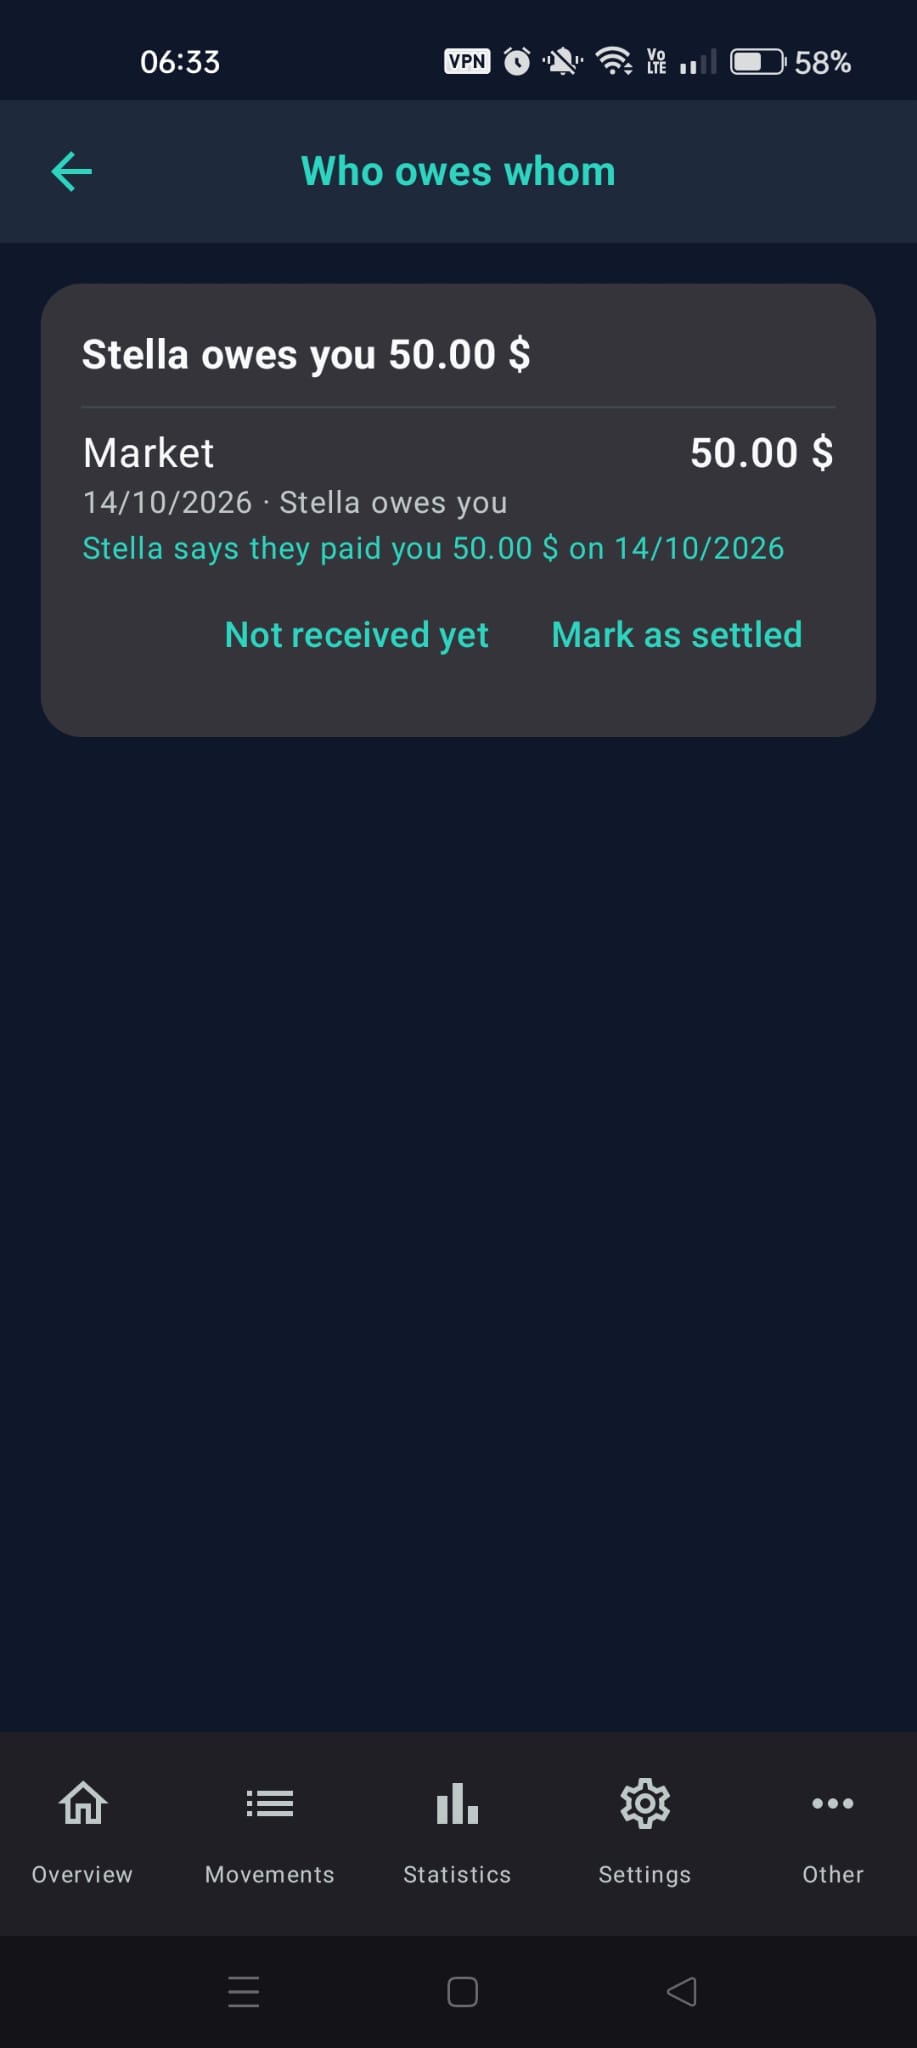
"Stella says they paid you" with the two answers "Not received yet" and "Mark as settled"
If the receiver settles first
Whoever is to receive the money can tap Mark as settled without waiting for the notice. In that case whoever owed the money finds, in Overview and on the transaction's row, the Record your payment reminder: they choose which account they paid from, or Don't record it, and tap Record. The reminder appears only once.
Some debts others owe you are stored on the other member's phone (for example, they entered the expense you paid): your phone cannot close them by itself. For those, the person's card shows Confirm you received, with the amount. Tap it after you have received the money: the other phone will mark the debts as settled at the next sync. For debts stored on your own phone, Mark as settled remains; both buttons can appear in the same card.
↔️ 11.8 Transfers with a joint account
When you move money from your personal account to a joint account, the transfer has two halves: the one on your personal account, which exists only on your phone, and the one on the joint account, which all members see and can edit.
If another member edits or deletes the half on the joint account, the app warns them ("Transfer with another member"): your half stays as it is, because FamLedger never changes a transaction on your personal account by itself. You decide.
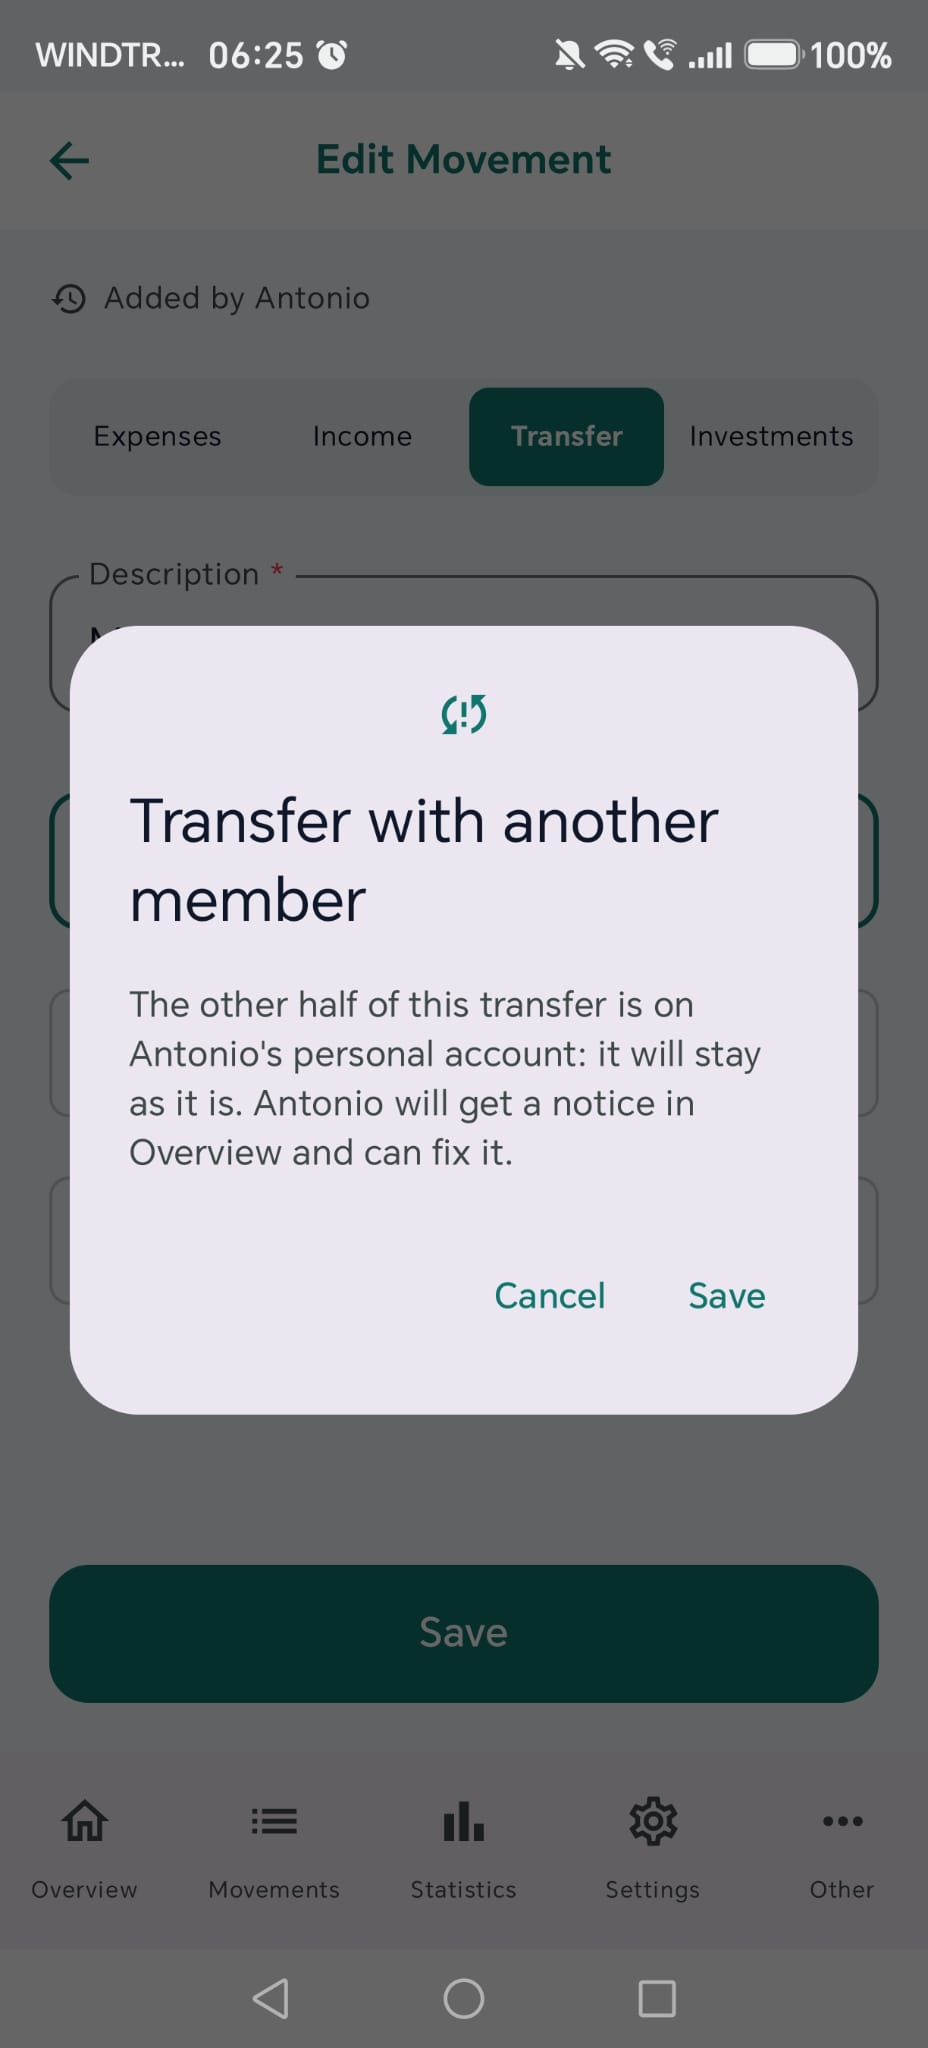
The "Transfer with another member" dialog seen by whoever edits the half on the joint account
How to fix your half
After syncing, the app tells you in two places:
- In Overview, the sync row shows "1 transfer to fix" with the Fix button, which opens the notices.
- In Transactions, the row of your half shows Transfer to fix with the Fix button. (Available from version 1.2.4.)
When you tap Fix the app explains what will happen and offers the right correction:
- Align my half: your half takes the amount and date of the other half.
- Delete my half: if the other half no longer exists, yours is deleted too.
After the correction the notice disappears from every screen. Two halves with the same amount on the same day are considered equal: no notice appears.
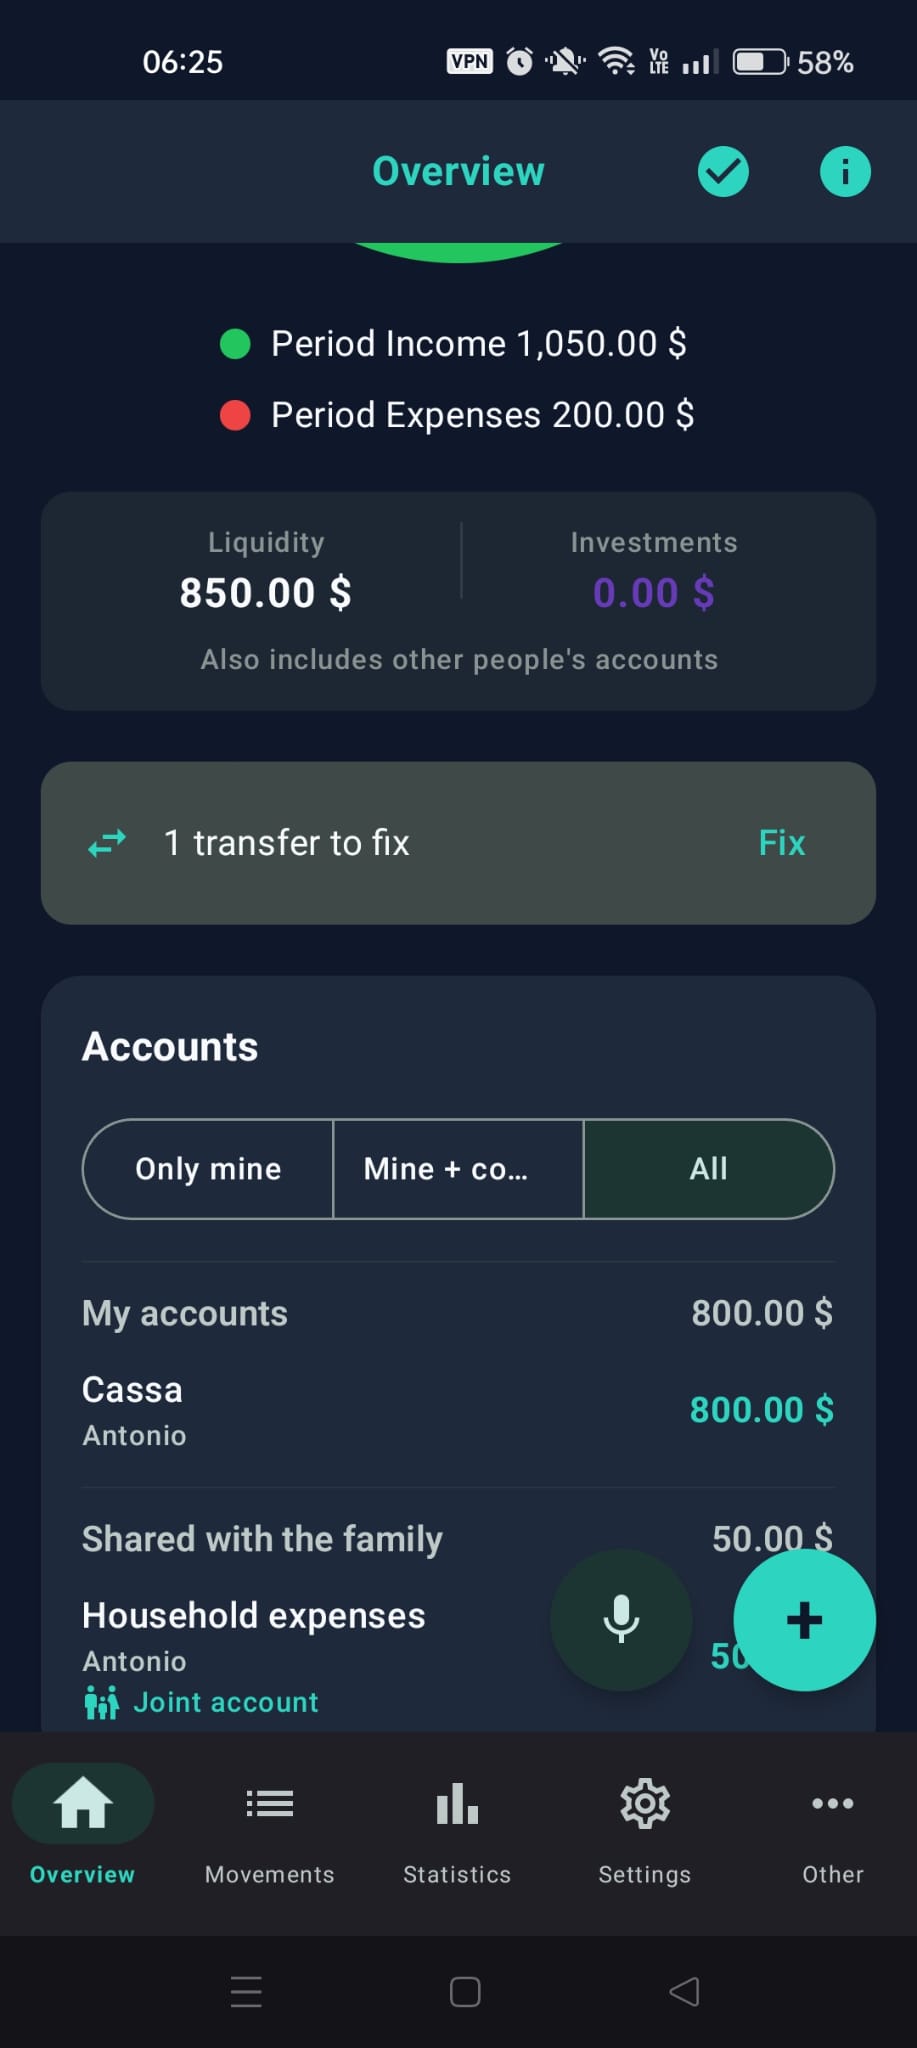
Overview with "1 transfer to fix" and "Fix"
🔔 11.9 Notices, simultaneous edits and restore
In People & Family > Manage family, when there are notices, you will see the Sync notices row (with a badge for new ones): it is the list of what the app had to decide or tell you during syncs. If a transfer needs fixing, the Fix button on the sync row in Overview also takes you there. The ones that need you to act are at the top. On each notice, the X (Dismiss) removes it; the Clear all icon at the top removes them all after a confirmation.
| Notice | What it means |
|---|---|
| Edited on two phones | Another member changed the same item at the same time: their version was kept. |
| Change not applied | Another member deleted the item while you were editing it: your change was not applied. There is a Restore button; when restoring is no longer possible it stays disabled, with the reason. |
| Duplicate removed | A recurring transaction or a refund had been generated on two phones: the duplicate was removed. |
| Duplicate budget | Two budgets had been set for the same category and month: only one was kept. |
| Transfer to fix | It has the Align my half or Delete my half buttons: see section 11.8. |
| Clock out of sync | The clock on the phone named in the notice seems wrong: check that phone's date and time settings. |
| Item not applied | You received an item that refers to data missing on this phone: it was not applied. |
| App update needed | The phones have different versions: update the app on all of them. |
| Different currency / Different family | That phone uses a different base currency or belongs to a different family: no data was exchanged. |
| Security warning | A phone sent a member list that could not be verified, or a phone that is not a family member tried to sync: no data was exchanged. |
| New invite needed | This phone missed too many of the family's changes. There is no button in the list: use Leave and rejoin with a new invite in Manage family and get invited again. |
| Member left | A member left the family and no longer syncs with this phone. |
Only two notices have a button: "Change not applied" (Restore) and "Transfer to fix" (Align my half or Delete my half). All the others only have the X to remove them.
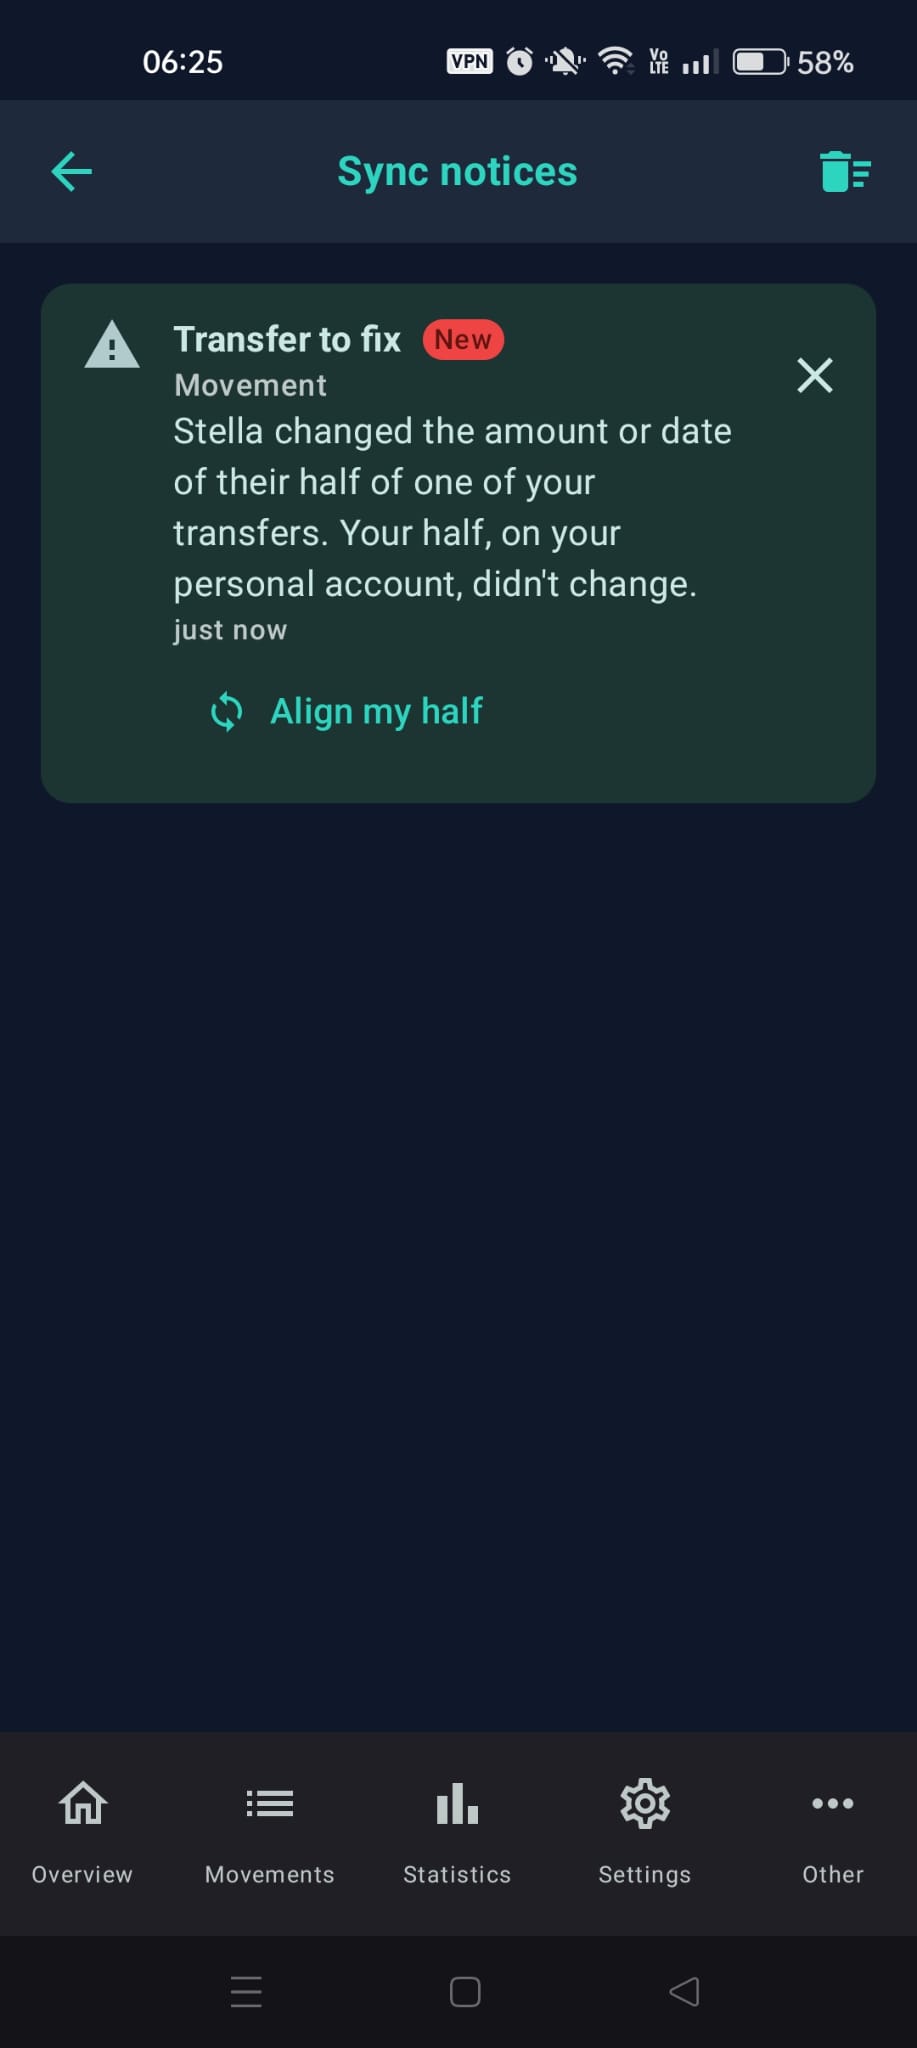
"Sync notices" with a "Transfer to fix" notice and the "Align my half" button
If you edit the same thing at the same time
If you are editing a transaction and meanwhile another member changes it, when you save you see Changed by someone else, with three choices: Overwrite (your version applies), Reload (you see their version) or Discard my changes. If the other member deleted it, you see "Deleted meanwhile".
Who did what
Opening a transaction of a shared account, you read who recorded it and who changed it: "Added by …", "Modified by …".
🚪 11.10 Leaving the family, removing a member, backup
- Leave family (at the bottom of Manage family): your phone stops syncing. All data stays on your phone, including what you received from the others, but accounts, goals and budgets are no longer shared. What you had already sent stays on the other members' phones, who, if they are reached, receive the "Member left" notice.
- Remove member: any member can remove another member, with the Remove member icon next to their name in Manage family. That phone stops syncing with the family and can join again only with a new invite, which any member can send and approve. The removed phone shows the notice "This phone was removed from the family and no longer syncs." with the Leave family button, and the sync row in Overview disappears.
- Backup (PRO feature): you can keep making and restoring backups. In a family the restore asks for confirmation and brings back only your personal data; the shared data stays the family's, as explained in section 10.2.
- The backup does not contain the family: after a restore on a new phone, or after clearing the data, a member has to invite you again to rejoin. If you rejoin with the same phone, they do not need to remove you first. After rejoining, at the first sync with each member the phone receives the family's data and sends nothing.
- "Delete all" and "Load sample data": if you are in a family, the confirmation warns that you will also leave the family and that the phone will also lose the data received from the others. Before deleting, the app runs the normal leave and, if it finds the other phones, tells them.
- Changing phone, or app data cleared from Android settings: the old phone stays in the family. First make a backup (requires PRO); restore it on the new phone and get invited again; then another member removes the old phone with Remove member. The Family screen reminds you with a card.
Debts with a member who left stay visible, with "(former member)" next to the name.
🔍 11.11 Which accounts to look at: Only mine, Mine + joint, All
In Overview and in Statistics, anyone in a family finds a selector with three choices:
- Only mine: your accounts, including the ones you made "Visible to the family", but not the joint accounts.
- Mine + joint: your accounts and the joint accounts.
- All: also the accounts the other members let you see.
Under the liquidity figure, a line reminds you what you are looking at ("Includes: your accounts only", "Includes: your accounts and shared ones", "Also includes other people's accounts"). The choice made in Overview also applies in Statistics. A transfer from your account to a joint account counts as an expense with "Only mine", and as an expense plus an income with "Mine + joint".
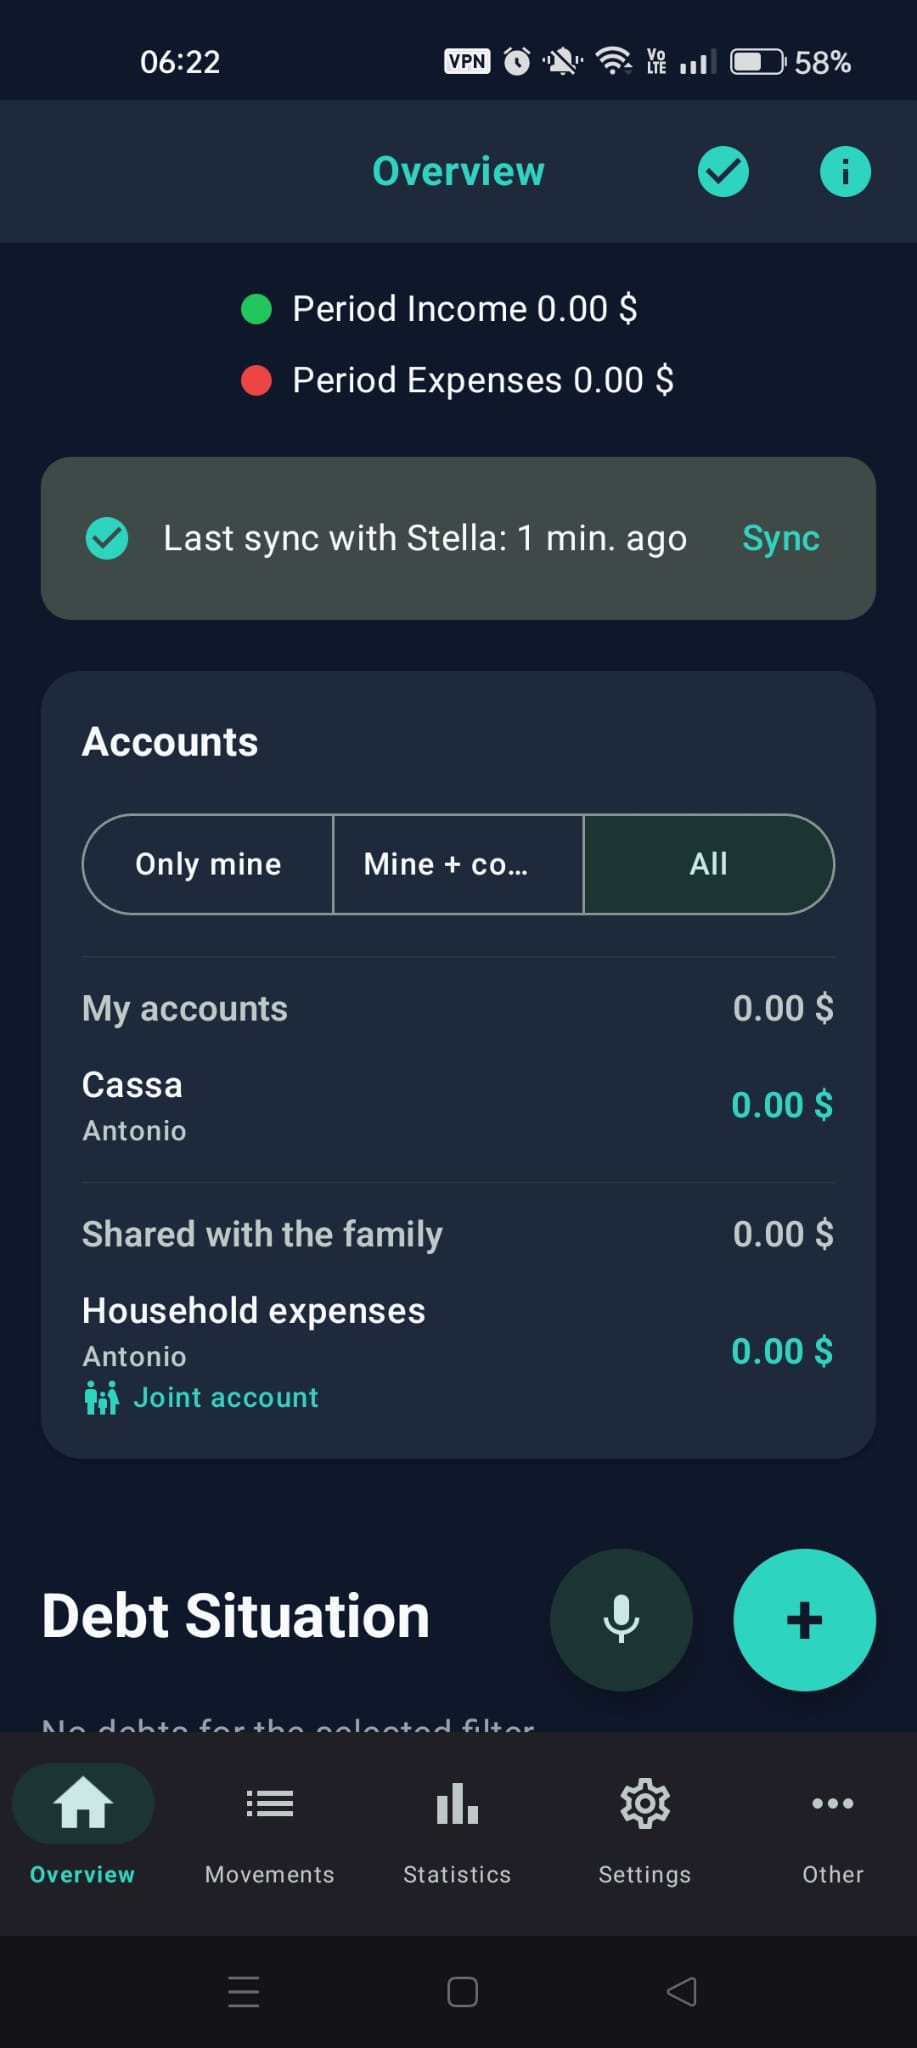
Overview with the sync row and the "Only mine / Mine + joint / All" selector
🛠️ 11.12 Common problems
| Problem | What to check |
|---|---|
| "… not found. Are you on the same Wi-Fi with FamLedger open?" | Open FamLedger on both phones, keep it in the foreground and check they are on the same Wi-Fi. Then tap Retry. |
| "Sync disabled" | The local network access permission is missing: tap Allow on the row in Overview, which opens the app's settings on the phone, and under Permissions allow "Nearby devices" (or "Local network"). |
| This phone's currency differs from the family's | Sync stays off until the currencies match. |
| "App update needed" | Update FamLedger on all the family's phones. |
| "New invite needed" | The phone went too long without syncing. Tap Leave and rejoin with a new invite and get invited again. |
| I can't see another member's account | The account must be shared by its owner (section 11.5), and then a sync is needed. |
✨ What's New & Updates
FamLedger is constantly evolving. In this section, you will find the main new features introduced in the recent updates of the application.
👨👩👧 Family: share across several phones, no cloud
You can now link your family's phones and share accounts, transactions, budgets and debts directly between you, on the same Wi-Fi. It is an optional feature: everything is in Chapter 11: Family.
📈 Investments: plans, price alerts and benchmark
The Investments section now includes investment plans, price alerts, comparison with a benchmark, returns and portfolio allocation. See Chapter 4.
🧮 Category budgets and fingerprint unlock
You can set a spending cap for each category, with carry-over of the remainder (section 9.6), and unlock the app with your fingerprint (section 9.3).
🎙️ Intelligent Voice Input [BETA]
You can record your expenses directly with your voice! By tapping the microphone icon next to the "+" button in Overview or in the Transactions list, you can dictate your transactions quickly and comfortably.
The app supports both a structured key-value method (Recommended) for optimal accuracy:
"Description pizza Amount 15 Date yesterday Category Leisure shared with Mark"
And a natural fast method (e.g., "15 for pizza yesterday").
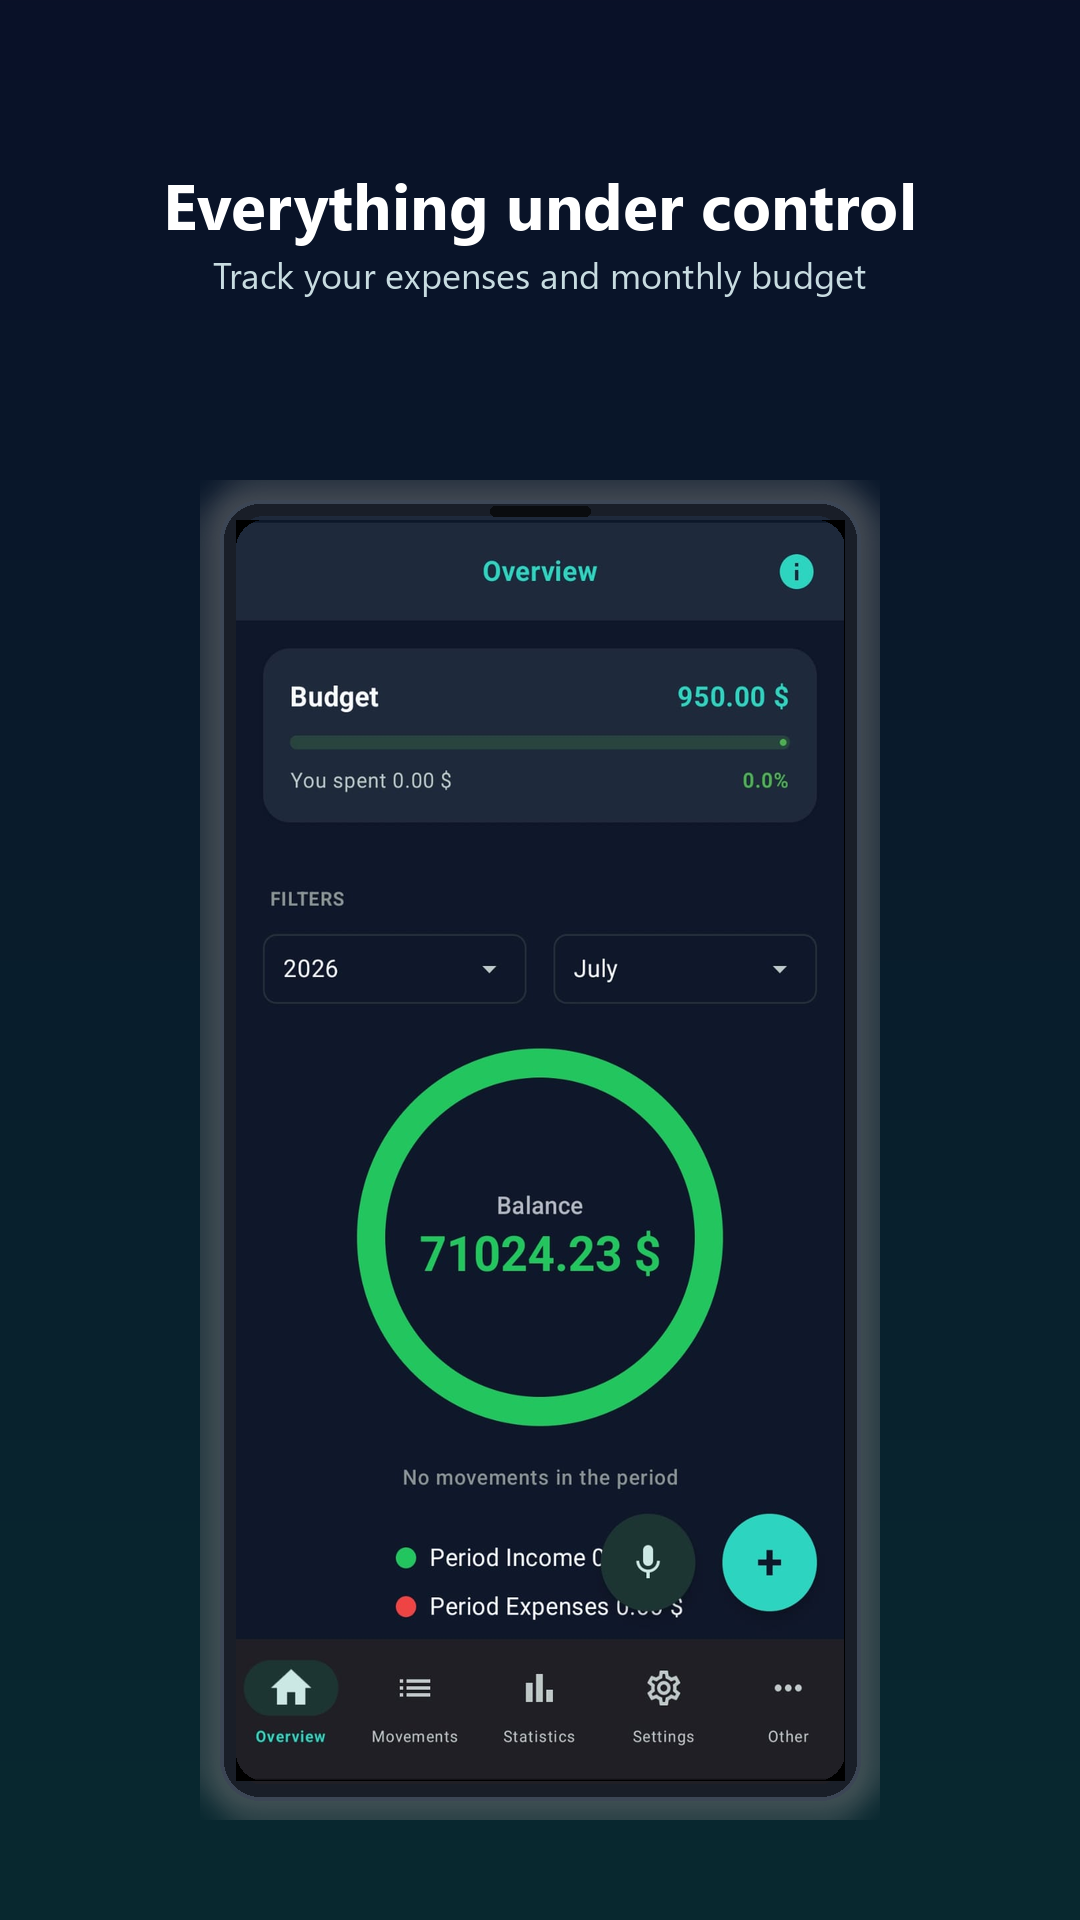
The interface with the microphone button placed next to the "+"